In this Python OpenCV article we want to talk about Getting Started with Python OpenCV, OpenCV (Open Source Computer Vision) is a library of programming functions mainly aimed at real time computer vision. OpenCV is written in C++, but has bindings for Python and you can access OpenCV in Python . with OpenCV you can perform different image and video processing tasks, such as face recognition, object detection and image filtering. in this article we will walk you through the basics of getting started with OpenCV in Python.
To get started with Python OpenCV, first we need to install that
|
1 |
pip install opencv-python |
Reading an Image
Now let’s start by loading and displaying an image in Python OpenCV
|
1 2 3 4 5 6 7 8 9 10 11 12 13 |
import cv2 # Load an image img = cv2.imread('lena.tif') # Display image cv2.imshow('image', img) # Wait for key press cv2.waitKey(0) # Destroy all windows cv2.destroyAllWindows() |
In the above code we have imported cv2 module, which contains functions that we need for image processing.
|
1 |
import cv2 |
after that we have loaded an image using the cv2.imread function. we pass the filename of the image as an argument. imread function returns NumPy array containing the pixel values of the image.
|
1 |
img = cv2.imread('lena.tif') |
Next we display the image using the cv2.imshow function. we pass window name and image array as arguments. imshow function displays the image in a window.
|
1 |
cv2.imshow('image', img) |
After that we wait for a key press using the cv2.waitKey function. this function waits for a key event for the specified number of milliseconds. in our case, we have set the wait time to 0, which means we wait indefinitely for key press.
|
1 |
cv2.waitKey(0) |
And lastly we destroy all windows using the cv2.destroyAllWindows function.
|
1 |
cv2.destroyAllWindows() |
Run the code and this is the result

Image Filtering
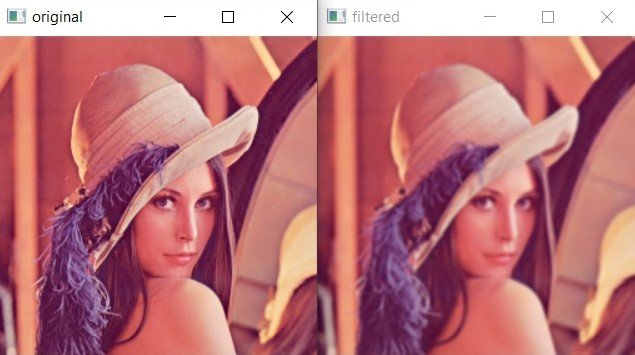
One of the most common tasks in image processing is image filtering. OpenCV provides several functions for image filtering including Gaussian filter, median filter and bilateral filter, this is an example of that
|
1 2 3 4 5 6 7 8 9 10 11 12 13 14 15 16 17 |
import cv2 # Load an image img = cv2.imread('lena.tif') # Apply Gaussian filter img_filtered = cv2.GaussianBlur(img, (5, 5), 0) # Display original and filtered images cv2.imshow('original', img) cv2.imshow('filtered', img_filtered) # Wait for a key press cv2.waitKey(0) # Destroy all windows cv2.destroyAllWindows() |
In the above code we have loaded an image using the cv2.imread function like before, after that we have applied Gaussian filter using the cv2.GaussianBlur function. we pass image array, kernel size and the standard deviation of the Gaussian in the x and y directions .
and after that we display the original and filtered images using cv2.imshow, wait for a key press using cv2.waitKey, and destroy all windows using cv2.destroyAllWindows.
Run the code and you can we have two images one is original image and the second one filtered image
Object Detection
Another common task in computer vision is object detection. OpenCV provides several methods for object detection, including Haar Cascade classifier and the HOG (Histogram of Oriented Gradients) descriptor.
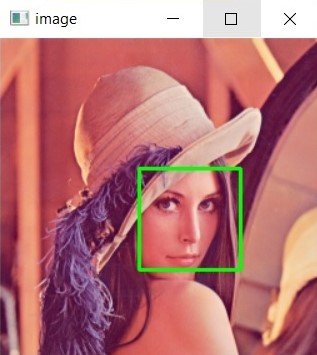
this is an example of how to use Haar Cascade classifier to detect faces in an image:
|
1 2 3 4 5 6 7 8 9 10 11 12 13 14 15 16 17 18 19 20 21 22 23 24 25 26 |
import cv2 # Load cascade classifier face_cascade = cv2.CascadeClassifier('haarcascade_frontalface_default.xml') # Load an image img = cv2.imread('lena.tif') # Convert image to grayscale gray = cv2.cvtColor(img, cv2.COLOR_BGR2GRAY) # Detect faces in the image faces = face_cascade.detectMultiScale(gray, scaleFactor=1.1, minNeighbors=5) # Draw rectangles around the faces for (x, y, w, h) in faces: cv2.rectangle(img, (x, y), (x+w, y+h), (0, 255, 0), 2) # Display the image cv2.imshow('image', img) # Wait for a key press cv2.waitKey(0) # Destroy all windows cv2.destroyAllWindows() |
In this code we have loaded Haar Cascade classifier for face detection using cv2.CascadeClassifier function. we have passed filename of the XML file containing the classifier as an argument, make sure that you have downloaded the HaarCascade FontalFace classifier.
|
1 |
face_cascade = cv2.CascadeClassifier('haarcascade_frontalface_default.xml') |
After that we have loaded an image using cv2.imread and convert it to grayscale using cv2.cvtColor.
|
1 2 |
img = cv2.imread('lena.tif') gray = cv2.cvtColor(img, cv2.COLOR_BGR2GRAY) |
After that we have used detectMultiScale function to detect faces in the image. we pass grayscale image, scale factor and the minimum number of neighbors as arguments. detectMultiScale function returns a list of rectangles that contain the detected faces.
|
1 |
faces = face_cascade.detectMultiScale(gray, scaleFactor=1.1, minNeighbors=5) |
After that we draw rectangles around detected faces using the cv2.rectangle function. we pass image array, top left and bottom right coordinates of the rectangle, color of rectangle, and thickness of the rectangle as arguments.
|
1 2 |
for (x, y, w, h) in faces: cv2.rectangle(img, (x, y), (x+w, y+h), (0, 255, 0), 2) |
And finally we display the image, wait for a key press and destroy all windows.
|
1 2 3 |
cv2.imshow('image', img) cv2.waitKey(0) cv2.destroyAllWindows() |
Run your code and you can see that we have one face and that is detected