In this PyQt6 Tutorial we are going to talk about Building Python GUI Application with PyQt6. first of all let’s talk about PyQt6 and the installation process.
What is Python PyQt6 ?
PyQt6 is a set of Python bindings for Qt application framework and GUI library. Qt is cross platform application development library and it is widely used for developing software applications with graphical user interfaces. PyQt6 allows developers to write Qt applications in Python and it is popular choice for Python developers who want to create cross platform desktop applications. PyQt6 provides access to all the classes and functions of the Qt framework, and all developers can create rich and interactive graphical user interfaces with features such as drag and drop, internationalization, threading and multimedia support. PyQt6 also includes supports for different platforms like Windows, macOS, Linux and mobile platforms such as Android and iOS, and PyQt6 is the latest version of PyQt, and it supports the latest version of Qt.
PyQt6 Tutorial – Building Python GUI Application
First of all we need to install PyQt6 and you can use pip for the installation.
|
1 |
pip install PyQt6 |
Let’s start by creating simple PyQt6 GUI application. basically we want to create our basic GUI window with Python PyQt6.
|
1 2 3 4 5 6 7 8 9 10 11 12 13 |
import sys from PyQt5.QtWidgets import QApplication, QWidget app = QApplication(sys.argv) # Create window window = QWidget() window.setWindowTitle('Geekscoders - Learn PyQt6') window.setGeometry(100, 100, 300, 200) window.show() # Run event loop sys.exit(app.exec()) |
Now let’s talk about above code, now this code will be similar to PyQt5 code if you are familiar with that, first we have imported sys module and QApplication and QWidget classes from the PyQt5.QtWidgets module. after that it creates an instance of the QApplication class with the system arguments passed as parameter. this initializes Qt application. after that it creates an instance of the QWidget class and sets its window title to Geekscoders – Learn PyQt6. it also sets the position and size of the window using the setGeometry() method, after that window is shown using the show() method, and finally event loop is started by calling app.exec(). this method runs the application event loop which handles user events and system events until the application is terminated. sys.exit() call ensures that the program exits cleanly when the event loop is terminated.
If you run the code you will see this result
Now let me give you some more information about the modules that we have used in the above example.
What is PyQt6 QApplication ?
PyQt6 QApplication is class that represents the application object for PyQt6 application. it provides the necessary functionalities to initialize Qt application, handle events and manage application main event loop. when PyQt6 application is launched, QApplication object needs to be created before any other Qt widgets or objects. QApplication constructor takes an optional list of command line arguments which can be used to specify different application settings and options. QApplication class also provides methods to set and retrieve application wide properties such as the application name, organization name and application version number. these properties can be used by other Qt widgets and objects to customize their behavior.
QtWidgets Module in PyQt6
QtWidgets module in PyQt6 is core module that provides different classes for creating and managing graphical user interfaces (GUIs) in PyQt6 application. this module includes different layout managers and other utility classes that make it easy to build complex and interactive desktop applications, QtWidgets module includes classes for handling input events such as mouse clicks and keyboard input and for displaying 2D graphics such as images and text.
Some of the most commonly used classes in the QtWidgets module include:
| QWidget | Base class for all user interface objects in PyQt6. It provides basic functionality needed to create and display a window. |
| QMainWindow | Main application window that provides central area for displaying the application content as well as a menu bar, toolbars and status bar. |
| QLabel | A widget that can display text and images. |
| QPushButton | A button widget that can be clicked by the user. |
| QLineEdit | Widget that allows the user to enter text. |
| QTextEdit | Widget that allows the user to edit and display multiline text. |
| QComboBox | A widget that provides a dropdown list of items. |
| QCheckBox | A widget that can be checked or unchecked by the user. |
| QRadioButton | A widget that allows the user to select one option from a group of options. |
| QSpinBox | A widget that allows the user to enter an integer value. |
| QDoubleSpinBox | A widget that allows the user to enter a floating point value. |
| QSlider | A widget that allows the user to select a value by moving a slider. |
| QProgressBar | Widget that displays a progress bar. |
| QTreeView | A widget that displays hierarchical data in tree like structure. |
| QTableWidget | A widget that displays tabular data in a grid. |
| QDockWidget | Widget that can be docked and undocked from the main application window. |
| QSplitter | A widget that allows the user to resize two or more widgets by dragging a handle. |
These are just some of the most commonly used classes in the QtWidgets module. there are many other classes and tools available in this module that make it possible to create complex and sophisticated graphical user interfaces for desktop applications.
Now let’s talk about PyQt6 layout manager classes that are available in QtWidgets module.
Layout Management in PyQt6 ?
Layout management in PyQt6 is the process of arranging widgets in window or dialog in a way that is both visually appealing and responsive to changes in the window size or content. PyQt6 provides several layout managers that make it easy to create complex and dynamic layouts for desktop applications. layout managers automatically adjust the position and size of widgets in response to changes in the window size or content. they ensure that widgets are spaced evenly and that there is enough room for all the widgets in the window.
These are some of the mostly used layout managers in PyQt6
| QHBoxLayout | Arranges widgets in a horizontal row. |
| QVBoxLayout | Arranges widgets in a vertical column. |
| QGridLayout | Arranges widgets in a grid of rows and columns. |
| QFormLayout | Arranges widgets in a grid of labels and input fields. |
| QStackedLayout | Allows widgets to be stacked on top of each other, with only one widget visible at a time. |
So we have learned that how we can create simple GUI window with PyQt6, now let’s use OOP, and create our Python PyQt6 GUI Application window with OOP.
|
1 2 3 4 5 6 7 8 9 10 11 12 13 14 15 16 17 18 19 20 21 22 23 |
import sys from PyQt5.QtWidgets import QApplication, QWidget class Window(QWidget): def __init__(self): super().__init__() # Set window properties self.setWindowTitle('Geekscoders - Learn PyQt6') self.setGeometry(100, 100, 300, 200) # Show window self.show() if __name__ == '__main__': # Create application object app = QApplication(sys.argv) # Create window object window = Window() # Run event loop sys.exit(app.exec()) |
In the above code we have created Window class that inherits from the QWidget class provided by PyQt6. after that we have defined __init__ method to set the window properties and show the window. we have created an instance of the QApplication class and store it in the app variable, and then creates an instance of the Window class and store it in the window variable. and lastly we start the event loop by calling the exec method of the QApplication object and pass control to the event loop until the user closes the window or exits the application, if you run the code you will see the same PyQt6 GUI Application window.
Right now we have just a basic window in Pyyhon PyQt6, now let’s add some widgets to the window and we want to learn about some important widgets in PyQt6.
PyQt6 QLabel
QLabel is a class in PyQt6 that provides text or image display area. it is used to display static text, images or pixmap. QLabel can display text in different formats such as plain text, HTML, and rich text. it also supports alignment, margin and padding properties. QLabel can be used as standalone widget or as a component of a more complex user interface. you can set the text or image to be displayed in the QLabel using the setText() and setPixmap() methods, and you can also set the alignment of the text or image using the setAlignment() method.
|
1 2 3 4 5 6 7 8 9 10 11 12 13 14 15 16 17 18 19 20 21 22 23 24 25 26 27 28 29 30 31 32 33 34 35 36 37 38 39 40 41 42 43 44 45 |
import sys from PyQt6.QtWidgets import QApplication, QWidget, QLabel, QHBoxLayout, QVBoxLayout from PyQt6.QtGui import QPixmap class LabelExample(QWidget): def __init__(self): super().__init__() # Set window properties self.setWindowTitle('QLabel Example') self.setGeometry(100, 100, 300, 200) # Create QLabel and set pixmap label = QLabel() pixmap = QPixmap('pic2.png') label.setPixmap(pixmap) label2 = QLabel("Welcome to Geekscoders.com") # Create horizontal and vertical layouts hbox = QHBoxLayout() vbox = QVBoxLayout() # Add label to horizontal layout hbox.addWidget(label) hbox.addWidget(label2) # Add horizontal layout to vertical layout vbox.addLayout(hbox) # Set main window layout self.setLayout(vbox) # Show window self.show() if __name__ == '__main__': # Create application object app = QApplication(sys.argv) # Create window object window = LabelExample() # Run event loop sys.exit(app.exec()) |
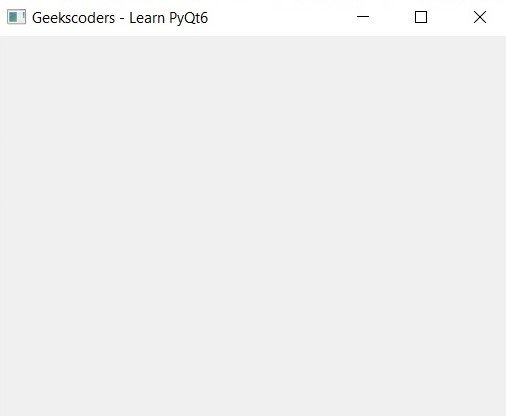
In this example we have created QLabel object and set its pixmap using the setPixmap() method, also we have added a text to the label. after that we creates horizontal layout (and a vertical layout. we have added QLabel to the horizontal layout using the addWidget() method, and then add the horizontal layout to the vertical layout using the addLayout() method. and finally we set the main window layout to the vertical layout using the setLayout() method.
Run the code and this will be the result
PyQt6 QPushButton
QPushButton is a class in PyQt6 that represents push button widget. it is used to create clickable buttons that perform an action when clicked. QPushButton can display text an icon or both.
|
1 2 3 4 5 6 7 8 9 10 11 12 13 14 15 16 17 18 19 20 21 22 23 24 25 26 27 28 29 30 31 32 33 34 35 36 37 38 39 40 41 42 43 44 |
import sys from PyQt6.QtWidgets import QApplication, QWidget, QLabel, QPushButton, QVBoxLayout from PyQt6.QtGui import QFont class ButtonExample(QWidget): def __init__(self): super().__init__() # Set window properties self.setWindowTitle('QPushButton Example') self.setGeometry(100, 100, 300, 200) # Creat QLabel and QPushButton self.label = QLabel('Hello World', self) self.button = QPushButton('Click me', self) # Connect button to function self.button.clicked.connect(self.on_button_click) # Creat vertical layout layout = QVBoxLayout() layout.addWidget(self.label) layout.addWidget(self.button) # Set window layout self.setLayout(layout) # Show window self.show() def on_button_click(self): self.label.setText('Welcome to Geekscoders.com') self.label.setFont(QFont("Times", 15)) self.label.setStyleSheet('color:red') if __name__ == '__main__': # Create application object app = QApplication(sys.argv) # Create window object window = ButtonExample() # Run event loop sys.exit(app.exec()) |
In this example we have created QLabel and QPushButton. we connect the clicked signal of the button to a function on_button_click() that sets the text of the label to Welcome to Geekscoders.com using the setText() method, also changes the text font size with color. we have used vertical layout to organize the widgets and add both the label and button to the layout using addWidget(). and at the end we set the main window layout to the vertical layout using the setLayout() method.
Run the code click on the button and this will be the result

PyQt6 QLineEdit
QLineEdit is PyQt6 class that provides single line text editor. it allows users to input and edit text and supports different features such as undo/redo, copy/paste and drag and drop.
|
1 2 3 4 5 6 7 8 9 10 11 12 13 14 15 16 17 18 19 20 21 22 23 24 25 26 27 28 29 30 31 32 33 34 35 36 37 38 39 40 41 42 43 44 45 46 47 48 |
import sys from PyQt6.QtWidgets import QApplication, QWidget, QLineEdit, QLabel, QVBoxLayout from PyQt6.QtGui import QFont class LineeditExample(QWidget): def __init__(self): super().__init__() # Set window properties self.setWindowTitle('QLineEdit Example') self.setGeometry(100, 100, 300, 200) # Create QLineEdit and QLabel widgets self.line_edit = QLineEdit(self) self.label = QLabel(self) self.label.setFont(QFont("Times", 15)) # Create vertical layout layout = QVBoxLayout() layout.addWidget(self.line_edit) layout.addWidget(self.label) # Set window layout self.setLayout(layout) # Show window self.show() # Connect signal to slot self.line_edit.returnPressed.connect(self.on_return_pressed) def on_return_pressed(self): # Get text from QLineEdit text = self.line_edit.text() # Set text of QLabel self.label.setText(text) if __name__ == '__main__': # Create application object app = QApplication(sys.argv) # Create window object window = LineeditExample() # Run event loop sys.exit(app.exec()) |
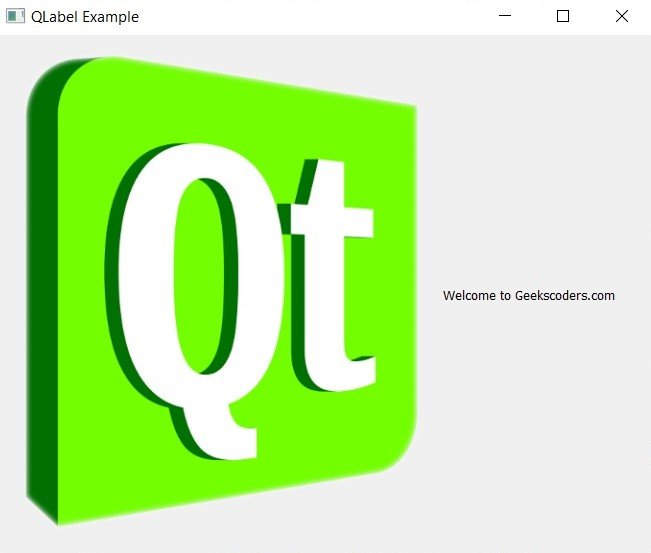
In this example we have added QLabel widget to the window and update its text whenever the user presses Enter key in the QLineEdit widget. we achieve this by connecting the returnPressed signal of the QLineEdit to the on_return_pressed() slot function which retrieves the text from the QLineEdit using the text() method and sets the text of the QLabel using the setText() method.
Run the code and this will be the result
PyQt6 QTextEdit
QTextEdit is a widget in PyQt6 that provides rich text editing area. it allows users to enter and edit formatted text including images, lists, tables and many more. QTextEdit widget is multiline text box that supports rich text formatting, so it is ideal for creating a text editor, word processor or note taking application.
|
1 2 3 4 5 6 7 8 9 10 11 12 13 14 15 16 17 18 19 20 21 22 23 24 25 26 27 28 29 30 31 32 33 34 35 36 37 38 39 40 41 42 43 44 45 46 47 48 49 |
import sys from PyQt6.QtWidgets import QApplication, QTextEdit, QPushButton, QVBoxLayout, QWidget, QFileDialog class TextEdit(QWidget): def __init__(self): super().__init__() # Set window properties self.setWindowTitle('QTextEdit Example') self.setGeometry(100, 100, 500, 400) # Create QTextEdit widget self.text_edit = QTextEdit() # Create QPushButton widget self.save_button = QPushButton('Save') # Create layout layout = QVBoxLayout() layout.addWidget(self.text_edit) layout.addWidget(self.save_button) # Connect signal to slot self.save_button.clicked.connect(self.save_text) self.setLayout(layout) def save_text(self): # Open file dialog to select file file_name, _ = QFileDialog.getSaveFileName(self, 'Save File', '', 'Text Files (*.txt)') if file_name: # Open file and write text to it with open(file_name, 'w') as f: f.write(self.text_edit.toPlainText()) if __name__ == '__main__': # Create application object app = QApplication(sys.argv) # Create window object window = TextEdit() # Show window window.show() # Run event loop sys.exit(app.exec()) |
In the above example we have created our window with QTextEdit widget and Save button. when the user clicks Save button, we open a file dialog to let the user choose where to save the file. if the user selects a file, we open the file and write the contents of the QTextEdit widget to it using the toPlainText() method. this method returns the plain text contents of the QTextEdit widget as a string.
This will be the result

PyQt6 QComboBox
QComboBox is PyQt6 widget that provides drop down list of selectable items. it allows users to select one item from a list of options which can be defined in code or loaded from data source such as a file or database. QComboBox provides several useful methods for adding and removing items, setting the currently selected item and responding to changes in the selected item. it also supports customization of the appearance and behavior of the drop down list including the ability to set the maximum number of visible items and to enable or disable auto completion of the selected item.
|
1 2 3 4 5 6 7 8 9 10 11 12 13 14 15 16 17 18 19 20 21 22 23 24 25 26 27 28 29 30 31 32 33 34 35 36 37 38 39 40 41 42 43 44 45 46 |
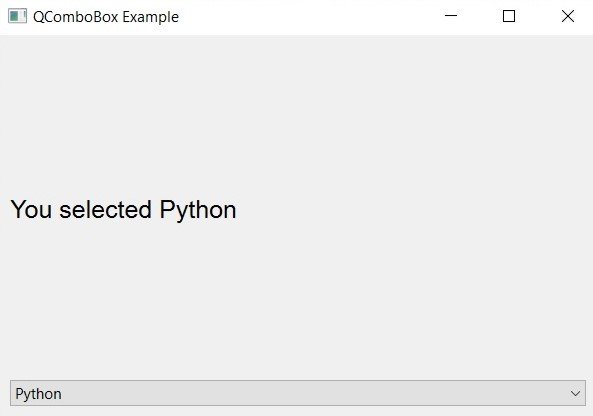
import sys from PyQt6.QtWidgets import QApplication, QLabel, QComboBox, QVBoxLayout, QWidget from PyQt6.QtGui import QFont class ComboExample(QWidget): def __init__(self): super().__init__() # Set window properties self.setWindowTitle('QComboBox Example') self.setGeometry(100, 100, 400, 200) # Create QLabel widget self.label = QLabel('Select a programming language:') # Create QComboBox widget self.combo_box = QComboBox() self.combo_box.addItems(['Python', 'Java', 'C++', 'JavaScript', 'Ruby', 'PHP']) # Create layout layout = QVBoxLayout() layout.addWidget(self.label) layout.addWidget(self.combo_box) self.setLayout(layout) # Connect signal to slot self.combo_box.currentIndexChanged.connect(self.update_label) def update_label(self, index): self.label.setText(f'You selected {self.combo_box.itemText(index)}') self.label.setFont(QFont("Times", 15)) if __name__ == '__main__': # Create application object app = QApplication(sys.argv) # Create window object window = ComboExample() # Show window window.show() # Run event loop sys.exit(app.exec()) |
In this example we have created window with QComboBox widget and QLabel widget. QComboBox is populated with a list of programming languages and the selected language is displayed in the QLabel when the user selects an item from the drop down list. currentIndexChanged signal of the QComboBox is connected to a slot that updates the text of the QLabel with the currently selected item.
Run the code and this will be the result
PyQt6 QCheckBox
QCheckBox is PyQt6 widget that provides checkable box that can be used to select or deselect an option. it can be used to present simple yes/no or true/false choice or to represent binary option in a more complex user interface. QCheckBox provides several useful methods for setting and getting the state of the check box, setting the text label displayed next to the box and responding to changes in the state of the check box. it also supports customization of the appearance and behavior of the check box, including the ability to set the size, font and style of the check box and label.
|
1 2 3 4 5 6 7 8 9 10 11 12 13 14 15 16 17 18 19 20 21 22 23 24 25 26 27 28 29 30 31 32 33 34 35 36 37 38 39 40 41 42 43 44 45 46 47 48 49 50 51 52 53 54 |
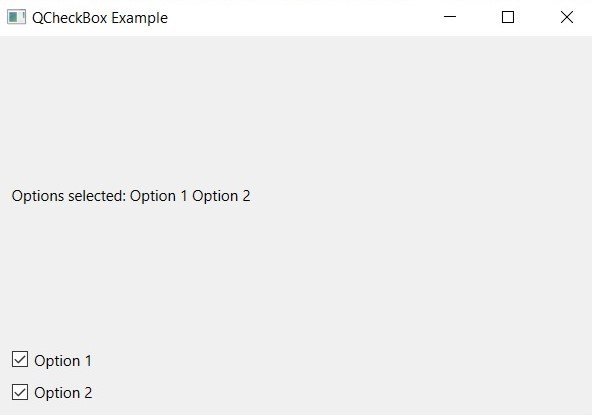
import sys from PyQt6.QtWidgets import QApplication, QLabel, QCheckBox, QVBoxLayout, QWidget class CheckBoxExample(QWidget): def __init__(self): super().__init__() # Set window properties self.setWindowTitle('QCheckBox Example') self.setGeometry(100, 100, 400, 200) # Create QLabel widget self.label = QLabel('Select options:') # Create QCheckBox widgets self.check_box1 = QCheckBox('Option 1') self.check_box2 = QCheckBox('Option 2') # Create layout layout = QVBoxLayout() layout.addWidget(self.label) layout.addWidget(self.check_box1) layout.addWidget(self.check_box2) self.setLayout(layout) # Connect signals to slots self.check_box1.stateChanged.connect(self.update_label) self.check_box2.stateChanged.connect(self.update_label) def update_label(self): text = f'Options selected: ' if self.check_box1.isChecked(): text += f'{self.check_box1.text()} ' if self.check_box2.isChecked(): text += f'{self.check_box2.text()} ' if not self.check_box1.isChecked() and not self.check_box2.isChecked(): text += 'none' self.label.setText(text) if __name__ == '__main__': # Create application object app = QApplication(sys.argv) # Create window object window = CheckBoxExample() # Show window window.show() # Run event loop sys.exit(app.exec()) |
In the above example we have created a window with two QCheckBox widgets and QLabel widget. state of the check boxes is displayed in the QLabel when the user toggles them. stateChanged signal of each QCheckBox is connected to a slot that updates the text of the QLabel with the currently selected options. if neither check box is selected the label displays none.
Run the code and this is the result
PyQt6 QRadioButton
QRadioButton is PyQt6 widget that allows the user to select one option from a group of options. it is similar to QCheckBox but the user can select only one option at a time. QRadioButton inherits from QAbstractButton class. QRadioButton works by grouping several radio buttons together using a QButtonGroup. QButtonGroup ensures that only one radio button can be selected at a time. when radio button is selected it emits toggled signal. you can connect to this signal to perform some action when the radio button is selected.
|
1 2 3 4 5 6 7 8 9 10 11 12 13 14 15 16 17 18 19 20 21 22 23 24 25 26 27 28 29 30 31 32 33 34 35 36 37 38 39 40 41 42 43 44 45 46 47 48 49 50 51 52 53 54 55 56 57 |
import sys from PyQt6.QtWidgets import QApplication, QWidget, QLabel,QRadioButton, QVBoxLayout from PyQt6.QtGui import QFont class RadioExample(QWidget): def __init__(self): super().__init__() # Set window properties self.setWindowTitle('QRadioButton Example') self.setGeometry(100, 100, 400, 200) # Create QRadioButton widgets self.radio_button1 = QRadioButton('Python') self.radio_button2 = QRadioButton('Java') self.radio_button3 = QRadioButton('C++') self.label = QLabel() self.label.setFont(QFont("Times", 15)) self.label.setStyleSheet('color:red') # Create layout layout = QVBoxLayout() layout.addWidget(self.radio_button1) layout.addWidget(self.radio_button2) layout.addWidget(self.radio_button3) layout.addWidget(self.label) # Set layout self.setLayout(layout) # Connect signals to slots self.radio_button1.toggled.connect(self.on_radio_button_toggled) self.radio_button2.toggled.connect(self.on_radio_button_toggled) self.radio_button3.toggled.connect(self.on_radio_button_toggled) def on_radio_button_toggled(self, checked): if checked: if self.radio_button1.isChecked(): self.label.setText("Python is selected") elif self.radio_button2.isChecked(): self.label.setText("Java is selected") elif self.radio_button3.isChecked(): self.label.setText('C++ is selected') if __name__ == '__main__': # Create application object app = QApplication(sys.argv) # Create window object window = RadioExample() # Show window window.show() # Run event loop sys.exit(app.exec()) |
In the above example we have created a window with three QRadioButton widgets. we group radio buttons together implicitly by adding them to the same QVBoxLayout. after that we connect the toggled signal of each radio button to a slot that prints the selected option in the label when the user selects it.
This is the result

PyQt6 QSpinBox
QSpinBox is PyQt6 widget that allows the user to select an integer value from a range of values. it is subclass of QAbstractSpinBox class. QSpinBox has spin box and two buttons, one to increment the value and another to decrement it. QSpinBox provides many properties to customize its behavior. for example you can set the minimum and maximum values, step size, and the number of digits to display. you can also set the suffix and prefix for the displayed value. QSpinBox emits valueChanged(int) signal whenever the value changes. you can connect to this signal to perform some action when the value changes.
|
1 2 3 4 5 6 7 8 9 10 11 12 13 14 15 16 17 18 19 20 21 22 23 24 25 26 27 28 29 30 31 32 33 34 35 36 37 38 39 40 41 42 43 44 45 46 47 48 49 |
import sys from PyQt6.QtWidgets import QApplication, QWidget, QLabel, QSpinBox, QVBoxLayout from PyQt6.QtGui import QFont class SpinExample(QWidget): def __init__(self): super().__init__() # Set window properties self.setWindowTitle('QSpinBox - Geekscoders.com') self.setGeometry(100, 100, 400, 200) # Create QSpinBox widget self.spin_box = QSpinBox() self.spin_box.setMinimum(1) self.spin_box.setMaximum(10) self.spin_box.setSingleStep(1) self.spin_box.setValue(5) # Create QLabel widget self.label = QLabel() # Create layout layout = QVBoxLayout() layout.addWidget(self.spin_box) layout.addWidget(self.label) # Set layout self.setLayout(layout) # Connect signals to slots self.spin_box.valueChanged.connect(self.on_spin_box_value_changed) def on_spin_box_value_changed(self, value): self.label.setText(f'Value selected: {value}') self.label.setFont(QFont("Times", 15)) if __name__ == '__main__': # Create application object app = QApplication(sys.argv) # Create window object window = SpinExample() # Show window window.show() # Run event loop sys.exit(app.exec()) |
In the above example we have created window with QSpinBox widget that allows the user to select an integer value from 1 to 10. we have also created QLabel widget to display the selected value. we connect valueChanged signal of the QSpinBox to a slot that updates the label with the selected value whenever the value changes.
This is the result

PyQt6 QProgressBar
QProgressBar is PyQt6 widget that shows the progress of long running operation. it provides graphical representation of the progress, usually as horizontal bar that grows from left to right. QProgressBar can be used to indicate the progress of file downloads, file uploads, installations or any other time-consuming task.
QProgressBar provides many properties to customize its appearance and behavior. for example you can set the minimum and maximum values, current value, and orientation of the progress bar. you can also set the text to be displayed in the progress bar and the alignment of the text. QProgressBar emits the valueChanged(int) signal whenever the value changes. you can connect to this signal to perform some action when the value changes.
|
1 2 3 4 5 6 7 8 9 10 11 12 13 14 15 16 17 18 19 20 21 22 23 24 25 26 27 28 29 30 31 32 33 34 35 36 37 38 39 40 41 42 43 44 45 46 47 48 49 |
import sys import time from PyQt6.QtWidgets import QApplication, QWidget, QProgressBar, QPushButton, QVBoxLayout class ProgresExample(QWidget): def __init__(self): super().__init__() # Set window properties self.setWindowTitle('QProgressBar - Geekscoders.com') self.setGeometry(100, 100, 400, 200) # Creat QProgressBar widget self.progress_bar = QProgressBar() self.progress_bar.setMinimum(0) self.progress_bar.setMaximum(100) self.progress_bar.setValue(0) # Create QPushButton widget self.button = QPushButton('Start') self.button.clicked.connect(self.start_progress) # Create layout layout = QVBoxLayout() layout.addWidget(self.progress_bar) layout.addWidget(self.button) # Set layout self.setLayout(layout) def start_progress(self): # Start progress for i in range(101): self.progress_bar.setValue(i) time.sleep(0.05) if __name__ == '__main__': # Create application object app = QApplication(sys.argv) # Create window object window = ProgresExample() # Show window window.show() # Run event loop sys.exit(app.exec()) |
In the above example we have created a window with QProgressBar widget that shows the progress of long running operation. we have also created QPushButton widget to start the progress. when the user clicks the button, we start the progress by updating the value of the progress bar in a loop. We use the setValue method of the QProgressBar widget to set the current value of the progress bar. We also use the sleep function from the time module to simulate a delay in the progress. The progress bar grows from left to right, and the text is aligned to the center of the progress bar.
This is the result

PyQt6 QTableWidget
QTableWidget is PyQt6 widget that provides table view with rows and columns. it allows you to display and edit tabular data in grid format. you can use QTableWidget to create tables with different numbers of rows and columns, add data to cells and customize the appearance of the table. QTableWidget provides many properties to customize its appearance and behavior. for example you can set the number of rows and columns, size of cells, text alignment of cells and selection mode. you can also set the data of cells using the setItem() method or setCellWidget() method to add widgets to cells.
QTableWidget emits several signals including cellClicked(), itemChanged() and cellDoubleClicked(). you can connect to these signals to perform some action when the user clicks or double clicks a cell or changes the data in a cell.
|
1 2 3 4 5 6 7 8 9 10 11 12 13 14 15 16 17 18 19 20 21 22 23 24 25 26 27 28 29 30 31 32 33 34 35 36 37 38 39 40 41 42 43 44 45 |
import sys from PyQt6.QtWidgets import QApplication, QWidget, QTableWidget, QTableWidgetItem, QVBoxLayout class TableExample(QWidget): def __init__(self): super().__init__() # Set window properties self.setWindowTitle('QTableWidget - Geekscoders.com') self.setGeometry(100, 100, 400, 200) # Creat QTableWidget widget self.table = QTableWidget() self.table.setColumnCount(3) self.table.setRowCount(2) self.table.setHorizontalHeaderLabels(['Name', 'Age', 'Gender']) # Set data to cell self.table.setItem(0, 0, QTableWidgetItem('Geekscoders')) self.table.setItem(0, 1, QTableWidgetItem('25')) self.table.setItem(0, 2, QTableWidgetItem('Male')) self.table.setItem(1, 0, QTableWidgetItem('John')) self.table.setItem(1, 1, QTableWidgetItem('30')) self.table.setItem(1, 2, QTableWidgetItem('Female')) # Create layout layout = QVBoxLayout() layout.addWidget(self.table) # Set layout self.setLayout(layout) if __name__ == '__main__': # Create application object app = QApplication(sys.argv) # Create window object window = TableExample() # Show window window.show() # Run event loop sys.exit(app.exec()) |
In the above example we have created a window with QTableWidget widget that shows a table with two rows and three columns. we have also set the horizontal header labels to Name, Age and Gender. we use the setItem() method to set the data of cells. we creates QTableWidgetItem object for each cell and set the text of the object. and at the end we add the table to the window layout.
This will be the result

PyQt6 QTreeView
PyQt6 QTreeView is a widget that displays data in hierarchical tree like structure. it allows the user to expand and collapse the nodes to view or hide the child items. QTreeView is used for displaying data that has a hierarchical structure such as file system, directory structure, or tree data structure. data is displayed in tree like format where each node represents a parent item and its children are displayed as sub nodes. it also allows for the user to interact with the data displayed in the tree view such as editing or deleting items.
|
1 2 3 4 5 6 7 8 9 10 11 12 13 14 15 16 17 18 19 20 21 22 23 24 25 26 27 28 29 30 31 32 33 34 35 36 |
import sys from PyQt6.QtGui import QStandardItem, QStandardItemModel from PyQt6.QtWidgets import QApplication, QTreeView, QWidget, QVBoxLayout class TreeViewExample(QWidget): def __init__(self): super().__init__() # Set up the window self.setWindowTitle("QTreeView Example") self.setGeometry(100, 100, 400, 400) # Create the model and set up some data self.model = QStandardItemModel() self.model.setHorizontalHeaderLabels(["Name", "Age"]) self.root_node = self.model.invisibleRootItem() for name, age in [("Geekscoders", 25), ("Bob", 30), ("John", 35)]: parent = QStandardItem(name) parent.appendRow([QStandardItem(name), QStandardItem(str(age))]) self.root_node.appendRow(parent) # Create the tree view and set the model self.tree_view = QTreeView() self.tree_view.setModel(self.model) self.tree_view.setEditTriggers(QTreeView.EditTrigger.NoEditTriggers) # Prevent editing of items # Set up the layout layout = QVBoxLayout() layout.addWidget(self.tree_view) self.setLayout(layout) if __name__ == "__main__": app = QApplication(sys.argv) window = TreeViewExample() window.show() sys.exit(app.exec()) |
This code creates simple window with QTreeView widget that displays some data with hierarchical structure. data is stored in QStandardItemModel which is then set as the model for QTreeView. each parent item is QStandardItem with name and each child item is a list of QStandardItems with name and an age. when the window is run QTreeView will display the data in tree like format with each parent item displayed as node with expand/collapse button, and its children displayed as sub nodes.
This will be the result
