In this Kivy Tutorial we are going to talk about Kivy Layout Management, when you are developing a GUI application, layout management is one the most important point, layouts are containers used to arrange widgets in a particular manner. there are different layouts in kivy that we will cover, for example we have AchorLayout, BoxLayout, FloatLayout, RelativeLayout, GridLayout, ScatterLayout and StackLayout.
BoxLayout
BoxLayout arranges children in a vertical or horizontal box. there are two ways that you can create boxlayout, using class and using kivy file. so first we are going to create using class file.
|
1 2 3 4 5 6 7 8 9 10 11 12 13 14 15 16 17 18 19 20 21 22 23 24 25 26 27 28 29 30 |
from kivy.app import App from kivy.uix.button import Button from kivy.uix.boxlayout import BoxLayout class BoxLayoutEx(App): def build(self): layout = BoxLayout(orientation='horizontal') btn1 = Button(text='GeeksCoders') btn2 = Button(text='GeeksCoders') btn3 = Button(text='GeeksCoders') btn4 = Button(text='GeeksCoders') layout.add_widget(btn1) layout.add_widget(btn2) layout.add_widget(btn3) layout.add_widget(btn4) return layout if __name__ == "__main__": window = BoxLayoutEx() window.run() |
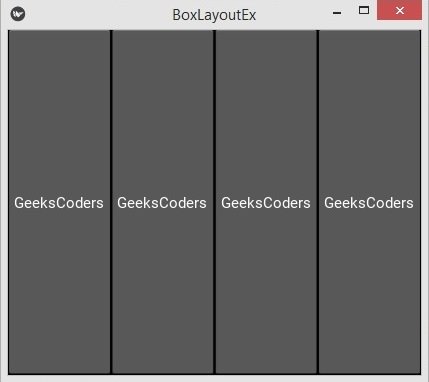
In the code first we have create a BoxLayout object and we have specified the orientation as horizontal, we have created four buttons and after that we have these buttons in the BoxLayout using add_widget() method.
Run the complete code and this is the result.
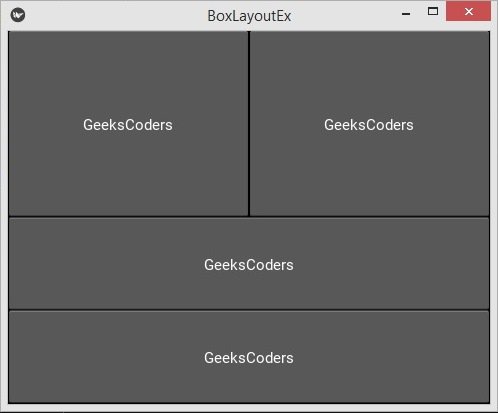
This code is mix of horizontal and vertical layout, basically we create two BoxLayout with vertical and horizontal orientation and after that we add widgets in the layouts.
|
1 2 3 4 5 6 7 8 9 10 11 12 13 14 15 16 17 18 19 20 21 22 23 24 25 26 27 28 29 30 31 |
from kivy.app import App from kivy.uix.button import Button from kivy.uix.boxlayout import BoxLayout class BoxLayoutEx(App): def build(self): mainLayout = BoxLayout(orientation = 'vertical') hboxLayout = BoxLayout(orientation='horizontal') btn1 = Button(text="GeeksCoders") btn2 = Button(text="GeeksCoders") hboxLayout.add_widget(btn1) hboxLayout.add_widget(btn2) vboxLayout = BoxLayout(orientation='vertical') btn3 = Button(text="GeeksCoders") btn4 = Button(text="GeeksCoders") vboxLayout.add_widget(btn3) vboxLayout.add_widget(btn4) mainLayout.add_widget(hboxLayout) mainLayout.add_widget(vboxLayout) return mainLayout if __name__ == "__main__": window = BoxLayoutEx() window.run() |
Run the complete code and this is the result.
OK now we want to create BoxLayout using Kivy code, this is our Python code and in here we have created two classes, the first class is for our BoxLayout and you can see that we are extending from BoxLayout, the second class extends from App class and we have just returned our first class in the second main class.
|
1 2 3 4 5 6 7 8 9 10 11 12 13 14 15 16 17 18 19 20 21 22 |
from kivy.app import App from kivy.uix.boxlayout import BoxLayout class MyBoxLayout(BoxLayout): pass class BoxLayoutEx(App): def build(self): return MyBoxLayout() if __name__ == "__main__": window = BoxLayoutEx() window.run() |
And now this is our .kv file, and the name of the file is boxlayoutex.kv, make sure that the name should be the same as your app class name.
|
1 2 3 4 5 6 7 8 9 10 11 12 13 14 15 16 17 18 19 20 21 22 23 24 25 26 27 28 29 |
#:kivy 1.10.0 <MyBoxLayout>: orientation: 'horizontal' Button: text: "GeeksCoders" background_color: 0, 1, 1, 1 font_size: 20 Button: text: "GeeksCoders" background_color: 0, 1, 0, 1 font_size: 20 Button: text: "GeeksCoders" background_color: 0, 0, 1, 1 font_size: 20 Button: text: "GeeksCoders" background_color: 1, 0, 1, 1 font_size: 20 Button: text: "GeeksCoders" background_color: 1, 0, 0, 1 font_size: 20 |
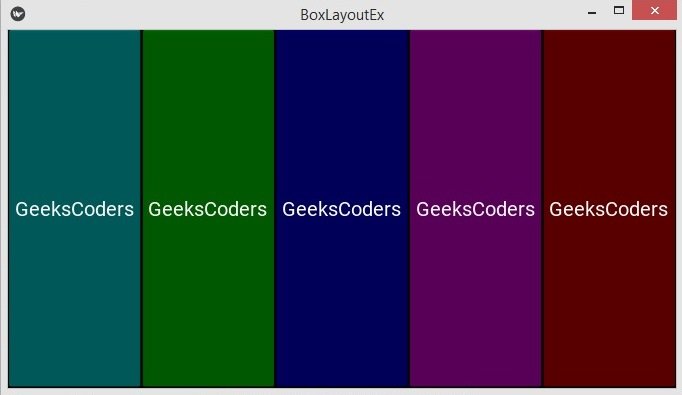
In the kivy file we have set the orientation for our BoxLayout as horizontal and we have added some buttons to the layout.
Run the complete code and this is the result.
AnchorLayout
The AnchorLayout aligns its children to a border (top, bottom, left, right) or center. there are two ways that you can create anchorlayout, using class and using kivy file. so first we are going to create using class file.
So in this code we are going to create the AnchorLayout using the python file.
|
1 2 3 4 5 6 7 8 9 10 11 12 13 14 15 16 17 18 19 20 21 22 23 24 25 26 27 28 29 30 31 32 |
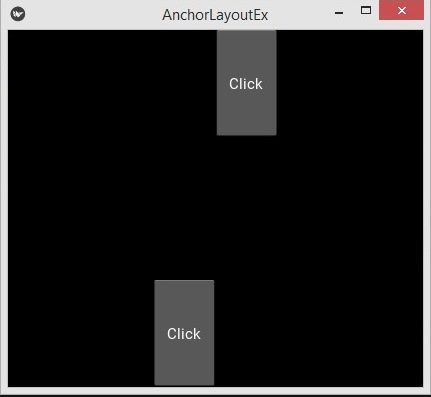
from kivy.app import App from kivy.uix .button import Button from kivy.uix.anchorlayout import AnchorLayout from kivy.uix.boxlayout import BoxLayout class AnchorLayoutEx(App): def build(self): anLayout1 = AnchorLayout(anchor_x='right', anchor_y='bottom') btn = Button(text='Click', size_hint = (0.3, 0.3)) anLayout2 = AnchorLayout(anchor_x='left', anchor_y='top') btn1 = Button(text='Click', size_hint = (0.3, 0.3)) anLayout1.add_widget(btn) anLayout2.add_widget(btn1) boxLayout = BoxLayout() boxLayout.add_widget(anLayout1) boxLayout.add_widget(anLayout2) return boxLayout if __name__ == "__main__": window = AnchorLayoutEx() window.run() |
Run the complete code and this is the result.
Now we want to create our AnchorLayout using Kivy Design Language, first make a Python file, and add this code. we have created two classes, the first class extends from the AnchorLayout, and it is just an empty class.
|
1 2 3 4 5 6 7 8 9 10 11 12 13 14 15 16 |
from kivy.app import App from kivy.uix.anchorlayout import AnchorLayout class MyAnchorLayout(AnchorLayout): pass class AnchorLayoutEx(App): def build(self): return MyAnchorLayout() if __name__ == "__main__": window = AnchorLayoutEx() window.run() |
Create a .kv file, make sure that your kivy file name should be the same as your main class name, for example in here our main class name is AnchorLayoutEx, and the kv file name should be anchorlayoutex.kv. in this file we have added anchors for the x and y positions, also we have added two buttons in the anchor layout.
|
1 2 3 4 5 6 7 8 9 10 11 12 13 14 15 |
#:kivy 1.10.0 <MyAnchorLayout>: anchor_x:'right' anchor_y:'top' Button: text:'GeeksCoders' size_hint:[.7,.7] Button: text:"GeeksCoders" size_hint:[.3,.3] |
Run the complete code and this is the result.

FloatLayout
FloatLayout honors the pos_hint and the size_hint properties of its children. there are two ways that you can create floatlayout, using class and using kivy file. so first we are going to create using class file. in the code first we have created a FloatLayout object, also i have added size for the float layout, after that i have created a button, we have added the button in the FloatLayout.
|
1 2 3 4 5 6 7 8 9 10 11 12 13 14 15 16 17 18 19 20 |
from kivy.app import App from kivy.uix.floatlayout import FloatLayout from kivy.uix.button import Button class FloatLayoutEx(App): def build(self): layout = FloatLayout(size=(200, 300)) button = Button(text='Geekscoders.com', size_hint=(.5, .25), pos=(20, 20)) layout.add_widget(button) return layout if __name__ == "__main__": window = FloatLayoutEx() window.run() |
Run the complete code and this is the result.

Now let’s create the FloatLayout using kivy file, we have created a class that extends from FloatLayout and and it is an empty class.
|
1 2 3 4 5 6 7 8 9 10 11 12 13 14 15 16 |
from kivy.app import App from kivy.uix.floatlayout import FloatLayout class MyFloatLayout(FloatLayout): pass class FloatLayoutEx(App): def build(self): return MyFloatLayout() if __name__ == "__main__": window = FloatLayoutEx() window.run() |
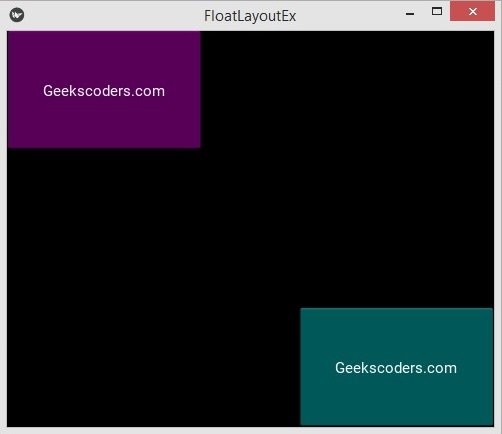
This is our kivy file name and it should be the same as the main class name, in our case it should be floatlayoutex.kv, because our main class name is FloatLayoutEx. we have added two buttons in the Float Layout.
|
1 2 3 4 5 6 7 8 9 10 11 12 13 14 15 16 |
#:kivy 1.10.0 <MyFloatLayout>: Button: text: 'Geekscoders.com' size_hint: .4, .3 background_color: 1,0,1,1 pos_hint: {'x': 0, 'top': 1} Button: size_hint: .4, .3 text: 'Geekscoders.com' background_color: 0,1,1,1 pos_hint: {'right': 1, 'y': 0} |
Run the complete code and this is the result.
GridLayout
The GridLayout arranges children in a matrix. It takes the available space and divides it into columns and rows, then adds widgets to the resulting “cells”. unlike many other toolkits, you cannot explicitly place a widget in a specific column/row. Each child is automatically assigned a position determined by the layout configuration and the child’s index in the children list. a GridLayout must always have at least one input constraint: GridLayout.cols or GridLayout.rows. If you do not specify cols or rows, the Layout will throw an exception. there are two ways that you can create gridlayout, using class and using kivy file. so first we are going to create using class file.
In this code we are going to create the GridLayout using the Python file. we have created our GridLayout, also we have specified the number of columns that we want, when you want to create the GridLayout, you need to give the number of columns or number of rows for the GridLayout,
|
1 2 3 4 5 6 7 8 9 10 11 12 13 14 15 16 17 18 19 20 21 22 23 24 25 26 27 28 29 30 |
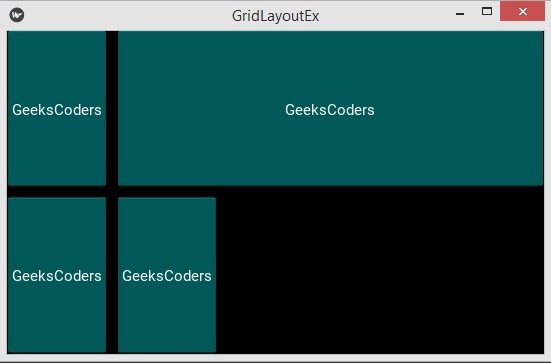
from kivy.app import App from kivy.uix.gridlayout import GridLayout from kivy.uix.button import Button class GridLayoutEx(App): def build(self): layout = GridLayout(cols=2) layout.add_widget(Button(text='GeeksCoders',size_hint_x=None, width=100)) layout.add_widget(Button(text='GeeksCoders',size_hint_x=None, width=100)) layout.add_widget(Button(text='Geekscoders.com')) layout.add_widget(Button(text='Geekscoders.com')) return layout if __name__ == "__main__": window = GridLayoutEx() window.run() |
Run the complete code and this is the result.
Now let’s create the GridLayout using kivy file. this is our Python code, our class extends from GridLayout.
|
1 2 3 4 5 6 7 8 9 10 11 12 13 14 15 16 17 18 19 20 21 22 23 24 25 26 |
from kivy.app import App from kivy.uix.gridlayout import GridLayout class MyGridLayout(GridLayout): pass class GridLayoutEx(App): def build(self): return MyGridLayout() if __name__ == "__main__": window = GridLayoutEx() window.run() |
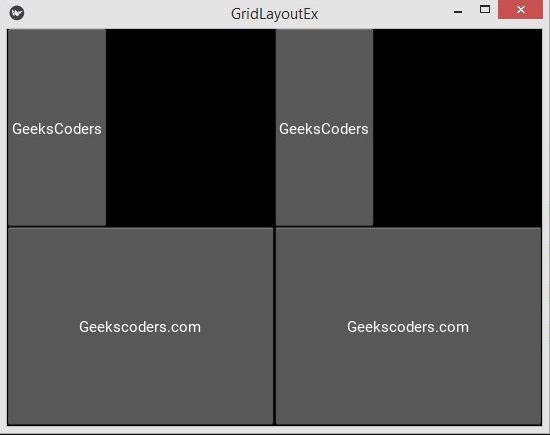
And this is our .kv file, make sure that the file name should be the same as the main class name. we have added 2 columns to the GridLayout, also we have added four button in the GridLayout.
|
1 2 3 4 5 6 7 8 9 10 11 12 13 14 15 16 17 18 19 20 21 22 23 24 25 |
#:kivy 1.10.0 <MyGridLayout>: cols: 2 spacing: 10 Button: text: 'GeeksCoders' size_hint_x: None background_color:0,1,1,1 Button: text: 'GeeksCoders' background_color:0,1,1,1 Button: text: 'GeeksCoders' size_hint_x: None background_color:0,1,1,1 Button: text: 'GeeksCoders' size_hint_x: None background_color:0,1,1,1 |
Run the code and this is the result.
RelativeLayout
This layout allows you to set relative coordinates for children. If you want absolute positioning, use the FloatLayout. the RelativeLayout class behaves just like the regular FloatLayout except that its child widgets are positioned relative to the layout. when a widget with position = (0,0) is added to a RelativeLayout, the child widget will also move when the position of the RelativeLayout is changed. The child widgets coordinates remain (0,0) as they are always relative to the parent layout.
Now let’s create the RelativeLayout using kivy file. this is our Python file and our class extends from FloatLayout class.
|
1 2 3 4 5 6 7 8 9 10 11 12 13 14 15 16 17 |
from kivy.app import App from kivy.uix.relativelayout import RelativeLayout class MyRelativeLayout(RelativeLayout): pass class RelativeLayoutEx(App): def build(self): return MyRelativeLayout() if __name__ == "__main__": window = RelativeLayoutEx() window.run() |
This is our .kv file, and the name of the file is relativelayoutex.kv, make sure that the name should be the same as your app class name. we have added some buttons to the layout.
|
1 2 3 4 5 6 7 8 9 10 11 12 13 14 15 16 17 18 19 20 21 22 23 24 25 26 27 28 29 30 31 32 33 34 35 36 |
#:kivy 1.10.0 <Button>: font_size: 15 size_hint: 0.3, 0.3 <MyRelativeLayout>: Button: text:"Geekscoders.com" background_color: 0,1,1,1 pos_hint: {"x":0, "y":0} Button: text:"Geekscoders.com" background_color: 0,1,1,1 pos_hint: {"right":1, "y":0} Button: text:"Geekscoders.com" background_color: 0,1,1,1 pos_hint: {"center_x":.5, "center_y":.5} Button: text:"Geekscoders.com" background_color: 0,1,1,1 pos_hint: {"x":0, "top":1} Button: text:"Geekscoders.com" background_color: 0,1,1,1 pos_hint: {"right":1, "top":1} |
Run the code and this is the result.

StackLayout
The StackLayout arranges children vertically or horizontally, as many as the layout can fit. The size of the individual children widgets do not have to be uniform. there are two ways that you can create stacklayout, using class and using kivy file. so first we are going to create using class file.
First we want to create our StackLayout using Python code.
|
1 2 3 4 5 6 7 8 9 10 11 12 13 14 15 16 17 18 19 20 21 22 23 |
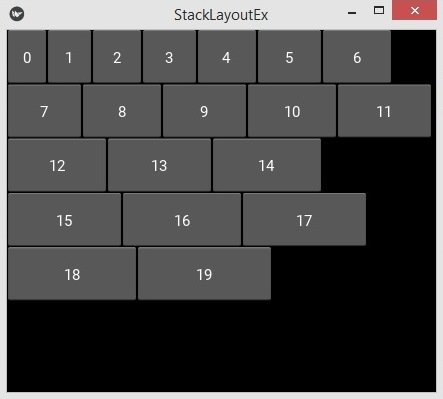
from kivy.app import App from kivy.uix.stacklayout import StackLayout from kivy.uix.button import Button class StackLayoutEx(App): def build(self): layout = StackLayout() for i in range(20): btn = Button(text = str(i), width = 40 + i * 5, size_hint=(None, 0.15)) layout.add_widget(btn) return layout if __name__ == "__main__": window = StackLayoutEx() window.run() |
Run the code and this is the result.
Now let’s create the StackLayout using kivy file, this is our Python file, our class extends from the StackLayout.
|
1 2 3 4 5 6 7 8 9 10 11 12 13 14 15 16 17 18 19 20 21 22 23 24 25 |
from kivy.app import App from kivy.uix.stacklayout import StackLayout from kivy.uix.button import Button class MyStackLayout(StackLayout): pass class StackLayoutEx(App): def build(self): return MyStackLayout() if __name__ == "__main__": window = StackLayoutEx() window.run() |
And this is our kivy file, and we have added four buttons in the layout.
|
1 2 3 4 5 6 7 8 9 10 11 12 13 14 15 16 17 18 19 20 21 22 23 24 25 |
#:kivy 1.10.0 <MyStackLayout>: orientation:'rl-tb' padding:10 Button: text:"Geekscoders.com" size_hint: [.6, .2] background_color: 0,1,1,1 Button: text:"Geekscoders.com" size_hint: [.4, .4] background_color: 1,0,1,1 Button: text:"Geekscoders.com" size_hint: [.3, .2] background_color: 1,1,0,1 Button: text:"Geekscoders.com" size_hint: [.4, .3] background_color: 1,1,1,1 |
Run the complete code and this is the result.

