In this Kivy Tutorial we are going to talk about Kivy Slider, the Slider widget looks like a scrollbar. It supports horizontal and vertical orientations, min/max values and a default value.
There are two ways that you can create slider in kivy, the first way is that you can create kivy slider using the kivy.uix.slider module, and the second way is using the kivy design language, so first let’s just do the first way. also iam going to show you how to create callbacks for the kivy slider.
This is the code for creating slider in kivy
|
1 2 3 4 5 6 7 8 9 10 11 12 13 14 15 16 17 |
from kivy.app import App from kivy.uix.slider import Slider class SliderWindow(App): def build(self): slider = Slider() return slider if __name__ == "__main__": window = SliderWindow() window.run() |
In the above code we have just created a simple slider, if you run the code this will be the result.

Now i want to add callback for the slider, i want by changing the slider the value of my label should be changed.
|
1 2 3 4 5 6 7 8 9 10 11 12 13 14 15 16 17 18 19 20 21 22 23 24 25 26 27 28 29 30 31 32 |
from kivy.app import App from kivy.uix.slider import Slider from kivy.uix.gridlayout import GridLayout from kivy.uix.label import Label class MyLayout(GridLayout): def __init__(self): super().__init__() self.cols = 2 self.slider = Slider(min = 0, max = 100) self.add_widget(self.slider) self.slider.bind(value = self.on_value_change) self.label = Label(text = "0") self.add_widget(self.label) def on_value_change(self, instance, value): self.label.text = "Value Is : {} ".format(int(value)) class SliderWindowEx(App): def build(self): return MyLayout() if __name__ == "__main__": window = SliderWindowEx() window.run() |
OK in the above code, you can see that first we have created a class that extends from the GridLayout, also we have added our Slider with the Label in that class, also you can see that we have binded the event to the slider like this.
|
1 |
self.slider.bind(value = self.on_value_change) |
And this is the method that we have binded with the slider. basically it is just a simple method and we are going to change the value of the label when the slider changes.
|
1 2 |
def on_value_change(self, instance, value): self.label.text = "Value Is : {} ".format(int(value)) |
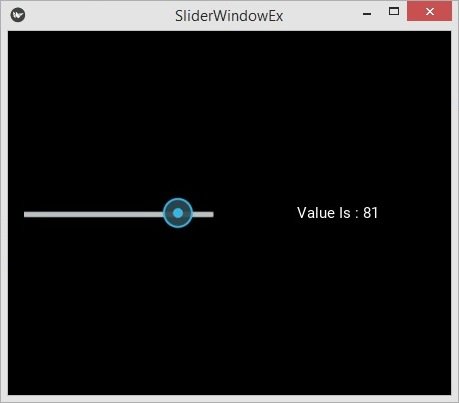
Run the complete code and this is the result.
Creating Kivy Slider with KV Language
Now we want to create our Slider using Kivy Design Language, create a new Python file and add the following codes in the file. in this code our class extends from GridLayout, because we want to add our two widgets label and slider in the GridLayout. in our main class we just return our layour class.
|
1 2 3 4 5 6 7 8 9 10 11 12 13 14 15 16 17 18 19 20 21 |
from kivy.app import App from kivy.uix.gridlayout import GridLayout class MyLayout(GridLayout): pass class SliderWindow(App): def build(self): return MyLayout() if __name__ == "__main__": window = SliderWindow() window.run() |
This is our kv file, make sure that the file name should be the same as your main class, for example in here our main class is SliderWindow, and the file should be sliderwindow.kv.
|
1 2 3 4 5 6 7 8 9 10 11 12 13 14 15 |
#:kivy 1.10.0 <MyLayout> mylabel:label cols:2 Slider: min:0 max:100 on_value:label.text = str(int(self.value)) Label: id:label text:"0" |
Run the complete code and this is the result.
