In this PyQt5 lesson we want to learn about PyQt5 QCheckBox with Qt Designer, a QCheckBox is an option button that can be switched on (checked) or off (unchecked). Checkboxes are typically used to represent features in an application that can be enabled or disabled without affecting others, but different types of behavior can be implemented. so there are two ways that you can create pyqt5 checkbox, the first way is to use Qt Designer and in the second way by using coding. so now first let’s do it using Qt Designer.
Open your Qt Designer, you can just write pyqt5designer in your terminal, after opening the Qt Designer you need to create Dialog without Buttons window. now we add widgets in Qt Designer.
- First add a vertical or VBoxLayout
- Add QLabel with QHBoxLayout in the vertical layout
- in the QHBoxLayout you need to add a label also a VBoxLayout, and in the VBoxLayout add three QCheckBox.
- Also at the end you need to add another Label, it should be in your main QVBoxLayout.
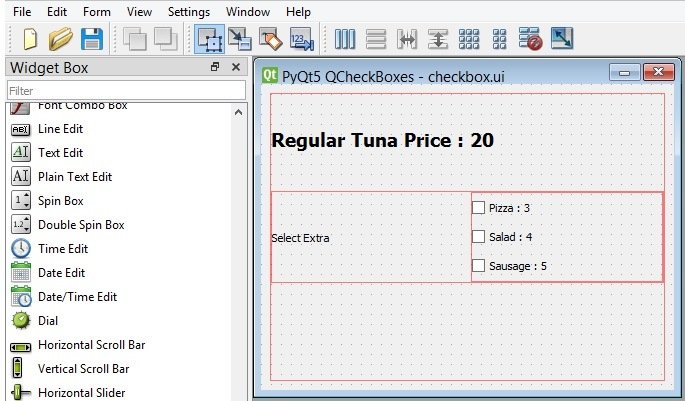
After completing the design you need to save the .ui file, iam going to name it checkbox.ui, now copy the file and paste it in the Scripts folder of your Python installation, because we want to convert our ui file in to python file and for converting you need to use pyuic5 module. pyuic5 module is located in the Scripts folder of your Python installation, run this command for converting in your terminal.
|
1 |
pyuic5 checkbox.ui -o checkboxexample.py -x |
Now this is the code
|
1 2 3 4 5 6 7 8 9 10 11 12 13 14 15 16 17 18 19 20 21 22 23 24 25 26 27 28 29 30 31 32 33 34 35 36 37 38 39 40 41 42 43 44 45 46 47 48 49 50 51 52 53 54 55 56 57 58 59 60 61 62 63 64 65 66 67 68 69 70 71 72 73 74 75 76 77 78 79 80 81 82 83 84 85 86 87 88 89 90 91 92 93 94 95 96 97 98 99 100 101 102 103 104 |
# -*- coding: utf-8 -*- # Form implementation generated from reading ui file 'checkbox.ui' # # Created by: PyQt5 UI code generator 5.15.1 # # WARNING: Any manual changes made to this file will be lost when pyuic5 is # run again. Do not edit this file unless you know what you are doing. from PyQt5 import QtCore, QtGui, QtWidgets class Ui_Dialog(object): def setupUi(self, Dialog): Dialog.setObjectName("Dialog") Dialog.resize(413, 306) self.verticalLayout_3 = QtWidgets.QVBoxLayout(Dialog) self.verticalLayout_3.setObjectName("verticalLayout_3") self.verticalLayout = QtWidgets.QVBoxLayout() self.verticalLayout.setObjectName("verticalLayout") self.label = QtWidgets.QLabel(Dialog) font = QtGui.QFont() font.setPointSize(14) font.setBold(True) font.setWeight(75) self.label.setFont(font) self.label.setObjectName("label") self.verticalLayout.addWidget(self.label) self.horizontalLayout = QtWidgets.QHBoxLayout() self.horizontalLayout.setObjectName("horizontalLayout") self.label_2 = QtWidgets.QLabel(Dialog) self.label_2.setObjectName("label_2") self.horizontalLayout.addWidget(self.label_2) self.verticalLayout_2 = QtWidgets.QVBoxLayout() self.verticalLayout_2.setObjectName("verticalLayout_2") self.checkBoxPizza = QtWidgets.QCheckBox(Dialog) self.checkBoxPizza.setObjectName("checkBoxPizza") self.checkBoxPizza.stateChanged.connect(self.checked_item) self.verticalLayout_2.addWidget(self.checkBoxPizza) self.checkBoxSalad = QtWidgets.QCheckBox(Dialog) self.checkBoxSalad.setObjectName("checkBoxSalad") self.verticalLayout_2.addWidget(self.checkBoxSalad) self.checkBoxSalad.stateChanged.connect(self.checked_item) self.checkBoxSausage = QtWidgets.QCheckBox(Dialog) self.checkBoxSausage.setObjectName("checkBoxSausage") self.verticalLayout_2.addWidget(self.checkBoxSausage) self.horizontalLayout.addLayout(self.verticalLayout_2) #added newly after conversion for connecting signal to slot self.checkBoxSausage.stateChanged.connect(self.checked_item) self.verticalLayout.addLayout(self.horizontalLayout) self.labelResult = QtWidgets.QLabel(Dialog) font = QtGui.QFont() font.setPointSize(12) font.setBold(True) font.setWeight(75) self.labelResult.setFont(font) self.labelResult.setText("") self.labelResult.setObjectName("labelResult") self.verticalLayout.addWidget(self.labelResult) self.verticalLayout_3.addLayout(self.verticalLayout) self.retranslateUi(Dialog) QtCore.QMetaObject.connectSlotsByName(Dialog) def retranslateUi(self, Dialog): _translate = QtCore.QCoreApplication.translate Dialog.setWindowTitle(_translate("Dialog", "PyQt5 QCheckBoxes")) self.label.setText(_translate("Dialog", "Regular Tuna Price : 20")) self.label_2.setText(_translate("Dialog", "Select Extra")) self.checkBoxPizza.setText(_translate("Dialog", "Pizza : 3")) self.checkBoxSalad.setText(_translate("Dialog", "Salad : 4")) self.checkBoxSausage.setText(_translate("Dialog", "Sausage : 5")) #this is method is added after conversion def checked_item(self): price = 20 if self.checkBoxPizza.isChecked(): price = price + 3 if self.checkBoxSalad.isChecked(): price = price + 4 if self.checkBoxSausage.isChecked(): price = price + 5 self.labelResult.setText("Total Price Is : {} ".format(price)) if __name__ == "__main__": import sys app = QtWidgets.QApplication(sys.argv) Dialog = QtWidgets.QDialog() ui = Ui_Dialog() ui.setupUi(Dialog) Dialog.show() sys.exit(app.exec_()) |
We have added some new codes in their so the first one is the stateChanged() signal for our QCheckBox.
|
1 2 |
#added newly after conversion for connecting signal to slot self.checkBoxSausage.stateChanged.connect(self.checked_item) |
And also the method or slot that we have connected with the stateChanged() signal of pyqt5 checkbox.
|
1 2 3 4 5 6 7 8 9 10 11 12 13 14 15 |
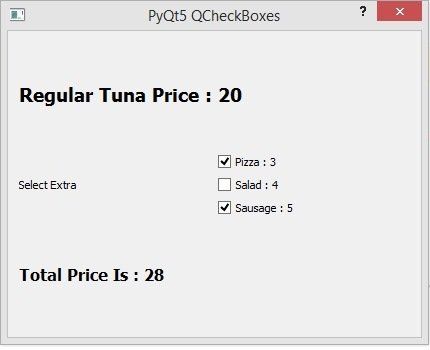
#this is method is added after conversion def checked_item(self): price = 20 if self.checkBoxPizza.isChecked(): price = price + 3 if self.checkBoxSalad.isChecked(): price = price + 4 if self.checkBoxSausage.isChecked(): price = price + 5 self.labelResult.setText("Total Price Is : {} ".format(price)) |
Run the complete code and this is the result.
Creating CheckBox with Coding
OK now let’s create our checkbox using coding, and this is the complete source code for PyQt5 How to Create CheckBox with Qt Designer
|
1 2 3 4 5 6 7 8 9 10 11 12 13 14 15 16 17 18 19 20 21 22 23 24 25 26 27 28 29 30 31 32 33 34 35 36 37 38 39 40 41 42 43 44 45 46 47 48 49 50 51 52 53 54 55 56 57 58 59 60 61 62 63 64 65 66 67 68 69 70 71 72 73 74 75 76 77 78 79 80 81 82 83 84 85 86 87 88 89 90 91 92 93 |
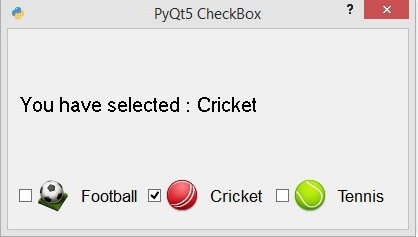
from PyQt5.QtWidgets import QApplication,QDialog, QHBoxLayout, QVBoxLayout, QLabel, QCheckBox import sys from PyQt5.QtGui import QIcon, QIcon, QFont from PyQt5.QtCore import QSize class Window(QDialog): def __init__(self): super().__init__() #window title, icon and geometry self.setGeometry(200,200, 400,200) self.setWindowTitle("PyQt5 CheckBox") self.setWindowIcon(QIcon('python.png')) self.create_checkbox() def create_checkbox(self): #this is our hboxlayout hbox = QHBoxLayout() #these are checkboxes self.check1 = QCheckBox("Football") self.check1.setIcon(QIcon('football.png')) self.check1.setIconSize(QSize(40,40)) self.check1.setFont(QFont("Sanserif", 13)) self.check1.toggled.connect(self.item_selected) hbox.addWidget(self.check1) self.check2 = QCheckBox("Cricket") self.check2.setIcon(QIcon('cricket.png')) self.check2.setIconSize(QSize(40, 40)) self.check2.setFont(QFont("Sanserif", 13)) self.check2.toggled.connect(self.item_selected) hbox.addWidget(self.check2) self.check3 = QCheckBox("Tennis") self.check3.setIcon(QIcon('tennis.png')) self.check3.setIconSize(QSize(40, 40)) self.check3.setFont(QFont("Sanserif", 13)) self.check3.toggled.connect(self.item_selected) hbox.addWidget(self.check3) #this is the vboxlayout vbox = QVBoxLayout() #we have created a label in here self.label = QLabel("Hello") self.label.setFont(QFont("Sanserif", 15)) #add the label in the vbox layout vbox.addWidget(self.label) #add the hbox layout in the vbox layout vbox.addLayout(hbox) #set the layout for the main window self.setLayout(vbox) def item_selected(self): value = "" #check for the check box value if self.check1.isChecked(): value = self.check1.text() if self.check2.isChecked(): value = self.check2.text() if self.check3.isChecked(): value = self.check3.text() self.label.setText("You have selected : " + value) app = QApplication(sys.argv) window = Window() window.show() sys.exit(app.exec_()) |
basically in this example we want to use two layouts first one is a QHBoxLayout, in the HBoxLayout we want to add our three checkboxes.
|
1 |
hbox = QHBoxLayout() |
You can use QCheckBox class for creating of the checkboxes, and you need to just add the title for the checkbox.
|
1 |
self.check1 = QCheckBox("Football") |
Set the icon for the checkbox, make sure that you have already added an icon to your working directory.
|
1 |
self.check1.setIcon(QIcon('football.png')) |
This is used for icon size of the checkbox.
|
1 |
self.check1.setIconSize(QSize(40,40)) |
In here we have connected the toggled() signal of the QCheckBox with the item_selected() method that we will create.
|
1 |
self.check1.toggled.connect(self.item_selected) |
Also you need to add your checkbox in the HBoxLayout using this code.
|
1 |
hbox.addWidget(self.check1) |
And this is the method that we have already connected with toggled() signal of the checkbox. basically in this method we are going to check the value of the checkboxes.
|
1 2 3 4 5 6 7 8 9 10 11 12 13 14 15 16 |
def item_selected(self): value = "" #check for the check box value if self.check1.isChecked(): value = self.check1.text() if self.check2.isChecked(): value = self.check2.text() if self.check3.isChecked(): value = self.check3.text() self.label.setText("You have selected : " + value) |
Run the complete code and this is the result.