In this PyQt5 tutorial we want to learn about PyQt5 QLCDNumber , so The QLCDNumber widget displays a number with LCD-like digits. It can display a number in just about any size. It can display decimal, hexadecimal, octal or binary numbers. It is easy to connect to data sources using the display() slot, which is overloaded to take any of five argument types.
In this lesson we are going to create three examples on pyqt QLCDNumber class, the first and second example is using coding and in the third example we are going to use Qt Designer.
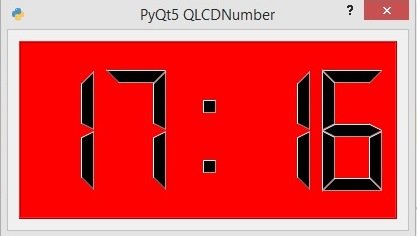
So in the first example we want to display our system clock using QLCDNumber. this is the complete source code for the first example.
Displaying System Clock with QLCDNumber
|
1 2 3 4 5 6 7 8 9 10 11 12 13 14 15 16 17 18 19 20 21 22 23 24 25 26 27 28 29 30 31 32 33 34 35 36 37 38 39 40 41 42 43 44 45 46 47 48 49 50 51 52 53 54 55 56 57 |
from PyQt5.QtWidgets import QApplication, QDialog,QLCDNumber, QVBoxLayout import sys from PyQt5.QtGui import QIcon from PyQt5.QtCore import QTime, QTimer class Window(QDialog): def __init__(self): super().__init__() #window requrements like geometry,icon and title self.setGeometry(200,200,400,200) self.setWindowTitle("PyQt5 QLCDNumber") self.setWindowIcon(QIcon("python.png")) #we need to create QTimer object timer = QTimer() timer.timeout.connect(self.lcd_number) #start the timer, it takes meli second timer.start(1000) self.lcd_number() def lcd_number(self): #vbox layout object vbox = QVBoxLayout() #create QLCDNumber object lcd = QLCDNumber() #give background color for the lcd number lcd.setStyleSheet('background:red') #add lcd number to vertical box layout vbox.addWidget(lcd) #create time object time = QTime.currentTime() text = time.toString('hh:mm') #displat the system time in the lcd lcd.display(text) self.setLayout(vbox) App = QApplication(sys.argv) window = Window() window.show() sys.exit(App.exec()) |
You can see that we have imported our required classes especially QLCDNumber class that is used for creating LCDNumber digits.
These are our window requirements like window title, window icon, width and height of the window, x and y position of the window.
|
1 2 3 |
self.setGeometry(200,200,400,200) self.setWindowTitle("PyQt5 QLCDNumber") self.setWindowIcon(QIcon("python.png")) |
So in here we are going to create a QTimer class object, the QTimer class provides repetitive and single-shot timers. the QTimer class provides a high-level programming interface for timers. To use it, create a QTimer, connect its timeout() signal to the appropriate slots, and call start(). you can see that we have started the timer in 1000 meli seconds.
|
1 2 3 |
timer = QTimer() timer.timeout.connect(self.lcd_number) timer.start(1000) |
This is used for creating the object of QLCDNumber.
|
1 |
lcd = QLCDNumber() |
Give background color for the LCDNumber.
|
1 |
lcd.setStyleSheet('background:red') |
In here we have created the object of QTime, because we want to get the system time. Also you need to convert the time to string.
|
1 2 |
time = QTime.currentTime() text = time.toString('hh:mm') |
This is the code that we want to show our time in lcd. you can use display() method of QLCDNumber class.
|
1 |
lcd.display(text) |
Run the complete code and this is the result.

Creating Random Number Generator with LCDNumber
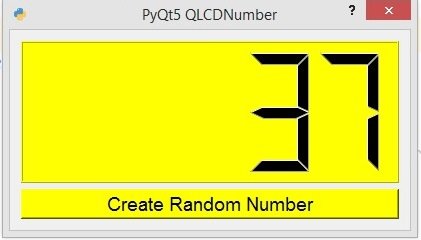
In this example we are going to create a simple random number generator with QLCDNumber, so this is the complete source code for the example.
|
1 2 3 4 5 6 7 8 9 10 11 12 13 14 15 16 17 18 19 20 21 22 23 24 25 26 27 28 29 30 31 32 33 34 35 36 37 38 39 40 41 42 43 44 45 46 47 48 49 50 |
from PyQt5.QtWidgets import QApplication, QDialog,\ QLCDNumber,QPushButton ,QVBoxLayout import sys from PyQt5.QtGui import QIcon, QFont from random import randint class Window(QDialog): def __init__(self): super().__init__() # window requrements like geometry,icon and title self.setGeometry(200,200,400,200) self.setWindowTitle("PyQt5 QLCDNumber") self.setWindowIcon(QIcon("python.png")) # vbox layout object vbox = QVBoxLayout() # create QLCDNumber object self.lcd = QLCDNumber() # give background color for the lcd number self.lcd.setStyleSheet('background-color:yellow') vbox.addWidget(self.lcd) #this is our button with the stylesheet self.button = QPushButton("Create Random Number") self.button.setStyleSheet('background-color:yellow') self.button.setFont(QFont("Sanserif", 14)) self.button.clicked.connect(self.rand_generator) vbox.addWidget(self.button) self.setLayout(vbox) def rand_generator(self): #create random number between 1 and 300 random = randint(1, 300) self.lcd.display(random) App = QApplication(sys.argv) window = Window() window.show() sys.exit(App.exec()) |
In this example we have a QLCDNumber widget, with a QPushButton. also you can see that we have connected the clicked() signal of button with the rand_generator() method.
|
1 |
self.button.clicked.connect(self.rand_generator) |
And this is our method that we have already connected with the clicked signal of the button.
|
1 2 3 4 5 |
def rand_generator(self): #create random number between 1 and 300 random = randint(1, 300) self.lcd.display(random) |
Run the complete code and this is the result.

Creating Random Number Generator with QT Designer
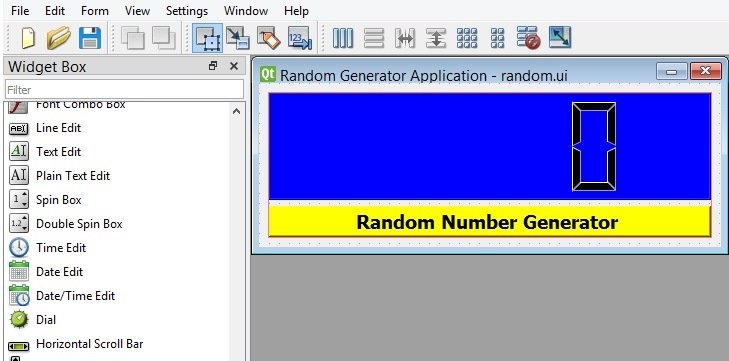
OK now we want to create our random number generator application with Qt Designer, you can just write pyqt5designer in your terminal, after opening the Qt Designer you need to create Dialog without Buttons window. now we add widgets in Qt Designer.
- Add a QVBoxLayout in the Qt Designer
- Add a QLCDNumber widget with a QPushButton in the Designer
Also we need to add some styles for the QLCDNumber and QPushButton, so right click on the window and choose Change Stylesheet. and add this style.
|
1 2 3 4 5 6 7 8 9 10 11 12 13 |
QLCDNumber { background-color:rgb(0, 0, 255) } QPushButton { background-color:rgb(255, 255, 0) } |
So this is our design.

After completing the design you need to save the .ui file, iam going to name it random.ui, now copy the file and paste it in the Scripts folder of your Python installation, because we want to convert our ui file in to python file and for converting you need to use pyuic5 module. pyuic5 module is located in the Scripts folder of your Python installation, run this command for converting in your terminal.
|
1 |
pyuic5 random.ui -o qlcd3.py -x |
And this is the converted code also we have added our valueChanged() signal with the method that we want to connect.
|
1 2 3 4 5 6 7 8 9 10 11 12 13 14 15 16 17 18 19 20 21 22 23 24 25 26 27 28 29 30 31 32 33 34 35 36 37 38 39 40 41 42 43 44 45 46 47 48 49 50 51 52 53 54 55 56 57 58 59 60 61 62 63 64 65 66 67 68 69 70 71 72 73 74 75 76 77 78 79 |
# -*- coding: utf-8 -*- # Form implementation generated from reading ui # file 'random.ui' # # Created by: PyQt5 UI code generator 5.15.1 # # WARNING: Any manual changes made to this file # will be lost when pyuic5 is # run again. Do not edit this file unless you # know what you are doing. from PyQt5 import QtCore, QtGui, QtWidgets from random import randint class Ui_Dialog(object): def setupUi(self, Dialog): Dialog.setObjectName("Dialog") Dialog.resize(462, 164) font = QtGui.QFont() font.setPointSize(14) font.setBold(True) font.setWeight(75) Dialog.setFont(font) Dialog.setStyleSheet("QLCDNumber {\n" "\n" "background-color:rgb(0, 0, 255)\n" "\n" "}\n" "\n" "\n" "QPushButton {\n" "\n" "background-color:rgb(255, 255, 0)\n" "\n" "\n" "}") self.verticalLayout_2 = QtWidgets.QVBoxLayout(Dialog) self.verticalLayout_2.setObjectName("verticalLayout_2") self.verticalLayout = QtWidgets.QVBoxLayout() self.verticalLayout.setObjectName("verticalLayout") self.lcdNumber = QtWidgets.QLCDNumber(Dialog) self.lcdNumber.setObjectName("lcdNumber") self.verticalLayout.addWidget(self.lcdNumber) self.pushButton = QtWidgets.QPushButton(Dialog) self.pushButton.clicked.connect(self.rand_generator) font = QtGui.QFont() font.setPointSize(14) font.setBold(True) font.setWeight(75) self.pushButton.setFont(font) self.pushButton.setObjectName("pushButton") self.verticalLayout.addWidget(self.pushButton) self.verticalLayout_2.addLayout(self.verticalLayout) self.retranslateUi(Dialog) QtCore.QMetaObject.connectSlotsByName(Dialog) def retranslateUi(self, Dialog): _translate = QtCore.QCoreApplication.translate Dialog.setWindowTitle(_translate("Dialog", "Random Generator Application")) self.pushButton.setText(_translate("Dialog", "Random Number Generator ")) def rand_generator(self): random = randint(1, 300) self.lcdNumber.display(random) if __name__ == "__main__": import sys app = QtWidgets.QApplication(sys.argv) Dialog = QtWidgets.QDialog() ui = Ui_Dialog() ui.setupUi(Dialog) Dialog.show() sys.exit(app.exec_()) |
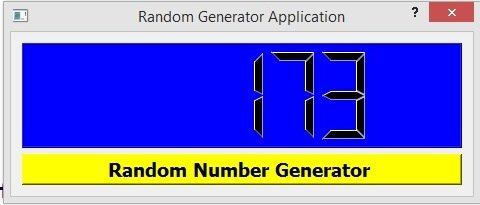
Run the complete code and this is the result.
