In this Python PyQt5 lesson we want to learn about Python PyQt5 QComboBox, using QComboBox you can add a selection widget that displays the current items.
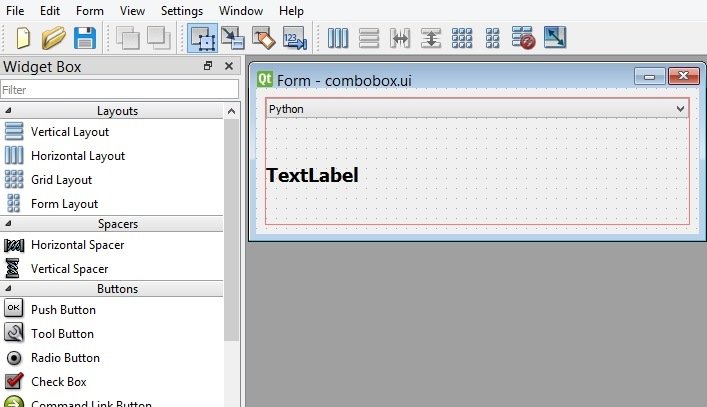
Now open your Qt Designer, you can just write pyqt5designer in your terminal, after opening the Qt Designer you need to create Widget window. now we add widgets in Qt Designer.
- Add a Vertical Layout
- In the vertical layout add a combobox
- Right click on the combobox and add items to the combobox
- Also add a label in the VBoxLayout
This is the design.

This is the ui file for the combobox.
|
1 2 3 4 5 6 7 8 9 10 11 12 13 14 15 16 17 18 19 20 21 22 23 24 25 26 27 28 29 30 31 32 33 34 35 36 37 38 39 40 41 42 43 44 45 46 47 48 49 50 51 52 53 54 55 56 57 58 59 60 61 62 63 64 65 66 67 68 |
<?xml version="1.0" encoding="UTF-8"?> <ui version="4.0"> <class>Form</class> <widget class="QWidget" name="Form"> <property name="geometry"> <rect> <x>0</x> <y>0</y> <width>443</width> <height>146</height> </rect> </property> <property name="windowTitle"> <string>Form</string> </property> <layout class="QVBoxLayout" name="verticalLayout_2"> <item> <layout class="QVBoxLayout" name="verticalLayout"> <item> <widget class="QComboBox" name="comboBox"> <item> <property name="text"> <string>Python</string> </property> </item> <item> <property name="text"> <string>Java</string> </property> </item> <item> <property name="text"> <string>C++</string> </property> </item> <item> <property name="text"> <string>C#</string> </property> </item> <item> <property name="text"> <string>JavaScript</string> </property> </item> </widget> </item> <item> <widget class="QLabel" name="label"> <property name="font"> <font> <pointsize>14</pointsize> <weight>75</weight> <bold>true</bold> </font> </property> <property name="text"> <string>TextLabel</string> </property> </widget> </item> </layout> </item> </layout> </widget> <resources/> <connections/> </ui> |
OK now we want to load our ui file, so for this copy the ui file and paste to your directory, after that create a new python file, iam going to call it LoadCombo.py and add this code, for loading the ui file we want to use uic module from Python PyQt5.
|
1 2 3 4 5 6 7 8 9 10 11 12 13 14 15 16 17 18 19 20 21 22 23 24 25 26 27 28 29 30 31 32 |
from PyQt5.QtWidgets import QApplication,\ QWidget, QComboBox, QLabel from PyQt5 import uic class UI(QWidget): def __init__(self): super().__init__() # loading the ui file with uic module uic.loadUi('combobox.ui', self) #find widgets in the ui file self.combo = self.findChild(QComboBox, "comboBox") self.combo.currentTextChanged.connect(self.combo_selected) self.label = self.findChild(QLabel, "label") def combo_selected(self): item = self.combo.currentText() self.label.setText("You selected : " + item) app = QApplication([]) window = UI() window.show() app.exec_() |
You can see in the above code we have used loadUI() method for loading the ui file.
|
1 |
uic.loadUi('combobox.ui', self) |
In our main design we have a QComboBox with a QLabel, so we need to find these widgets in the ui file, as we have done in the above code, we can use findChild() method for finding the widgets in ui file.
|
1 2 |
self.combo = self.findChild(QComboBox, "comboBox") self.label = self.findChild(QLabel, "label") |
Also we have connected our currentTextChanged() signal of combobox with the combo_selected() method.
|
1 |
self.combo.currentTextChanged.connect(self.combo_selected) |
And this is the method that we have already connected with the signal, in this method we are going to just get the text from the combobox and we set the text in the label using setText() method.
|
1 2 3 |
def combo_selected(self): item = self.combo.currentText() self.label.setText("You selected : " + item) |
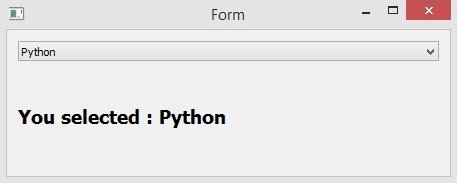
Run the complete code and this is the result.

Creating PyQt QComboBox with Coding
OK now we want to create our Python PyQt5 QComboBox using coding, in the previous part we have used Qt Designer, in here we are not going to use Qt Designer. this is the complete source code.
|
1 2 3 4 5 6 7 8 9 10 11 12 13 14 15 16 17 18 19 20 21 22 23 24 25 26 27 28 29 30 31 32 33 34 35 36 37 38 39 40 41 42 43 44 45 46 47 48 49 50 51 52 53 54 |
from PyQt5.QtWidgets import QApplication, QWidget, \ QVBoxLayout, QComboBox, QLabel import sys from PyQt5.QtGui import QIcon, QFont class Window(QWidget): def __init__(self): super().__init__() #window requrements like geometry,icon and title self.setGeometry(200,200,400,200) self.setWindowTitle("PyQt5 QComboBox") self.setWindowIcon(QIcon("python.png")) #our vboxlayout vbox = QVBoxLayout() #create the object of combobox self.combo = QComboBox() #add items to the combobox self.combo.addItem("Python") self.combo.addItem("Java") self.combo.addItem("C++") self.combo.addItem("C#") self.combo.addItem("JavaScript") #connected combobox signal self.combo.currentTextChanged.connect(self.combo_selected) #create label self.label = QLabel("") self.label.setFont(QFont("Sanserif", 15)) self.label.setStyleSheet('color:red') #added widgets in the vbox layout vbox.addWidget(self.combo) vbox.addWidget(self.label) self.setLayout(vbox) def combo_selected(self): item = self.combo.currentText() self.label.setText("You selected : " + item) App = QApplication(sys.argv) window = Window() window.show() sys.exit(App.exec()) |
These are our window requirements like window title, window icon, width and height of the window, x and y position of the window.
|
1 2 3 |
self.setGeometry(200,200,400,200) self.setWindowTitle("PyQt5 QComboBox") self.setWindowIcon(QIcon("python.png")) |
So you can use QComboBox class object for creating combobox in pyqt.
|
1 |
self.combo = QComboBox() |
This is the currentTextChanged() signal that is connected with the combo_selected() method.
|
1 |
self.combo.currentTextChanged.connect(self.combo_selected) |
This is the method that we have already connected with the currentTextChanged signal of combobox. so in this method first we need to get the item value from PyQt5 QComboBox and after that we set the value in Python PyQt5 label.
|
1 2 3 |
def combo_selected(self): item = self.combo.currentText() self.label.setText("You selected : " + item) |
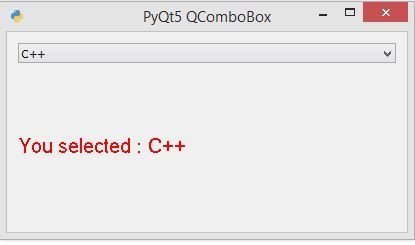
Run the complete code and this is the result.
