In this Python PyQt5 lesson we want to learn about Python PyQt5 QDial , so the QDial class provides a rounded range control (like a speedometer or potentiometer). QDial is used when the user needs to control a value within a program-definable range, and the range either wraps around (typically, 0.. 359 degrees) or the dialog layout needs a square widget.
Now open your Qt Designer, you can just write pyqt5designer in your terminal, after opening the Qt Designer you need to create Widget window. now we add widgets in Qt Designer.
- Add a VBoxLayout in the Qt Designer
- Add a QDial and QLabel widgets in the VBoxLayout
You can right click on the dial and choose Change Stylesheet and add this css style.
|
1 2 3 4 5 |
QDial { background-color:red; } |
This is the design.

After completing the design you need to save the .ui file, iam going to name it diald.ui, now copy the file and paste it in the Scripts folder of your Python installation, because we want to convert our ui file in to python file and for converting you need to use pyuic5 module. pyuic5 module is located in the Scripts folder of your Python installation, run this command for converting in your terminal.
|
1 |
pyuic5 listwidget.ui -o listwidget.py -x |
And this is the converted code also we have added our valueChanged() signal with the method that we want to connect.
|
1 2 3 4 5 6 7 8 9 10 11 12 13 14 15 16 17 18 19 20 21 22 23 24 25 26 27 28 29 30 31 32 33 34 35 36 37 38 39 40 41 42 43 44 45 46 47 48 49 50 51 52 53 54 55 56 57 58 59 60 61 62 63 64 65 66 |
# -*- coding: utf-8 -*- # Form implementation generated from reading # ui file 'diald.ui' # # Created by: PyQt5 UI code generator 5.15.1 # # WARNING: Any manual changes made to this file # will be lost when pyuic5 is # run again. Do not edit this file unless you know # what you are doing. from PyQt5 import QtCore, QtGui, QtWidgets class Ui_Form(object): def setupUi(self, Form): Form.setObjectName("Form") Form.resize(451, 305) self.verticalLayout_2 = QtWidgets.QVBoxLayout(Form) self.verticalLayout_2.setObjectName("verticalLayout_2") self.verticalLayout = QtWidgets.QVBoxLayout() self.verticalLayout.setObjectName("verticalLayout") self.dial = QtWidgets.QDial(Form) self.dial.valueChanged.connect(self.dial_changed) self.dial.setMaximum(360) self.dial.setStyleSheet("QDial {\n" "\n" "background-color:red;\n" "\n" "}") self.dial.setObjectName("dial") self.verticalLayout.addWidget(self.dial) self.label = QtWidgets.QLabel(Form) font = QtGui.QFont() font.setPointSize(14) font.setBold(True) font.setWeight(75) self.label.setFont(font) self.label.setText("") self.label.setObjectName("label") self.verticalLayout.addWidget(self.label) self.verticalLayout_2.addLayout(self.verticalLayout) self.retranslateUi(Form) QtCore.QMetaObject.connectSlotsByName(Form) def dial_changed(self): getValue = self.dial.value() self.label.setText("Dial is changing : "+ str(getValue)) def retranslateUi(self, Form): _translate = QtCore.QCoreApplication.translate Form.setWindowTitle(_translate("Form", "Form")) if __name__ == "__main__": import sys app = QtWidgets.QApplication(sys.argv) Form = QtWidgets.QWidget() ui = Ui_Form() ui.setupUi(Form) Form.show() sys.exit(app.exec_()) |
This is the method that we have already connected with the clicked signal of qdial class. firs we need to get the value from the dial class and after that we set the value in our label.
|
1 2 3 |
def dial_changed(self): getValue = self.dial.value() self.label.setText("Dial is changing : "+ str(getValue)) |
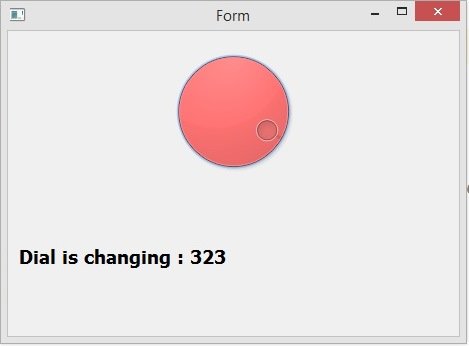
Run the code and this will be the result.

Creating PyQt5 QDial using coding
OK now we want to create our pyqt5 dial using coding, in the previous part we have used Qt Designer, in here we are not going to use Qt Designer. this is the complete source code.
|
1 2 3 4 5 6 7 8 9 10 11 12 13 14 15 16 17 18 19 20 21 22 23 24 25 26 27 28 29 30 31 32 33 34 35 36 37 38 39 40 41 42 43 44 45 46 47 |
from PyQt5.QtWidgets import QApplication, QWidget,\ QVBoxLayout, QDial, QLabel import sys from PyQt5.QtGui import QIcon, QFont class Window(QWidget): def __init__(self): super().__init__() self.setGeometry(200,200,400,300) self.setWindowTitle("PyQt5 QDial Application") self.setWindowIcon(QIcon("python.png")) self.create_dial() def create_dial(self): vbox = QVBoxLayout() self.dial = QDial() self.dial.setMinimum(0) self.dial.setMaximum(360) self.dial.setValue(30) self.dial.setStyleSheet('background-color:green') self.dial.valueChanged.connect(self.dial_changed) self.label = QLabel("") self.label.setFont(QFont("Sanserif", 15)) self.label.setStyleSheet('color:red') vbox.addWidget(self.dial) vbox.addWidget(self.label) self.setLayout(vbox) def dial_changed(self): getValue = self.dial.value() self.label.setText("Dial is changing : "+ str(getValue)) App = QApplication(sys.argv) window = Window() window.show() sys.exit(App.exec()) |
These are our window requirements like window title, window icon, width and height of the window, x and y position of the window.
|
1 2 3 |
self.setGeometry(200,200,400,300) self.setWindowTitle("PyQt5 QDial Application") self.setWindowIcon(QIcon("python.png")) |
So you can use QDial class object for creating dial in Python PyQt5.
|
1 |
self.dial = QDial() |
In here we have set the minimum and maximum value of QDial class. also we have added stylesheet for our dial application.
|
1 2 3 4 |
self.dial.setMinimum(0) self.dial.setMaximum(360) self.dial.setValue(30) self.dial.setStyleSheet('background-color:green') |
This is the valueChanged() signal that is connected with the dial_changed() method.
|
1 |
self.dial.valueChanged.connect(self.dial_changed) |
This is the method that we have already connected with the clicked signal of dial. so in this method first we need to get the item value from PyQt5 QDial and after that we set the value in pyqt label.
|
1 2 3 |
def dial_changed(self): getValue = self.dial.value() self.label.setText("Dial is changing : "+ str(getValue)) |
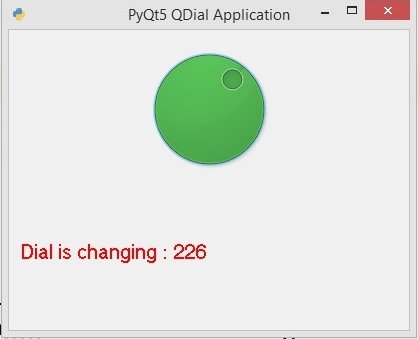
Run the complete code and this is the result.
