In this Python PyQt5 Tutorial we are going to learn about Python PyQt5 QPainter, so PyQt5 QPainter class has optimized functions to do drawing GUI programs. you can draw everything from simple lines to complex shapes like pies and chords. in this lesson we want to draw rectangle, ellipse, polygon and text.
1: Drawing Rectangle with QPainter
OK first of all we want to draw rectangle in pyqt5, now this is the complete source code.
|
1 2 3 4 5 6 7 8 9 10 11 12 13 14 15 16 17 18 19 20 21 22 23 24 25 26 27 28 29 30 31 |
from PyQt5.QtWidgets import QApplication, QWidget import sys from PyQt5.QtGui import QIcon from PyQt5.QtGui import QPainter, QPen, QBrush from PyQt5.QtCore import Qt class Window(QWidget): def __init__(self): super().__init__() self.setGeometry(200,200,400,300) self.setWindowTitle("PyQt5 Drawing") self.setWindowIcon(QIcon("python.png")) def paintEvent(self, e): painter = QPainter(self) painter.setPen(QPen(Qt.black, 5, Qt.SolidLine)) painter.setBrush(QBrush(Qt.red, Qt.SolidPattern)) # painter.setBrush(QBrush(Qt.green, Qt.DiagCrossPattern)) painter.drawRect(100, 15, 300, 100) App = QApplication(sys.argv) window = Window() window.show() sys.exit(App.exec()) |
These are our window requirements like window title, window icon, width and height of the window, x and y position of the window.
|
1 2 3 |
self.setGeometry(200,200,400,300) self.setWindowTitle("PyQt5 Drawing") self.setWindowIcon(QIcon("python.png")) |
For drawing shapes with QPainter class in Python PyQt5 you need to add paintEvent() method and in that method you can draw your shapes.
We need to create the object of QPainter class.
|
1 |
painter = QPainter(self) |
Using this code we can set the pen and brush for our rectangle shape.
|
1 2 |
painter.setPen(QPen(Qt.black, 5, Qt.SolidLine)) painter.setBrush(QBrush(Qt.red, Qt.SolidPattern)) |
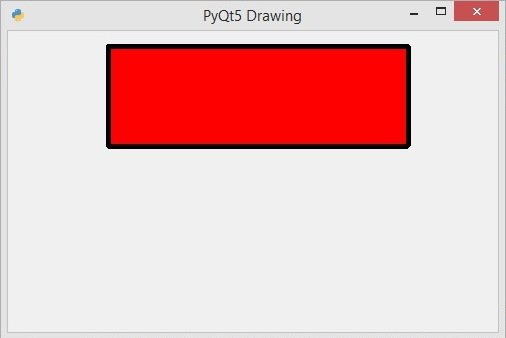
And in here we can use drawRect() method for drawing of the rectangle in pyqt5, you need to add the x and y position also the width and height of the rectangle.
|
1 |
painter.drawRect(100, 15, 300, 100) |
Run the code this is the result.

2: Drawing Ellipse with QPainter
Now we want to draw ellipse in pyqt5. this is the complete code for drawing ellipse.
|
1 2 3 4 5 6 7 8 9 10 11 12 13 14 15 16 17 18 19 20 21 22 23 24 25 26 27 28 |
from PyQt5.QtWidgets import QApplication, QWidget import sys from PyQt5.QtGui import QIcon from PyQt5.QtGui import QPainter, QPen, QBrush from PyQt5.QtCore import Qt class Window(QWidget): def __init__(self): super().__init__() self.setGeometry(200, 200, 700, 400) self.setWindowTitle("PyQt5 Ellipse ") self.setWindowIcon(QIcon("python.png")) def paintEvent(self, e): painter = QPainter(self) painter.setPen(QPen(Qt.black, 5, Qt.SolidLine)) painter.setBrush(QBrush(Qt.red, Qt.SolidPattern)) painter.setBrush(QBrush(Qt.green, Qt.DiagCrossPattern)) painter.drawEllipse(100, 100, 400, 200) App = QApplication(sys.argv) window = Window() window.show() sys.exit(App.exec()) |
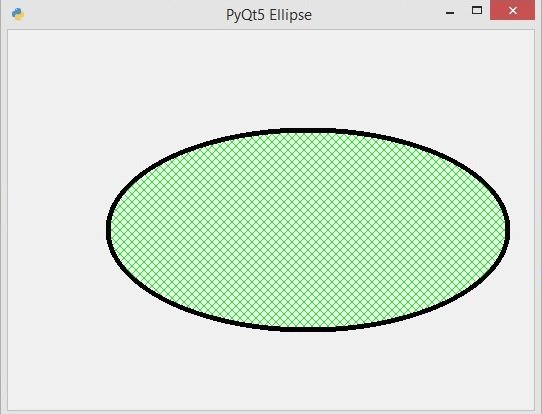
So in here you can use drawEllipse() function, and you need to give the x, y position, width and height of the ellipse.
|
1 |
painter.drawEllipse(100, 100, 400, 200) |
Run the complete code and this is the result.

3: Drawing Text with QPainter
OK Now we want to draw Text in Python PyQt5. this is the complete code for drawing Text.
|
1 2 3 4 5 6 7 8 9 10 11 12 13 14 15 16 17 18 19 20 21 22 23 24 25 26 27 28 29 30 31 32 33 34 35 36 37 38 |
from PyQt5.QtWidgets import QApplication, QWidget import sys from PyQt5.QtGui import QIcon, QTextDocument from PyQt5.QtGui import QPainter from PyQt5.QtCore import Qt, QRectF, QRect class Window(QWidget): def __init__(self): super().__init__() self.setGeometry(200, 200, 700, 400) self.setWindowTitle("PyQt5 Drawing") self.setWindowIcon(QIcon("python.png")) def paintEvent(self, e): painter = QPainter(self) painter.drawText(100, 100, "GeeksCoders.com") rect = QRect(100, 150, 250, 25) painter.drawRect(rect) painter.drawText(rect, Qt.AlignCenter, "PyQt5 Course") document = QTextDocument() rect2 = QRectF(0, 0, 250, 250) document.setTextWidth(rect2.width()) document.setHtml("<b>Python GUI </b> <i>Development </i>" "<font size = '12' color='green'> Complete Crash Course GeeksCoders.com</font>") document.drawContents(painter, rect2) App = QApplication(sys.argv) window = Window() window.show() sys.exit(App.exec()) |
Also we have used html in our text using QTextDocument class.
Run the complete code and this will be the result.

4: Drawing Polygon with QPainter
Let’s create polygon in python pyqt5, this is the complete source code for drawing polygon.
|
1 2 3 4 5 6 7 8 9 10 11 12 13 14 15 16 17 18 19 20 21 22 23 24 25 26 27 28 29 30 31 32 33 34 35 36 37 |
from PyQt5.QtWidgets import QApplication, QWidget import sys from PyQt5.QtGui import QIcon, QPolygon from PyQt5.QtGui import QPainter, QPen, QBrush from PyQt5.QtCore import Qt, QPoint class Window(QWidget): def __init__(self): super().__init__() self.setGeometry(200, 200, 700, 400) self.setWindowTitle("PyQt5 Drawing") self.setWindowIcon(QIcon("python.png")) def paintEvent(self, e): painter = QPainter(self) painter.setPen(QPen(Qt.black, 5, Qt.SolidLine)) painter.setBrush(QBrush(Qt.red, Qt.SolidPattern)) painter.setBrush(QBrush(Qt.green, Qt.VerPattern)) points = QPolygon([ QPoint(10, 10), QPoint(10, 100), QPoint(100, 10), QPoint(100, 100) ]) painter.drawPolygon(points) App = QApplication(sys.argv) window = Window() window.show() sys.exit(App.exec()) |
For drawing polygon the first thing you need to create some points using QPolygon.
|
1 2 3 4 5 6 7 |
points = QPolygon([ QPoint(10, 10), QPoint(10, 100), QPoint(100, 10), QPoint(100, 100) ]) |
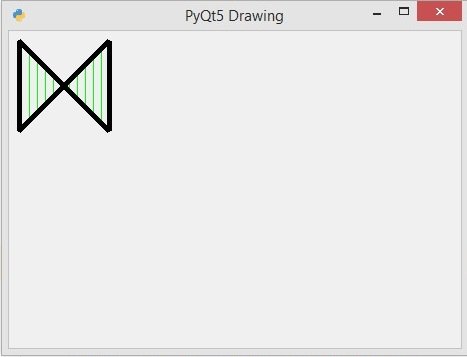
After that you can use drawPolygon() method and you need to add your points in the method.
|
1 |
painter.drawPolygon(points) |
Run the complete code and this is the result.
