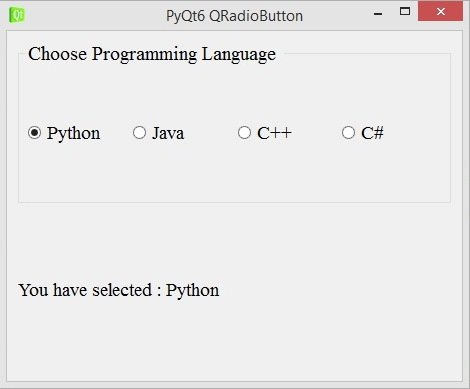
In this PyQt6 lesson we are going to learn about How to Create QRadioButton in PyQt6, a QRadioButton is an option button that can be switched on (checked) or off (unchecked). Radio buttons typically present the user with a “one of many” choice.
What is QRadioButton in PyQt6 ?
QRadioButton is a widget in PyQt6 that allows the user to select one option from group of mutually exclusive options. it is commonly used in forms, surveys and other applications where the user needs to choose from a limited set of options.
QRadioButton is usually used in conjunction with a QLabel, which provides label or prompt for the radio button group. Multiple QRadioButton widgets can be grouped together using a QButtonGroup object, which ensures that only one radio button in the group can be selected at a time.
This is the complete code for this lesson
|
1 2 3 4 5 6 7 8 9 10 11 12 13 14 15 16 17 18 19 20 21 22 23 24 25 26 27 28 29 30 31 32 33 34 35 36 37 38 39 40 41 42 43 44 45 46 47 48 49 50 51 52 53 54 55 56 57 58 59 60 61 62 63 64 65 66 67 68 69 70 71 72 |
from PyQt6.QtWidgets import QApplication, QWidget, QVBoxLayout,\ QHBoxLayout,QRadioButton,QGroupBox , QLabel from PyQt6.QtGui import QIcon, QFont import sys class Window(QWidget): def __init__(self): super().__init__() self.setWindowTitle("PyQt6 QRadioButton") self.setWindowIcon(QIcon("qt.png")) self.setGeometry(500,200, 500,400) self.radio_btn() vbox = QVBoxLayout() vbox.addWidget(self.grpbox) # this is our label self.label = QLabel("Hello") self.label.setFont(QFont("Times New Roman", 14)) # add your widgets in the vbox layout vbox.addWidget(self.label) self.setLayout(vbox) def radio_btn(self): self.grpbox = QGroupBox("Choose Programming Language ") self.grpbox.setFont(QFont("Times New Roman", 15)) # this is hbox layout hbox = QHBoxLayout() # these are the radiobuttons self.rad1 = QRadioButton("Python") self.rad1.setChecked(True) self.rad1.setFont(QFont("Times New Roman", 14)) self.rad1.toggled.connect(self.on_selected) hbox.addWidget(self.rad1) self.rad2 = QRadioButton("Java") self.rad2.setFont(QFont("Times New Roman", 14)) self.rad2.toggled.connect(self.on_selected) hbox.addWidget(self.rad2) self.rad3 = QRadioButton("C++") self.rad3.setFont(QFont("Times New Roman", 14)) self.rad3.toggled.connect(self.on_selected) hbox.addWidget(self.rad3) self.rad4 = QRadioButton("C#") self.rad4.setFont(QFont("Times New Roman", 14)) self.rad4.toggled.connect(self.on_selected) hbox.addWidget(self.rad4) self.grpbox.setLayout(hbox) # method or slot for the toggled signal def on_selected(self): radio_button = self.sender() if radio_button.isChecked(): self.label.setText("You have selected : " + radio_button.text()) app = QApplication(sys.argv) window = Window() window.show() sys.exit(app.exec()) |
You can use QRadioButton class for creating of the radiobutton in PyQt6.
|
1 |
self.rad1 = QRadioButton("Python") |
This is our groupbox, we can use QGroupBox class for creating of the groupbox, basically it is used for grouping of the widgets in pyqt6.
|
1 2 |
self.grpbox = QGroupBox("Choose Programming Language ") self.grpbox.setFont(QFont("Times New Roman", 15)) |
This is our method, in this method first we are going to get the value from the radiobutton and after we set that value to our label, this method is connected with the toggled() signal of QRadioButton.
|
1 2 3 4 5 |
def on_selected(self): radio_button = self.sender() if radio_button.isChecked(): self.label.setText("You have selected : " + radio_button.text()) |
In here we have connected our method with the toggled signal of QRadioButton.
|
1 |
self.rad1.toggled.connect(self.on_selected) |
Run the complete code and this is the result.
