In this PyQt6 lesson we are going to learn about How to Create QTableWidget with PyQt6, using QTableWidge we can add items in row and columns. we will learn how you can use coding for creating QTableWidget and how you can use Qt Designer.
This is the complete code for this lesson.
|
1 2 3 4 5 6 7 8 9 10 11 12 13 14 15 16 17 18 19 20 21 22 23 24 25 26 27 28 29 30 31 32 33 34 35 36 37 38 39 40 41 |
from PyQt6.QtWidgets import QApplication, \ QWidget, QTableWidget, QVBoxLayout, QTableWidgetItem from PyQt6.QtGui import QIcon, QFont import sys class Window(QWidget): def __init__(self): super().__init__() self.setWindowTitle("PyQt6 TableWidget") self.setWindowIcon(QIcon("qt.png")) self.setGeometry(500,200, 500,400) vbox = QVBoxLayout() tableWidget = QTableWidget() tableWidget.setRowCount(3) tableWidget.setColumnCount(3) tableWidget.setStyleSheet('background-color:yellow') tableWidget.setFont(QFont("Times New Roman", 12)) tableWidget.setItem(0, 0, QTableWidgetItem("FName")) tableWidget.setItem(0, 1, QTableWidgetItem("Lname")) tableWidget.setItem(0, 2, QTableWidgetItem("email")) tableWidget.setItem(1, 0, QTableWidgetItem("Parwiz")) tableWidget.setItem(1, 1, QTableWidgetItem("Forogh")) tableWidget.setItem(1, 2, QTableWidgetItem("parwiz@gmail.com")) tableWidget.setItem(2, 0, QTableWidgetItem("John")) tableWidget.setItem(2, 1, QTableWidgetItem("Doe")) tableWidget.setItem(2, 2, QTableWidgetItem("john@gmail.com")) vbox.addWidget(tableWidget) self.setLayout(vbox) app = QApplication(sys.argv) window = Window() window.show() sys.exit(app.exec()) |
In here we have created our QTableWidget object also we need to set the row and column count for the tablewidget.
|
1 2 3 |
tableWidget = QTableWidget() tableWidget.setRowCount(3) tableWidget.setColumnCount(3) |
And using QTableWidgeItem class you can add items to the pyqt tablewidget, you need to set the row and column for the items.
|
1 2 3 |
tableWidget.setItem(0, 0, QTableWidgetItem("FName")) tableWidget.setItem(0, 1, QTableWidgetItem("Lname")) tableWidget.setItem(0, 2, QTableWidgetItem("email")) |
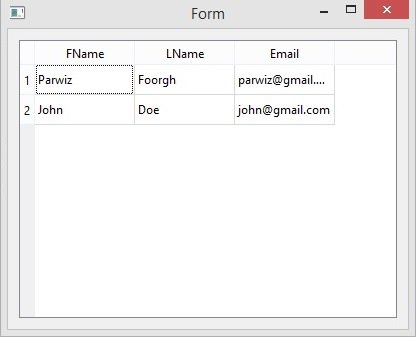
Run the complete code and this is the result.

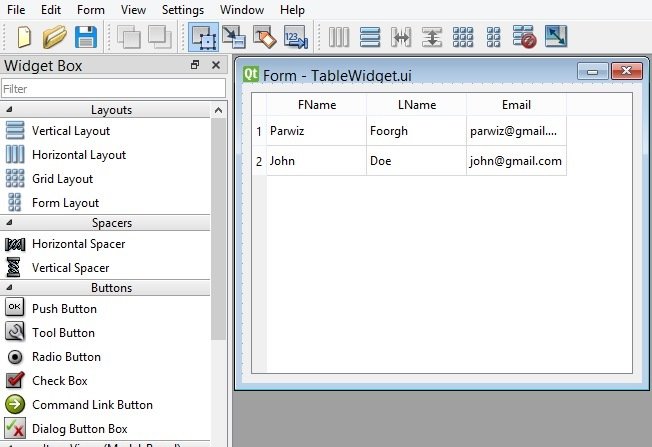
Now we want to use Qt Designer for creating QTableWidget, we can just write pyqt5designer in our terminal, after opening the Qt Designer we need to create Widgets window. now we add widgets in Qt Designer.
- Add a Vertical Layout in the Qt Designer
- Add a TableWidget item in the VBoxLayout
- Right click and add items in the column and rows
Now convert your UI file to Py file using this command.
|
1 |
pyuic6 -x TableWidget.ui -o mytablewidget.py |
This is the converted file.
|
1 2 3 4 5 6 7 8 9 10 11 12 13 14 15 16 17 18 19 20 21 22 23 24 25 26 27 28 29 30 31 32 33 34 35 36 37 38 39 40 41 42 43 44 45 46 47 48 49 50 51 52 53 54 55 56 57 58 59 60 61 62 63 64 65 66 67 68 69 70 71 72 73 74 75 76 77 78 |
from PyQt6 import QtCore, QtGui, QtWidgets class Ui_Form(object): def setupUi(self, Form): Form.setObjectName("Form") Form.resize(400, 300) self.horizontalLayout = QtWidgets.QHBoxLayout(Form) self.horizontalLayout.setObjectName("horizontalLayout") self.tableWidget = QtWidgets.QTableWidget(Form) self.tableWidget.setObjectName("tableWidget") self.tableWidget.setColumnCount(3) self.tableWidget.setRowCount(2) item = QtWidgets.QTableWidgetItem() self.tableWidget.setVerticalHeaderItem(0, item) item = QtWidgets.QTableWidgetItem() self.tableWidget.setVerticalHeaderItem(1, item) item = QtWidgets.QTableWidgetItem() self.tableWidget.setHorizontalHeaderItem(0, item) item = QtWidgets.QTableWidgetItem() self.tableWidget.setHorizontalHeaderItem(1, item) item = QtWidgets.QTableWidgetItem() self.tableWidget.setHorizontalHeaderItem(2, item) item = QtWidgets.QTableWidgetItem() self.tableWidget.setItem(0, 0, item) item = QtWidgets.QTableWidgetItem() self.tableWidget.setItem(0, 1, item) item = QtWidgets.QTableWidgetItem() self.tableWidget.setItem(0, 2, item) item = QtWidgets.QTableWidgetItem() self.tableWidget.setItem(1, 0, item) item = QtWidgets.QTableWidgetItem() self.tableWidget.setItem(1, 1, item) item = QtWidgets.QTableWidgetItem() self.tableWidget.setItem(1, 2, item) self.horizontalLayout.addWidget(self.tableWidget) self.retranslateUi(Form) QtCore.QMetaObject.connectSlotsByName(Form) def retranslateUi(self, Form): _translate = QtCore.QCoreApplication.translate Form.setWindowTitle(_translate("Form", "Form")) item = self.tableWidget.verticalHeaderItem(0) item.setText(_translate("Form", "1")) item = self.tableWidget.verticalHeaderItem(1) item.setText(_translate("Form", "2")) item = self.tableWidget.horizontalHeaderItem(0) item.setText(_translate("Form", "FName")) item = self.tableWidget.horizontalHeaderItem(1) item.setText(_translate("Form", "LName")) item = self.tableWidget.horizontalHeaderItem(2) item.setText(_translate("Form", "Email")) __sortingEnabled = self.tableWidget.isSortingEnabled() self.tableWidget.setSortingEnabled(False) item = self.tableWidget.item(0, 0) item.setText(_translate("Form", "Parwiz")) item = self.tableWidget.item(0, 1) item.setText(_translate("Form", "Foorgh")) item = self.tableWidget.item(0, 2) item.setText(_translate("Form", "parwiz@gmail.com")) item = self.tableWidget.item(1, 0) item.setText(_translate("Form", "John")) item = self.tableWidget.item(1, 1) item.setText(_translate("Form", "Doe")) item = self.tableWidget.item(1, 2) item.setText(_translate("Form", "john@gmail.com")) self.tableWidget.setSortingEnabled(__sortingEnabled) if __name__ == "__main__": import sys app = QtWidgets.QApplication(sys.argv) Form = QtWidgets.QWidget() ui = Ui_Form() ui.setupUi(Form) Form.show() sys.exit(app.exec()) |
Run the complete code and this is the result.