In this PyQt6 lesson we are going to learn about PyQt6 MySQL Database Programming, we will learn that how you can create database using GUI designer, how you can insert and retrieve data and how you can create a simple login in PyQt6 with MySQL database.
First we need to install MySQL Connector, it is MySQL driver written in Python which does not depend on MySQL C client libraries and implements the DB API v2.0 specification (PEP-249).
|
1 |
pip install mysql-connector-python |
After that you need to download and install WAMP Server, because we want to use wamp server as virtual server for mysql.
Creating MySQL Database
First we want to create our database using a GUI design, so open your Qt Designer using pyqt5designer.
- Add QLabel and QLineEdit make the layout horizontally
- Add two QPushButton make the layout horizontally
- Add QLabel below the QPushButton
- Make the main window layout vertically
- Add horizontal spacer between buttons and lineedit

Now we want to convert our UI file to Py file.
|
1 |
pyuic6 -x DatabaseCon.ui -o databasecon.py |
This is the converted file and we have added some codes for creating the database and database connection.
|
1 2 3 4 5 6 7 8 9 10 11 12 13 14 15 16 17 18 19 20 21 22 23 24 25 26 27 28 29 30 31 32 33 34 35 36 37 38 39 40 41 42 43 44 45 46 47 48 49 50 51 52 53 54 55 56 57 58 59 60 61 62 63 64 65 66 67 68 69 70 71 72 73 74 75 76 77 78 79 80 81 82 83 84 85 86 87 88 89 90 91 92 93 94 95 |
from PyQt6 import QtCore, QtGui, QtWidgets import mysql.connector as mc class Ui_Form(object): def setupUi(self, Form): Form.setObjectName("Form") Form.resize(426, 160) self.verticalLayout = QtWidgets.QVBoxLayout(Form) self.verticalLayout.setObjectName("verticalLayout") self.horizontalLayout = QtWidgets.QHBoxLayout() self.horizontalLayout.setObjectName("horizontalLayout") self.label = QtWidgets.QLabel(Form) self.label.setObjectName("label") self.horizontalLayout.addWidget(self.label) self.lineEdit = QtWidgets.QLineEdit(Form) self.lineEdit.setObjectName("lineEdit") self.horizontalLayout.addWidget(self.lineEdit) self.verticalLayout.addLayout(self.horizontalLayout) spacerItem = QtWidgets.QSpacerItem(20, 40, QtWidgets.QSizePolicy. Policy.Minimum, QtWidgets.QSizePolicy.Policy.Expanding) self.verticalLayout.addItem(spacerItem) self.horizontalLayout_2 = QtWidgets.QHBoxLayout() self.horizontalLayout_2.setObjectName("horizontalLayout_2") self.dbCreation = QtWidgets.QPushButton(Form) self.dbCreation.setObjectName("dbCreation") # connected the method to clicked signal self.dbCreation.clicked.connect(self.create_database) self.horizontalLayout_2.addWidget(self.dbCreation) self.dbConnection = QtWidgets.QPushButton(Form) self.dbConnection.setObjectName("dbConnection") #connected the method to clicked signal self.dbConnection.clicked.connect(self.db_connect) self.horizontalLayout_2.addWidget(self.dbConnection) self.verticalLayout.addLayout(self.horizontalLayout_2) self.label_2 = QtWidgets.QLabel(Form) font = QtGui.QFont() font.setPointSize(14) font.setBold(True) font.setWeight(75) self.label_2.setFont(font) self.label_2.setText("") self.label_2.setObjectName("label_2") self.verticalLayout.addWidget(self.label_2) self.retranslateUi(Form) QtCore.QMetaObject.connectSlotsByName(Form) #creating database in WAMP Server def create_database(self): try: mydb = mc.connect( host="localhost", user="root", password="" ) cursor = mydb.cursor() dbname = self.lineEdit.text() cursor.execute("CREATE DATABASE {}".format(dbname)) self.label_2.setText("Database {} created ".format(dbname)) except mc.Error as e: self.label_2.setText("Database creation failed") #Checking the database connection def db_connect(self): try: mydb = mc.connect( host="localhost", user="root", password="", database="pyqt6" ) self.label_2.setText("There is a connection") except mc.Error as e: self.label_2.setText("Error in connection") def retranslateUi(self, Form): _translate = QtCore.QCoreApplication.translate Form.setWindowTitle(_translate("Form", "Form")) self.label.setText(_translate("Form", "Database Name:")) self.dbCreation.setText(_translate("Form", "Database Creation")) self.dbConnection.setText(_translate("Form", "Database Connection")) if __name__ == "__main__": import sys app = QtWidgets.QApplication(sys.argv) Form = QtWidgets.QWidget() ui = Ui_Form() ui.setupUi(Form) Form.show() sys.exit(app.exec()) |
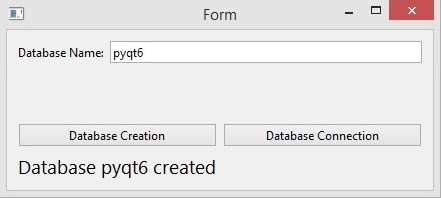
In the above code this is our method for creating the database in the WAMP Server, we can use connect() method from MySQL connection, you need to add the host, username and password as parameter, after that create the object of cursor(), also we need to get the value or database name from the QLineEdit, at the end just execute your query for creating the database.
|
1 2 3 4 5 6 7 8 9 10 11 12 13 |
def create_database(self): try: mydb = mc.connect( host="localhost", user="root", password="" ) cursor = mydb.cursor() dbname = self.lineEdit.text() cursor.execute("CREATE DATABASE {}".format(dbname)) self.label_2.setText("Database {} created ".format(dbname)) except mc.Error as e: self.label_2.setText("Database creation failed") |
Run the code give the database name and you have your database in WAMP server.
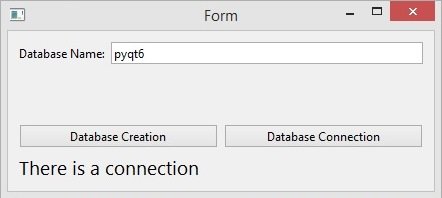
Using this code you can check database connection.
|
1 2 3 4 5 6 7 8 9 10 11 12 |
def db_connect(self): try: mydb = mc.connect( host="localhost", user="root", password="", database="pyqt6" ) self.label_2.setText("There is a connection") except mc.Error as e: self.label_2.setText("Error in connection") |
Click on the Database Connection button and this will be the result, if you change the database name you will get error.
Inserting Data to MySQL Database
Now we want to insert some data in to our database, first of all you need to create a table in your pyqt6 database, iam going to call it users, after that we design our GUI application for inserting data, open Qt Designer.
- Add two QLabel and two QLineEdit, make the layout horizontally
- Add QPushButton and QLabel.
- Make the main window layout vertically
- Add horizontally spacer between QLineEdit and QPushButton

Now convert your UI file to PY file.
|
1 |
pyuic6 -x InsertData.ui -o InsertData.py |
This is our converted file.
|
1 2 3 4 5 6 7 8 9 10 11 12 13 14 15 16 17 18 19 20 21 22 23 24 25 26 27 28 29 30 31 32 33 34 35 36 37 38 39 40 41 42 43 44 45 46 47 48 49 50 51 52 53 54 55 56 57 58 59 60 61 62 63 64 65 66 67 68 69 70 71 72 73 74 75 76 77 78 79 80 81 82 83 84 85 86 87 88 89 90 91 92 93 94 95 96 97 98 99 100 101 102 103 104 105 106 107 108 109 110 111 |
from PyQt6 import QtCore, QtGui, QtWidgets import mysql.connector as mc class Ui_Form(object): def setupUi(self, Form): Form.setObjectName("Form") Form.resize(463, 265) self.verticalLayout_2 = QtWidgets.QVBoxLayout(Form) self.verticalLayout_2.setObjectName("verticalLayout_2") self.horizontalLayout = QtWidgets.QHBoxLayout() self.horizontalLayout.setObjectName("horizontalLayout") self.label = QtWidgets.QLabel(Form) font = QtGui.QFont() font.setPointSize(12) font.setBold(True) font.setWeight(75) self.label.setFont(font) self.label.setObjectName("label") self.horizontalLayout.addWidget(self.label) self.lineEdit = QtWidgets.QLineEdit(Form) font = QtGui.QFont() font.setPointSize(12) self.lineEdit.setFont(font) self.lineEdit.setObjectName("lineEdit") self.horizontalLayout.addWidget(self.lineEdit) self.verticalLayout_2.addLayout(self.horizontalLayout) self.horizontalLayout_2 = QtWidgets.QHBoxLayout() self.horizontalLayout_2.setObjectName("horizontalLayout_2") self.label_2 = QtWidgets.QLabel(Form) font = QtGui.QFont() font.setPointSize(12) font.setBold(True) font.setWeight(75) self.label_2.setFont(font) self.label_2.setObjectName("label_2") self.horizontalLayout_2.addWidget(self.label_2) self.lineEdit_2 = QtWidgets.QLineEdit(Form) font = QtGui.QFont() font.setPointSize(12) self.lineEdit_2.setFont(font) self.lineEdit_2.\ setEchoMode(QtWidgets.QLineEdit.EchoMode.Password) self.lineEdit_2.setObjectName("lineEdit_2") self.horizontalLayout_2.addWidget(self.lineEdit_2) self.verticalLayout_2.addLayout(self.horizontalLayout_2) spacerItem = QtWidgets.QSpacerItem(20, 40, QtWidgets.QSizePolicy. Policy.Minimum, QtWidgets.QSizePolicy.Policy.Expanding) self.verticalLayout_2.addItem(spacerItem) self.verticalLayout = QtWidgets.QVBoxLayout() self.verticalLayout.setObjectName("verticalLayout") self.pushButton = QtWidgets.QPushButton(Form) self.pushButton.clicked.connect(self.insert_data) font = QtGui.QFont() font.setPointSize(12) self.pushButton.setFont(font) self.pushButton.setObjectName("pushButton") self.verticalLayout.addWidget(self.pushButton) self.label_3 = QtWidgets.QLabel(Form) font = QtGui.QFont() font.setPointSize(14) self.label_3.setFont(font) self.label_3.setObjectName("label_3") self.verticalLayout.addWidget(self.label_3) self.verticalLayout_2.addLayout(self.verticalLayout) self.retranslateUi(Form) QtCore.QMetaObject.connectSlotsByName(Form) def insert_data(self): try: mydb = mc.connect( host="localhost", user="root", password="", database="pyqt6" ) mycursor = mydb.cursor() email = self.lineEdit.text() password = self.lineEdit_2.text() query = "INSERT INTO users (email, password) VALUES (%s, %s)" value = (email, password) mycursor.execute(query, value) mydb.commit() self.label_3.setText("Data has been inserted ") except mc.Error as e: self.label_3.setText("Error Inserting Data") def retranslateUi(self, Form): _translate = QtCore.QCoreApplication.translate Form.setWindowTitle(_translate("Form", "Form")) self.label.setText(_translate("Form", "Email:")) self.label_2.setText(_translate("Form", "Password:")) self.pushButton.setText(_translate("Form", "Insert Data")) self.label_3.setText(_translate("Form", "TextLabel")) if __name__ == "__main__": import sys app = QtWidgets.QApplication(sys.argv) Form = QtWidgets.QWidget() ui = Ui_Form() ui.setupUi(Form) Form.show() sys.exit(app.exec()) |
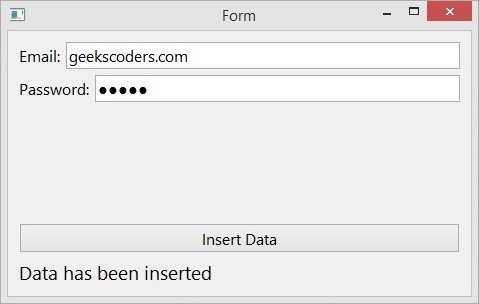
And this is the method for inserting the data, we have connected this method with the clicked signal of the QPushButton, this is the change that we have brought to our file, first we have created our database connection code and after that we have got the value from the QLineEdits, at the end we have executed our query for inserting the data.
|
1 2 3 4 5 6 7 8 9 10 11 12 13 14 15 16 17 18 19 20 21 22 23 |
def insert_data(self): try: mydb = mc.connect( host="localhost", user="root", password="", database="pyqt6" ) mycursor = mydb.cursor() email = self.lineEdit.text() password = self.lineEdit_2.text() query = "INSERT INTO users (email, password) VALUES (%s, %s)" value = (email, password) mycursor.execute(query, value) mydb.commit() self.label_3.setText("Data has been inserted ") except mc.Error as e: self.label_3.setText("Error Inserting Data") |
Run the code and insert the data this will be the result.
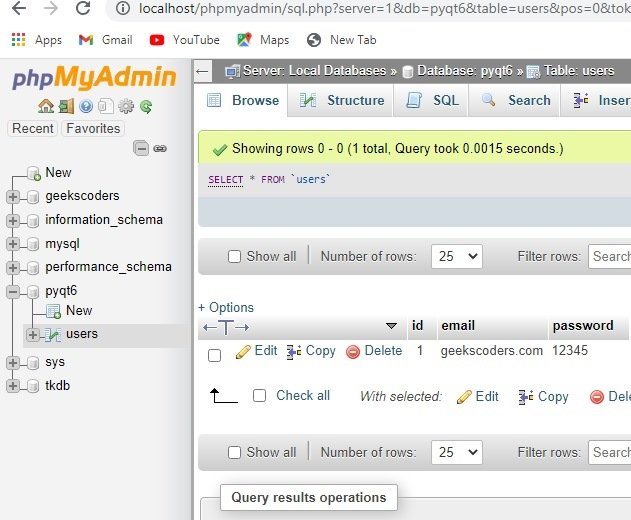
Check your Wamp Server and we have the data.
Retrieving Data from MySQL in QTableWidget
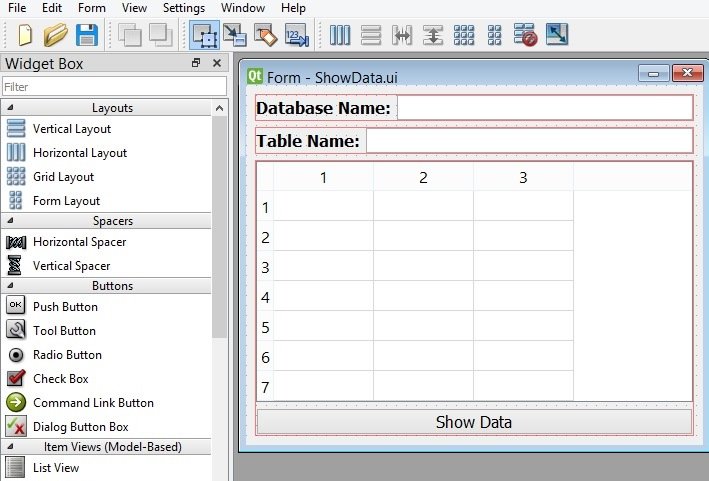
Now we want to retrieve data from MySQL database in to QTableWidget, open your Qt Designer.
- Add two QLabel and two QLineEdit, make the layout horizontally
- Add QTableWidget,add column row and column count
- Add QPushButton
- Make the main window layout vertically
Now convert your UI file to PY file.
|
1 |
pyuic6 -x ShowData.ui -o ShowData.py |
This is the converted file, also we have added a new method in here for showing the data in the QTableWidget, we have connected the method with the clicked signal of QPushButton.
|
1 2 3 4 5 6 7 8 9 10 11 12 13 14 15 16 17 18 19 20 21 22 23 24 25 26 27 28 29 30 31 32 33 34 35 36 37 38 39 40 41 42 43 44 45 46 47 48 49 50 51 52 53 54 55 56 57 58 59 60 61 62 63 64 65 66 67 68 69 70 71 72 73 74 75 76 77 78 79 80 81 82 83 84 85 86 87 88 89 90 91 92 93 94 95 96 97 98 99 100 101 102 103 104 105 106 107 108 109 110 111 |
from PyQt6 import QtCore, QtGui, QtWidgets from PyQt6.QtWidgets import QTableWidgetItem import mysql.connector as mc class Ui_Form(object): def setupUi(self, Form): Form.setObjectName("Form") Form.resize(457, 360) self.verticalLayout_2 = QtWidgets.QVBoxLayout(Form) self.verticalLayout_2.setObjectName("verticalLayout_2") self.horizontalLayout = QtWidgets.QHBoxLayout() self.horizontalLayout.setObjectName("horizontalLayout") self.label = QtWidgets.QLabel(Form) font = QtGui.QFont() font.setPointSize(12) font.setBold(True) font.setWeight(75) self.label.setFont(font) self.label.setObjectName("label") self.horizontalLayout.addWidget(self.label) self.lineEdit = QtWidgets.QLineEdit(Form) font = QtGui.QFont() font.setPointSize(12) self.lineEdit.setFont(font) self.lineEdit.setObjectName("lineEdit") self.horizontalLayout.addWidget(self.lineEdit) self.verticalLayout_2.addLayout(self.horizontalLayout) self.horizontalLayout_2 = QtWidgets.QHBoxLayout() self.horizontalLayout_2.setObjectName("horizontalLayout_2") self.label_2 = QtWidgets.QLabel(Form) font = QtGui.QFont() font.setPointSize(12) font.setBold(True) font.setWeight(75) self.label_2.setFont(font) self.label_2.setObjectName("label_2") self.horizontalLayout_2.addWidget(self.label_2) self.lineEdit_2 = QtWidgets.QLineEdit(Form) font = QtGui.QFont() font.setPointSize(12) self.lineEdit_2.setFont(font) self.lineEdit_2.setObjectName("lineEdit_2") self.horizontalLayout_2.addWidget(self.lineEdit_2) self.verticalLayout_2.addLayout(self.horizontalLayout_2) self.verticalLayout = QtWidgets.QVBoxLayout() self.verticalLayout.setObjectName("verticalLayout") self.tableWidget = QtWidgets.QTableWidget(Form) font = QtGui.QFont() font.setPointSize(12) self.tableWidget.setFont(font) self.tableWidget.setRowCount(7) self.tableWidget.setColumnCount(3) self.tableWidget.setObjectName("tableWidget") self.verticalLayout.addWidget(self.tableWidget) self.pushButton = QtWidgets.QPushButton(Form) font = QtGui.QFont() font.setPointSize(12) self.pushButton.setFont(font) self.pushButton.setObjectName("pushButton") self.pushButton.clicked.connect(self.show_data) self.verticalLayout.addWidget(self.pushButton) self.verticalLayout_2.addLayout(self.verticalLayout) self.retranslateUi(Form) QtCore.QMetaObject.connectSlotsByName(Form) def show_data(self): try: dbname = self.lineEdit.text() tablename = self.lineEdit_2.text() mydb = mc.connect( host="localhost", user="root", password="", database=dbname ) mycursor = mydb.cursor() mycursor.execute("SELECT * FROM {}".format(tablename)) result = mycursor.fetchall() self.tableWidget.setRowCount(0) for row_number, row_data in enumerate(result): self.tableWidget.insertRow(row_number) for column_number, data in enumerate(row_data): self.tableWidget.setItem(row_number, column_number, QTableWidgetItem(str(data))) except mc.Error as e: print("Error occured") def retranslateUi(self, Form): _translate = QtCore.QCoreApplication.translate Form.setWindowTitle(_translate("Form", "Form")) self.label.setText(_translate("Form", "Database Name:")) self.label_2.setText(_translate("Form", "Table Name:")) self.pushButton.setText(_translate("Form", "Show Data")) if __name__ == "__main__": import sys app = QtWidgets.QApplication(sys.argv) Form = QtWidgets.QWidget() ui = Ui_Form() ui.setupUi(Form) Form.show() sys.exit(app.exec()) |
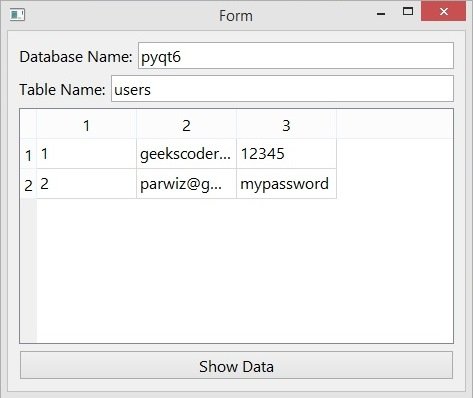
Run the code, give the database and table name, this will be the result.
Creating Simple Login in PyQt6 with MySQL
Now we want to create a simple login with MySQL database in PyQt6, Open your Qt Designer, you can just write pyqt5designer in your terminal, after opening the Qt Designer you need to create Widget window. now we add widgets in Qt Designer.
- Add an HBoxLayout in QHBoxLayout add a label and lineedit
- Add another HBoxLayout, you need to also add a label and lineedit in this layout
- Add a VBoxLayout, in this layout add a QLabel with a QPushButton
- At the end click on the main window and select layout vertically for all widgets
- Also you need to add a vertical spacer between the lineedits and button.

After completing the design you need to save the .ui file, iam going to name it Login.ui, now convert the file to py.
|
1 |
pyuic6 -x Login.ui -o login.py |
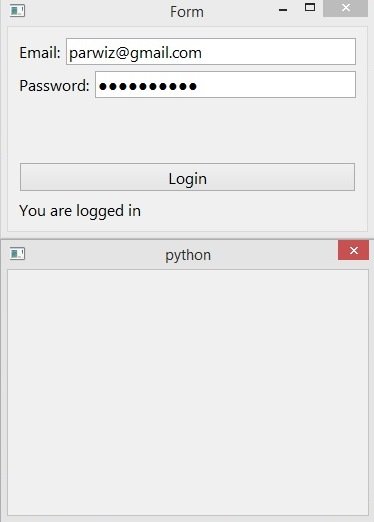
This is the converted file, we have added one method in our file and that is for login, first we want to get the email and password from the user and after we compare that with the registered email and password of our database. in the successful login we want to open the second dialog.
|
1 2 3 4 5 6 7 8 9 10 11 12 13 14 15 16 17 18 19 20 21 22 23 24 25 26 27 28 29 30 31 32 33 34 35 36 37 38 39 40 41 42 43 44 45 46 47 48 49 50 51 52 53 54 55 56 57 58 59 60 61 62 63 64 65 66 67 68 69 70 71 72 73 74 75 76 77 78 79 80 81 82 83 84 85 86 87 88 89 90 91 92 93 94 95 96 97 98 99 100 101 102 103 104 105 106 107 108 109 110 111 112 113 114 115 116 117 118 |
from PyQt6 import QtCore, QtGui, QtWidgets import mysql.connector as mc from PyQt6.QtWidgets import QDialog class Ui_Form(object): def setupUi(self, Form): Form.setObjectName("Form") Form.resize(359, 281) self.verticalLayout_2 = QtWidgets.QVBoxLayout(Form) self.verticalLayout_2.setObjectName("verticalLayout_2") self.horizontalLayout = QtWidgets.QHBoxLayout() self.horizontalLayout.setObjectName("horizontalLayout") self.label = QtWidgets.QLabel(Form) font = QtGui.QFont() font.setPointSize(12) font.setBold(True) font.setWeight(75) self.label.setFont(font) self.label.setObjectName("label") self.horizontalLayout.addWidget(self.label) self.lineEdit = QtWidgets.QLineEdit(Form) font = QtGui.QFont() font.setPointSize(12) self.lineEdit.setFont(font) self.lineEdit.setObjectName("lineEdit") self.horizontalLayout.addWidget(self.lineEdit) self.verticalLayout_2.addLayout(self.horizontalLayout) self.horizontalLayout_2 = QtWidgets.QHBoxLayout() self.horizontalLayout_2.setObjectName("horizontalLayout_2") self.label_2 = QtWidgets.QLabel(Form) font = QtGui.QFont() font.setPointSize(12) font.setBold(True) font.setWeight(75) self.label_2.setFont(font) self.label_2.setObjectName("label_2") self.horizontalLayout_2.addWidget(self.label_2) self.lineEdit_2 = QtWidgets.QLineEdit(Form) font = QtGui.QFont() font.setPointSize(12) self.lineEdit_2.setFont(font) self.lineEdit_2.setEchoMode(QtWidgets.QLineEdit. EchoMode.Password) self.lineEdit_2.setObjectName("lineEdit_2") self.horizontalLayout_2.addWidget(self.lineEdit_2) self.verticalLayout_2.addLayout(self.horizontalLayout_2) spacerItem = QtWidgets.QSpacerItem(20, 40, QtWidgets. QSizePolicy.Policy.Minimum, QtWidgets.QSizePolicy.Policy.Expanding) self.verticalLayout_2.addItem(spacerItem) self.verticalLayout = QtWidgets.QVBoxLayout() self.verticalLayout.setObjectName("verticalLayout") self.pushButton = QtWidgets.QPushButton(Form) self.pushButton.clicked.connect(self.login) font = QtGui.QFont() font.setPointSize(12) self.pushButton.setFont(font) self.pushButton.setObjectName("pushButton") self.verticalLayout.addWidget(self.pushButton) self.label_3 = QtWidgets.QLabel(Form) font = QtGui.QFont() font.setPointSize(12) font.setBold(True) font.setWeight(75) self.label_3.setFont(font) self.label_3.setText("") self.label_3.setObjectName("label_3") self.verticalLayout.addWidget(self.label_3) self.verticalLayout_2.addLayout(self.verticalLayout) self.retranslateUi(Form) QtCore.QMetaObject.connectSlotsByName(Form) def login(self): try: email = self.lineEdit.text() password = self.lineEdit_2.text() mydb = mc.connect( host="localhost", user="root", password="", database="pyqt6" ) mycursor = mydb.cursor() query = "SELECT email,password from users where " \ "email like '" + email + "'and password like '" + password + "'" mycursor.execute(query) result = mycursor.fetchone() if result == None: self.label_3.setText("Incorrect email or password") else: self.label_3.setText("You are logged in") mydialog = QDialog() mydialog.setModal(True) mydialog.exec() except mc.Error as e: self.label_3.setText("Error") def retranslateUi(self, Form): _translate = QtCore.QCoreApplication.translate Form.setWindowTitle(_translate("Form", "Form")) self.label.setText(_translate("Form", "Email:")) self.label_2.setText(_translate("Form", "Password:")) self.pushButton.setText(_translate("Form", "Login")) if __name__ == "__main__": import sys app = QtWidgets.QApplication(sys.argv) Form = QtWidgets.QWidget() ui = Ui_Form() ui.setupUi(Form) Form.show() sys.exit(app.exec()) |
Run the complete code give the correct email and password you will see the second dialog.