
In this article we want to talk about Creating Menus in Tkinter: Step-by-Step Guide, Tkinter is Python GUI library that provides developers with different tools to create good interfaces. one of the key components of GUI application is it is menu system. Menus provide users with hierarchical structure to navigate through the application’s features and settings. in this article,we will are going to explore step by step process of creating menus in Tkinter.
first step in creating Tkinter menu is to import the library. this can be done with following code:
|
1 |
import tkinter as tk |
After that we need to create root window, which will serve as the main container for application. this can be done with below code:
|
1 |
root = tk.Tk() |
So menu bar is top level menu that appears at the top of window. this can be created with following code:
|
1 |
menu_bar = tk.Menu(root) |
File menu is the first level menu that allows users to open, save or close a file. you can use this code for that:
|
1 2 3 4 5 |
file_menu = tk.Menu(menu_bar, tearoff=0) file_menu.add_command(label="Open") file_menu.add_command(label="Save") file_menu.add_separator() file_menu.add_command(label="Exit", command=root.quit) |
edit menu is another first level menu that allows users to cut, copy and paste text or other objects. you can use this code for that:
|
1 2 3 4 |
edit_menu = tk.Menu(menu_bar, tearoff=0) edit_menu.add_command(label="Cut") edit_menu.add_command(label="Copy") edit_menu.add_command(label="Paste") |
After creating menus we need to add those to the menu bar. you can use this code for that:
|
1 2 |
menu_bar.add_cascade(label="File", menu=file_menu) menu_bar.add_cascade(label="Edit", menu=edit_menu) |
For displaying the menu bar root window needs to be configured to display the menu bar:
|
1 |
root.config(menu=menu_bar) |
At the end we need to run our TKinter application, to run the application we need to enter the main event loop:
|
1 |
root.mainloop() |
This is the complete code for Creating Menus in Tkinter: Step-by-Step Guide
|
1 2 3 4 5 6 7 8 9 10 11 12 13 14 15 16 17 18 19 20 21 22 23 |
import tkinter as tk root = tk.Tk() menu_bar = tk.Menu(root) file_menu = tk.Menu(menu_bar, tearoff=0) file_menu.add_command(label="Open") file_menu.add_command(label="Save") file_menu.add_separator() file_menu.add_command(label="Exit", command=root.quit) edit_menu = tk.Menu(menu_bar, tearoff=0) edit_menu.add_command(label="Cut") edit_menu.add_command(label="Copy") edit_menu.add_command(label="Paste") menu_bar.add_cascade(label="File", menu=file_menu) menu_bar.add_cascade(label="Edit", menu=edit_menu) root.config(menu=menu_bar) root.mainloop() |
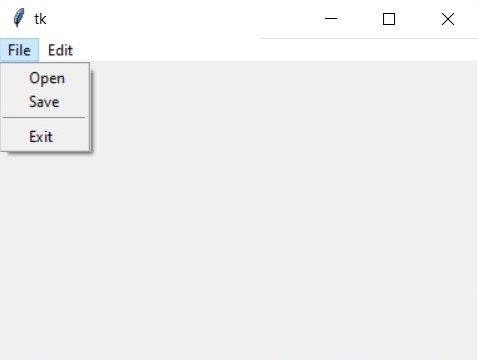
Run the complete code and this will be the result
Learn More on Python
- PyQt5 QTableWidget Tutorial: Create a Dynamic Table
- Create GUI Applications with Python & TKinter
- Python TKinter Layout Management
- How to Create Label in TKinter
- How to Create Buttin in Python TKinter
- Build Music Player in Python TKinter
- Python GUI Programming with TKinter
- TKinter VS PyQt, Which one is Good
- Creating Custom Widgets in TKinter
Creating menus in Tkinter is simple process that involves creating root window, menu bar and menus themselves. once we have created the menus we need to add those to the menu bar, and root window needs to be configured to display menu bar. with these steps you can create nice menus.
