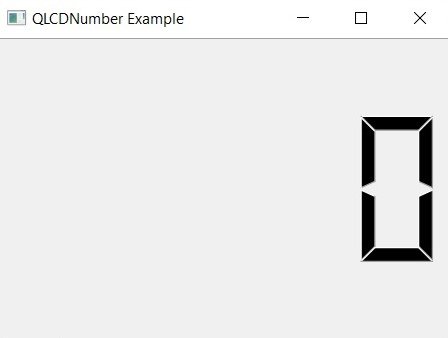
In this lesson we want to learn about Python PySide6 QLCDNumber, for creating QLCDNumber widget in PySide6, you can use the QLCDNumber() constructor. QLCDNumber widget can be created with specific number of digits and with or without a decimal point. Here is an example:
|
1 2 3 4 5 6 7 8 9 10 11 12 13 14 15 16 17 18 19 20 21 22 |
from PySide6.QtWidgets import QApplication, QMainWindow, QLCDNumber import sys class LCDExample(QMainWindow): def __init__(self): super().__init__() # create a QLCDNumber widget with 5 digits and no decimal point lcd = QLCDNumber(self) lcd.setDigitCount(5) # set the window geometry and title, and show the window self.setGeometry(300, 300, 300, 200) self.setWindowTitle('QLCDNumber Example') self.setCentralWidget(lcd) self.show() if __name__ == '__main__': app = QApplication(sys.argv) window = LCDExample() sys.exit(app.exec()) |
In above example we have created new PySide6 application and QMainWindow object. after that we created QLCDNumber object with 5 digits and no decimal point, and set it as the central widget of the main window. and at the end we set the window geometry and title and show the window.
Run the complete code and this will be the result.
Customizing the QLCDNumber Widget
QLCDNumber widget can be customized in many ways to suit your needs. some of the properties that can be customized include the number of digits, the decimal point, the display mode and the palette. these are some examples:
Setting the Number of Digits
You can set the number of digits in the QLCDNumber widget using the setDigitCount() method. this is the example:
|
1 |
lcd.setDigitCount(6) |
This will set the number of digits in the widget to 6.
Setting the Decimal Point
You can display decimal point in QLCDNumber widget by setting the setSmallDecimalPoint() property to True. this is an example:
|
1 |
lcd.setSmallDecimalPoint(True) |
This will display a small decimal point in the widget.
Setting the Display Mode
QLCDNumber widget can be displayed in several modes, including hex, decimal and octal. you can set the display mode using the setMode() method. this is an example:
|
1 |
lcd.setMode(QLCDNumber.Hex) |
This will set the display mode to hexadecimal.
Setting the Palette
You can change the color scheme of the QLCDNumber widget by setting palette using setPalette() method. this is an example:
|
1 2 3 |
palette = lcd.palette() palette.setColor(palette.WindowText, Qt.red) lcd.setPalette(palette) |
This will set the text color of the widget to red.
Using the QLCDNumber Widget
QLCDNumber widget is useful for displaying numerical values in your applications. you can set value of the widget using display() method. this is an example:
|
1 |
lcd.display(12345) |
This will set value of the widget to 12345.
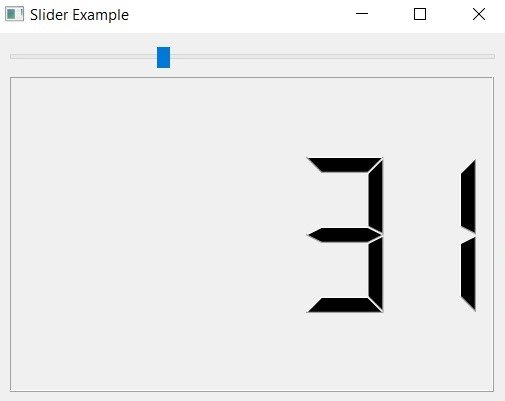
Now let’s add functionality of signals and slots to our app, this is an example of using signals and slots with QSlider and QLCDNumber widget. in this example the QSlider will be used to adjust the value displayed in the QLCDNumber widget:
|
1 2 3 4 5 6 7 8 9 10 11 12 13 14 15 16 17 18 19 20 21 22 23 24 25 26 27 28 29 30 31 32 33 34 35 36 |
from PySide6.QtCore import Qt from PySide6.QtWidgets import QApplication, QSlider, QLCDNumber, QVBoxLayout, QWidget import sys class Example(QWidget): def __init__(self): super().__init__() # create a QSlider widget and set its orientation to horizontal slider = QSlider(Qt.Horizontal) # create a QLCDNumber widget with 5 digits and no decimal point lcd = QLCDNumber(5) # create a QVBoxLayout to hold the widgets vbox = QVBoxLayout() vbox.addWidget(slider) vbox.addWidget(lcd) self.setLayout(vbox) # connect the valueChanged signal of the slider to the display slot of the lcd widget slider.valueChanged.connect(lcd.display) # set the window geometry and title, and show the window self.setGeometry(300, 300, 300, 200) self.setWindowTitle('Slider Example') self.show() if __name__ == '__main__': app = QApplication(sys.argv) ex = Example() sys.exit(app.exec()) |
In this example we have created new PySide6 application and QMainWindow object. after that we have created QSlider object with horizontal orientation and QLCDNumber object with 5 digits and no decimal point. after that we connect valueChanged signal of slider to the display slot of lcd widget, so that whenever the value of slider changes, the value displayed in the lcd widget will be updated. finally we set the window geometry and title and show the window.
display() method of QLCDNumber widget is slot which means it can be connected to signal. in this case we are connecting it to the valueChanged signal of QSlider widget, which is emitted whenever the value of the slider changes.
When the valueChanged signal is emitted by QSlider widget, the display() slot of QLCDNumber widget will be called with the new value of the slider as its argument. this will update the value displayed in the QLCDNumber widget to match the value of the slider.
Overall, this example demonstrates the power and flexibility of signals and slots in PySide6, and how they can be used to create responsive and interactive GUI applications.
Run the complete code and change the slider this will be the result.