In this lesson we want to learn about Python PySide6 QTableWidget, QTableWidget is subclass of the QAbstractItemView class and is used to display and edit tabular data. It is particularly useful when you want to display data in a table format, where each row represents an item or record, and each column represents a data field or attribute.
Creating a QTableWidget
For creating QTableWidget in PySide6, you can use the following code:
|
1 2 3 4 5 6 7 8 9 10 11 12 13 14 15 16 17 18 19 20 21 22 23 24 25 26 27 28 29 30 |
from PySide6.QtWidgets import QApplication, QTableWidget, QTableWidgetItem # Create the application app = QApplication([]) # Create a QTableWidget instance table = QTableWidget() # Set the number of rows and columns in the table table.setRowCount(4) table.setColumnCount(2) # Set the headers for the table table.setHorizontalHeaderLabels(['Name', 'Age']) # Populate the table with data table.setItem(0, 0, QTableWidgetItem('Bob')) table.setItem(0, 1, QTableWidgetItem('25')) table.setItem(1, 0, QTableWidgetItem('John')) table.setItem(1, 1, QTableWidgetItem('30')) table.setItem(2, 0, QTableWidgetItem('Charlie')) table.setItem(2, 1, QTableWidgetItem('35')) table.setItem(3, 0, QTableWidgetItem('David')) table.setItem(3, 1, QTableWidgetItem('40')) # Show the table table.show() # Run the application app.exec() |
In this code we have created QTableWidget instance, set the number of rows and columns in the table, set the headers for the table, and populate the table with data using the setItem method. finally we have showed the table and run the application using the show and exec methods.
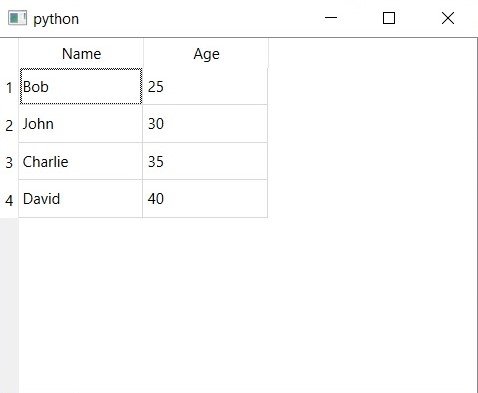
Run the code and this will be the result.
Styling a QTableWidget
By default QTableWidget has plain and unstyled appearance. however you can customize its appearance using style sheets. for example to change the background color of QTableWidget, you can use the following code:
|
1 2 3 4 5 |
# Create the QTableWidget table = QTableWidget() # Set the style sheet for the QTableWidget table.setStyleSheet('background-color: #F5F5F5;') |
In this code, we set the background color of the QTableWidget to a light gray color using a style sheet.
You can also set font and font size of the headers and cells using style sheets. for example to set the font of the headers to bold and increase the font size of the cells you can use the following code:
|
1 2 3 |
# Set the style sheet for the QTableWidget table.setStyleSheet('QHeaderView::section { font-weight: bold; }' 'QTableWidget { font-size: 16px; }') |
In this code we set the font of the headers to bold using the QHeaderView::section selector and increase the font size of the cells using the QTableWidget selector.
This is OOP code for QTableWidget
|
1 2 3 4 5 6 7 8 9 10 11 12 13 14 15 16 17 18 19 20 21 22 23 24 25 26 27 28 29 30 31 32 33 34 35 36 37 38 39 40 41 42 43 44 45 |
from PySide6.QtWidgets import QApplication, QTableWidget, QTableWidgetItem, QVBoxLayout, QWidget class TableWidget(QWidget): def __init__(self, data): super().__init__() self.data = data self.initUI() def initUI(self): # Create a QTableWidget instance self.table = QTableWidget() # Set the number of rows and columns in the table self.table.setRowCount(len(self.data)) self.table.setColumnCount(len(self.data[0])) # Set the headers for the table headers = [str(i) for i in range(len(self.data[0]))] self.table.setHorizontalHeaderLabels(headers) # Populate the table with data for i, row in enumerate(self.data): for j, item in enumerate(row): self.table.setItem(i, j, QTableWidgetItem(str(item))) # Set the layout layout = QVBoxLayout() layout.addWidget(self.table) self.setLayout(layout) if __name__ == '__main__': # Create the application app = QApplication([]) # Create the table data data = [['Alice', 25], ['Bob', 30], ['Charlie', 35], ['David', 40]] # Create the TableWidget instance table_widget = TableWidget(data) # Show the TableWidget table_widget.show() # Run the application app.exec() |
In this code we have created TableWidget class that inherits from QWidget. TableWidget class takes the table data as an argument in its constructor and initializes the UI in the initUI method. initUI method creates QTableWidget instance, sets the number of rows and columns, sets the headers, populates the table with data and sets the layout.
For using TableWidget class we have created an instance of it with the table data and show it. The app.exec() method starts the event loop which allows application to run.
