In this PyQt5 Tutorial we are going to learn about Creating Menus and Toolbars, so PyQt5 is popular Python library used for creating desktop applications with graphical user interface (GUI). In this tutorial we are going to learn about creating menus and toolbars using PyQt5.
To follow this this tutorial, you will need to have PyQt5 installed on your computer. you can install it using pip in your terminal.
|
1 |
pip install PyQt5 |
You will also need code editor or an integrated development environment (IDE) such as PyCharm or Visual Studio Code.
OK now first of all we need to create basic PyQt5 application that we will use to demonstrate how to create menus and toolbars. open your code editor or IDE and create new Python file, after that add this code.
|
1 2 3 4 5 6 7 8 9 10 11 12 13 14 15 16 17 18 19 20 21 22 23 24 |
import sys from PyQt5.QtWidgets import QApplication, QMainWindow class App(QMainWindow): def __init__(self): super().__init__() self.title = 'GeeksCoders.com' self.left = 100 self.top = 100 self.width = 800 self.height = 600 self.MyUI() def MyUI(self): self.setWindowTitle(self.title) self.setGeometry(self.left, self.top, self.width, self.height) self.show() if __name__ == '__main__': app = QApplication(sys.argv) ex = App() sys.exit(app.exec_()) |
In the above code we have imported necessary modules from PyQt5 and defined a class named App which extends from QMainWindow. after that we have defined the constructor to set the window’s title, size and position. then we called the MyUI method, which sets the window’s title and geometry and displays it on the screen.
Run the complete code and this will be the result

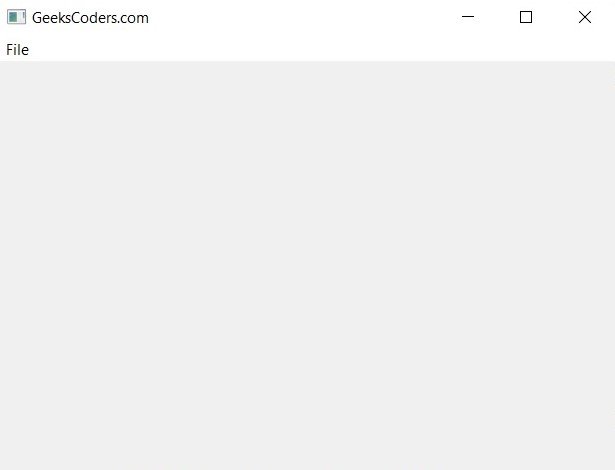
Now that we have created our basic application, let’s add menu bar to our application. Menus are standard user interface element that allow users to perform different actions within an application. we can create menu bar by creating QMenuBar object and adding it to the main window.
|
1 2 3 4 5 6 7 8 9 10 11 12 13 14 15 16 17 18 19 20 21 22 23 24 25 26 27 28 |
import sys from PyQt5.QtWidgets import QApplication, QMainWindow class App(QMainWindow): def __init__(self): super().__init__() self.title = 'GeeksCoders.com' self.left = 100 self.top = 100 self.width = 800 self.height = 600 self.MyUI() def MyUI(self): self.setWindowTitle(self.title) self.setGeometry(self.left, self.top, self.width, self.height) menu_bar = self.menuBar() file_menu = menu_bar.addMenu('File') self.show() if __name__ == '__main__': app = QApplication(sys.argv) ex = App() sys.exit(app.exec_()) |
In the above code we have created QMenuBar object and assigned it to the menu_bar variable. after that we have created QMenu object named file_menu and added it to the menu bar using the addMenu method.
Run the complete code and this will be the result
Learn More on Python
- PyQt5 QTableWidget Tutorial: Create a Dynamic Table
- Create GUI Applications with Python & TKinter
- Python TKinter Layout Management
- How to Create Label in TKinter
- How to Create Buttin in Python TKinter
- Build Music Player in Python TKinter
- Python GUI Programming with TKinter
- TKinter VS PyQt, Which one is Good
- Creating Custom Widgets in TKinter
- How to Create Menus in TKinter