In this lesson we want to learn about PyQt6: The Ultimate GUI Toolkit for Python Developers.
Introduction:
PyQt6 is powerful and user friendly GUI library for Python. it has easy to learn syntax and different features, PyQt6 is the perfect choice for developers looking to create nice and functional user interfaces. In this article we are going to explore what makes PyQt6 the ultimate GUI toolkit for Python developers, and why it is must have tool for your next project.
Key Features:
- Cross-Platform Compatibility: One of the biggest advantages of PyQt6 is its cross platform compatibility. if you are developing for Windows, Mac or Linux, PyQt6 makes it easy to create beautiful and functional user interfaces that look and feel great on any platform. with PyQt6 you can be sure that your user interfaces will look and work the same across all platforms, making it easier for you to reach your target audience.
- Wide Range of Widgets and Features: PyQt6 offers different widgets and features that make it easy to create beautiful and functional user interfaces. from buttons and text boxes to calendars and image displays, PyQt6 has everything you need to create perfect user interface for your project. with its nice and easy to use syntax you can be sure that you are using the right tool for your job.
- Large Community and Support: PyQt6 has large and active community of developers who contribute to the library. it has various resources, tutorials and supports available online. it is easy to find help when you need it. whether you are just starting new with GUI development or are an experienced developer, PyQt6 community has a lot of things.
- Advanced Features and Capabilities: PyQt6 is packed with advanced features and capabilities that make it easy to create professional grade user interfaces. from its support for high DPI displays and device independent pixel scaling, to its advanced styling and animation features, PyQt6 has everything you need to create beautiful and functional user interfaces.
- Easy Integration with Other Tools: PyQt6 integrates easily with other tools and technologies, this makes it great choice for developers who want to build complex and sophisticated applications. if you are using other libraries and frameworks or working with databases and APIs, PyQt6 makes it easy to add advanced functionality to your user interfaces.
How to Install PyQt6:
PyQt6 can be installed using the pip, these are the steps to install PyQt6:
- Install Python: First of all you need to install Python, you can download and install it from the official Python website (https://www.python.org/).
- Install pip: Pip is the package manager for Python and is used to install and manage packages. if pip is not install you need to install that, you can download it from the official pip website (https://pip.pypa.io/en/stable/installation/).
- Install PyQt6: Once you have pip installed, you can install PyQt6 by running the following command in your terminal or command prompt:
|
1 |
pip install PyQt6 |
- Verify Installation: You can verify that PyQt6 is installed by running the following command in your terminal or command prompt:
|
1 |
pip show PyQt6 |
This will display information about PyQt6 package, including version number and location on your system.
With these steps you should now have PyQt6 installed on your computer and be ready to start using it for your next project!
Example on Python PyQt6
This is basic example of creating a window using PyQt6:
|
1 2 3 4 5 6 7 8 9 10 11 12 13 |
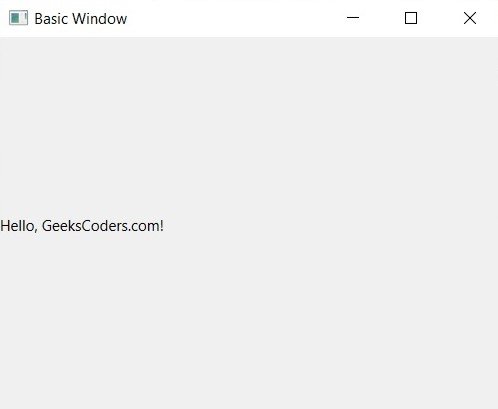
import sys from PyQt6.QtWidgets import QApplication, QMainWindow, QLabel app = QApplication(sys.argv) window = QMainWindow() window.setWindowTitle("Basic Window") window.resize(400, 300) label = QLabel("Hello, GeeksCoders.com!") window.setCentralWidget(label) window.show() sys.exit(app.exec()) |
In this code first of all we have created an instance of QApplication class, which is the main class for PyQt6 application. after that we have created an instance of QMainWindow class, which represents the main window of our application.
We set the window title to “Basic Window” and resize it to 400×300 pixels. after that we have created an instance of the QLabel class, which is widget used to display text or images. we set the label’s text to “Hello, Geekscoders.com!” and make it the central widget of the main window.
and at the end we call window.show() to display the main window and app.exec() to start the application’s event loop. the application will exit when the main window is closed.
Run the complete code and this will be the result

This is just basic window with a label, now let’s add a QPushButton to our PyQt6 window.
|
1 2 3 4 5 6 7 8 9 10 11 12 13 14 15 16 17 |
import sys from PyQt6.QtWidgets import QApplication, QMainWindow, QLabel, QPushButton app = QApplication(sys.argv) window = QMainWindow() window.setWindowTitle("Basic Window") window.resize(400, 300) label = QLabel("Hello, GeeksCoders!") button = QPushButton("Click Me") window.setCentralWidget(label) window.statusBar().addPermanentWidget(button) window.show() sys.exit(app.exec()) |
In this code we have added QPushButton widget with the text “Click Me”. after that we have added the button to the status bar of the main window using statusBar().addPermanentWidget method. the button will be displayed at the bottom of the window, to the right of the label.
Run the complete code and this will be the result.

Right now we don’t have any layout in our PyQt6 GUI window, let’s talk about layouts, Layout management in PyQt6 refers to the way in which widgets are arranged in window. PyQt6 provides several layout management classes that allow you to position widgets in flexible and efficient way.
The most commonly used layout management classes in PyQt6 are:
QBoxLayout: Arranges widgets vertically or horizontally in single row or column.
QGridLayout: Arranges widgets in grid pattern.
QFormLayout: Arranges widgets in a form, with labels and input fields aligned vertically.
QStackedLayout: Allows you to stack widgets one on top of the other with only one widget visible at time.
QHBoxLayout: Arranges the widgets horizontally.
QVBoxLayout: Arranges the widgets vertically.
Each of these layout management classes can be added to widget or container widget such as QMainWindow or QDialog to arrange its child widgets. by combining different layout management classes, you can create complex and flexible user interfaces.
This is an example of how you can add vertical box layout to the previous code:
|
1 2 3 4 5 6 7 8 9 10 11 12 13 14 15 16 17 18 19 20 21 22 23 |
import sys from PyQt6.QtWidgets import QApplication,QWidget, QMainWindow, QLabel, QPushButton, QVBoxLayout app = QApplication(sys.argv) window = QMainWindow() window.setWindowTitle("Layout Management") window.setGeometry(100, 100, 400, 300) label = QLabel("Hello, GeeksCoders!") button = QPushButton("Click Me") layout = QVBoxLayout() layout.addWidget(label) layout.addWidget(button) central_widget = QWidget() central_widget.setLayout(layout) window.setCentralWidget(central_widget) window.setLayout(layout) window.show() sys.exit(app.exec()) |
In this code we have created vertical box layout using QVBoxLayout and added the label and button widgets to it using addWidget and finally set the layout of the main window using setLayout. this will arrange the label and button widgets vertically in the window.
Run the complete code and this will be the result.

What is Signals and Slots in PyQt6?
Now let’s add event handling to our code and in PyQt6 we can handle event handling with signals and slots, Signals and Slots is a mechanism for communication between objects in the PyQt6 GUI framework. It allows one object to send a signal to another object indicating that an event has occurred, and for the receiving object to handle the event by executing a designated slot.
In PyQt6, signals are defined as part of a widget’s class, and slots are normal Python methods. When a signal is emitted, any connected slots are automatically executed.
For example, in the case of a button widget, you could connect the clicked signal to a slot that updates the text of a label widget. When the button is clicked, the signal is emitted, and the slot updates the label’s text.
This is an example of adding a button and using signals and slots mechanism in a PyQt6 window:
|
1 2 3 4 5 6 7 8 9 10 11 12 13 14 15 16 17 18 19 20 21 22 23 24 25 26 27 28 |
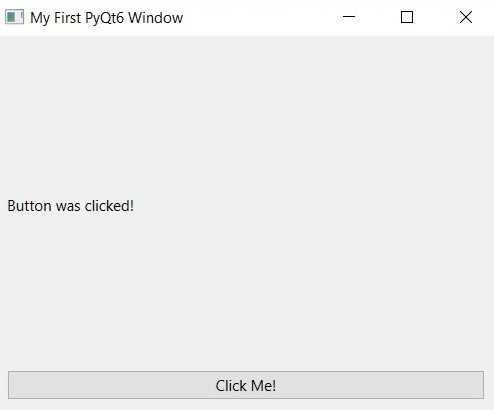
import sys from PyQt6.QtWidgets import QApplication, QMainWindow, QLabel, QPushButton, QVBoxLayout, QWidget app = QApplication(sys.argv) window = QMainWindow() window.setWindowTitle("My First PyQt6 Window") window.resize(400, 300) label = QLabel("Hello, GeeksCoders!", parent=window) button = QPushButton("Click Me!", parent=window) button.clicked.connect(lambda: label.setText('Button was clicked!')) layout = QVBoxLayout() layout.addWidget(label) layout.addWidget(button) central_widget = QWidget() central_widget.setLayout(layout) window.setCentralWidget(central_widget) window.show() sys.exit(app.exec()) |
In this example the connect method is used to connect the clicked signal of the button to a lambda function that sets the text of the label to “Button was clicked!”. When the button is clicked, the signal is emitted and the connected slot is called, changing the text of the label.
Signals and slots provide a powerful and flexible way to add interactivity to your PyQt6 applications. They allow you to separate the code for handling events from the code for responding to those events, making your code cleaner and easier to maintain.
Run the complete code and click on the button this will be the result.

This is the same code, but this time we have used Object Oriented Programming.
|
1 2 3 4 5 6 7 8 9 10 11 12 13 14 15 16 17 18 19 20 21 22 23 24 25 26 27 28 29 30 |
import sys from PyQt6.QtWidgets import QApplication, QMainWindow, QLabel, QPushButton, QVBoxLayout, QWidget class MainWindow(QMainWindow): def __init__(self): super().__init__() self.setWindowTitle("My First PyQt6 Window") self.resize(400, 300) self.label = QLabel("Hello, GeeksCoders!", self) self.button = QPushButton("Click Me!", self) self.button.clicked.connect(self.on_button_clicked) layout = QVBoxLayout() layout.addWidget(self.label) layout.addWidget(self.button) central_widget = QWidget() central_widget.setLayout(layout) self.setCentralWidget(central_widget) def on_button_clicked(self): self.label.setText('Button was clicked!') if __name__ == '__main__': app = QApplication(sys.argv) window = MainWindow() window.show() sys.exit(app.exec()) |
Other Libraries for Python GUI Development
There are several other libraries available for GUI development in Python including:
- Tkinter: Tkinter is the built in GUI library for Python and it provides simple and easy to use interface for developing GUI applications. Tkinter is good choice for beginners or for simple applications that don’t require more advanced features.
- wxPython: wxPython is powerful GUI library for Python, it provides rich set of widgets and tools for building complex applications. wxPython has large community of users and is well documented, making it great choice for more advanced applications.
- PyGTK: PyGTK is GUI library for Python that provides large set of widgets and tools for building desktop applications. PyGTK is used by many popular open source applications, and it has large community of users and developers.
- Kivy: Kivy is an open source Python library for developing mobile and desktop applications. Kivy provides modern and flexible interface for GUI development, and it supports both touchscreen and mouse based inputs.
These are just few libraries available for GUI development in Python. the best library for you will depend on your specific needs and requirements, so it is good idea to try ou few different libraries to see which one works best for you.
Difference Between PyQt5 and PyQt6
PyQt5 and PyQt6 are both sets of Python bindings for the Qt libraries, but there are some differences between them:
- Python Compatibility: PyQt5 is compatible with Python 2.x and 3.x, while PyQt6 is only compatible with Python 3.x.
- Qt Version: PyQt5 is based on Qt 5, while PyQt6 is based on Qt 6. Qt 6 includes several new features and improvements over Qt 5, such as improved performance, a more modern and flexible architecture, and support for high-resolution displays.
- API Changes: The API (Application Programming Interface) for PyQt6 has changed in some places compared to PyQt5, so code written for PyQt5 may need to be modified to work with PyQt6.
- Support: PyQt5 has been around for longer and has a larger user base, so there is more support available for it. PyQt6 is a newer library, so there may be less support available for it.
In general PyQt6 is newer and more modern version of PyQt, with improved performance and a more flexible architecture, but it may not be fully backwards compatible with PyQt5, and there may be less support available for it. if you are starting new project than PyQt6 may be good choice, but if you have existing code written for PyQt5, you may want to stick with PyQt5 for now.
-
Learn More on Python
- Get Started with wxPython: A Complete Guide to Building GUI Applications
- Python: The Most Versatile Programming Language of the 21st Century
- Tkinter: A Beginner’s Guide to Building GUI Applications in Python
- PySide6: The Cross-Platform GUI Framework for Python
- The Ultimate Guide to Kivy: Building Cross-Platform Apps with Python
- Discover the Power of Django: The Best Web Framework for Your Next Project
- How to Earn Money with Python
- Why Flask is the Ideal Micro-Web Framework
- Python Pillow: The Ultimate Guide to Image Processing with Python
- Get Started with Pygame: A Beginner’s Guide to Game Development with Python
- Python PyOpenGL: A Guide to High-Performance 3D Graphics in Python
- The Cross-Platform Game Development Library in Python
- Unleash the Power of Computer Vision with Python OpenCV
Final Thoughts
In result we can say PyQt6 is the ultimate GUI toolkit for Python developers. with its cross platform compatibility, different widgets and features, large community, advanced capabilities and easy integration with other tools, PyQt6 is the perfect choice for your next project. so if you are looking for GUI library that will help you create beautiful and functional user interfaces, look no further than PyQt6!
