In this Python TKinter article we are going to learn How to Create CheckButton in Python TKinter, creating CheckButtons in Python Tkinter is simple process that can be done with just few lines of code. CheckButtons are a type of GUI widget that allow users to select one or more options from a list. this makes them useful for creating interactive applications that require user input.
How to Create CheckButton in Python TKinter
So for creating of CheckButton in Python TKinter first we need to import TKinter module, this imports all of classes and functions from the Tkinter module.
|
1 |
from tkinter import * |
Now we can create our TKinter window, and we can use Tk() function. this will creates a blank window that you can add widgets to. this is an example:
|
1 2 3 |
window = Tk() window.title("CheckButton Example") window.geometry("300x200") |
So this code creates a window with title CheckButton Example and a size of 300 pixels by 200 pixels.
For creating CheckButton in Python Tkinter, we need to use Checkbutton() function. this function takes several arguments including parent window, text to display next to the CheckButton and variable that will store state of the CheckButton.
|
1 2 3 |
var1 = IntVar() check_button = Checkbutton(window, text="Option 1", variable=var1) check_button.pack() |
If you want to create multiple CheckButtons you can repeat this process for each one. just make sure to use different variable name for each CheckButton’s variable.
|
1 2 3 4 5 6 7 8 9 10 11 |
var1 = IntVar() check_button1 = Checkbutton(window, text="Option 1", variable=var1) check_button1.pack() var2 = IntVar() check_button2 = Checkbutton(window, text="Option 2", variable=var2) check_button2.pack() var3 = IntVar() check_button3 = Checkbutton(window, text="Option 3", variable=var3) check_button3.pack() |
once we have created our CheckButtons, we need to display window by calling the mainloop() function. this function will keep the window open until the user closes it.
|
1 |
window.mainloop() |
So this is the complete code for this article
|
1 2 3 4 5 6 7 8 9 10 11 12 13 14 15 16 17 18 19 |
from tkinter import * window = Tk() window.title("GeeeksCoders - CheckButton Example") window.geometry("300x200") var1 = IntVar() check_button1 = Checkbutton(window, text="Option 1", variable=var1) check_button1.pack() var2 = IntVar() check_button2 = Checkbutton(window, text="Option 2", variable=var2) check_button2.pack() var3 = IntVar() check_button3 = Checkbutton(window, text="Option 3", variable=var3) check_button3.pack() window.mainloop() |
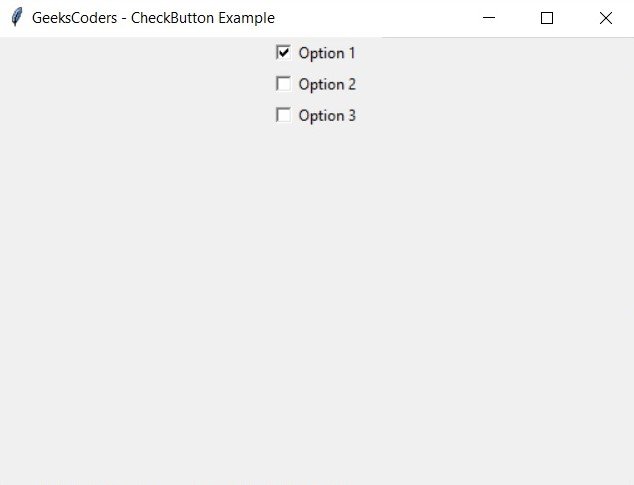
With this code you should see a window with three CheckButtons labeled Option 1, Option 2 and Option 3.

Learn More on Python GUI
- How to Use Stylesheets in PyQt5
- How to Build Custom Widgets in PyQt6
- How to Use Qt Designer with PySide6
- How to Add Icon to PySide6 Window
- How to Load UI in Python PySide6
- How to Create RadioButton in PySide6
- How to Create ComboBox in PySide6
- How to Create CheckBox in Python PySide6
- Responsive Applications with PyQt6 Multithreading
- Event Handling in Python and PyQt6
- How to Use Stylesheets in Python PyQt6
