In this Python PyQt6 lesson we want to learn How to Use Stylesheets in Python PyQt6, so Python PyQt6 is powerful graphical user interface (GUI) toolkit that allows developers to build interactive and nice desktop applications. PyQt6 offers different builtin widgets that can be used to create standard GUI components, such as buttons, labels and text fields. however sometimes you need to create custom widgets to meet specific design requirements or to add new functionality to your application. in this article we are going to talk about the process of building custom widgets using PyQt6, so first of all we need to install this library.
You can use pip for installation
|
1 |
pip install PyQt6 |
What are Stylesheets?
Stylesheets are a way of defining the visual appearance of widgets in PyQt6. they are similar to CSS (Cascading Style Sheets) used in web development. with stylesheets you can define color, font, background, padding and other visual properties of a widget.
For using stylesheets in Python PyQt6, you need to set stylesheet property of a widget to valid CSS style string. for example suppose you want to change the background color of QPushButton to red. you can do this by setting the stylesheet property of the button as follows:
|
1 2 |
button = QPushButton('Click me') button.setStyleSheet('background-color: red') |
In the above code we have created new QPushButton called Click me. after that we set stylesheet property of the button to background-color: red. this changes the background color of the button to red.
Cascading Stylesheets
Similar to CSS stylesheets in PyQt6 support cascading. this means that you can apply styles to multiple widgets by using the same stylesheet. for example suppose you want to change the font size of all the labels in your application to 16 pixels. you can do this by setting the stylesheet property of the QApplication instance as follows:
|
1 2 |
app = QApplication([]) app.setStyleSheet('QLabel { font-size: 16px }') |
In the above code we have created new QApplication instance and set its stylesheet property to QLabel { font-size: 16px }. this applies the style to all the QLabel widgets in the application.
Use Externally Stylesheets in Python PyQt6
PyQt6 also allows you to use external stylesheets. this is useful when you have large application with complex user interface and you want to separate the styling from the application code. to use an external stylesheet you can create separate CSS file and load it using the setStyleSheet() method. for example:
|
1 2 3 |
app = QApplication([]) with open('style.css', 'r') as f: app.setStyleSheet(f.read()) |
This is the complete for external stylesheet
|
1 2 3 4 5 6 7 8 9 10 11 12 13 14 15 16 17 18 19 20 21 22 23 24 25 |
from PyQt6.QtWidgets import QApplication, QLabel, QPushButton, QVBoxLayout, QWidget app = QApplication([]) # Set the stylesheet for the entire application with open('style.css', 'r') as f: app.setStyleSheet(f.read()) # Create a new widget and set its layout widget = QWidget() layout = QVBoxLayout(widget) # Create label label = QLabel('Welcome to GeeksCoders.com') # Create button button = QPushButton('Click me') # Add the label and button to the layout layout.addWidget(label) layout.addWidget(button) # Show the widget and start the application event loop widget.show() app.exec() |
In the above code we have imported necessary PyQt6 classes: QApplication, QLabel, QPushButton, QVBoxLayout and QWidget. after that we have created new QApplication instance and set its stylesheet to the contents of CSS file called style.css.
After that we have created new QWidget instance called widget and set its layout to QVBoxLayout instance called layout, also we have QLabel and QPushButton and we want to change the stylesheet of that.
and finally we show widget using widget.show() method and start the application event loop using the app.exec() method.
Also you need to create style.css in your working directory
|
1 2 3 4 5 6 7 8 9 10 11 12 13 14 15 16 17 |
QPushButton { font-size: 16px; background-color: blue; color: white; padding: 10px; border-radius: 5px; } QPushButton:hover { background-color: navy; } QLabel { font-size: 24px; color: red; font-weight: bold; } |
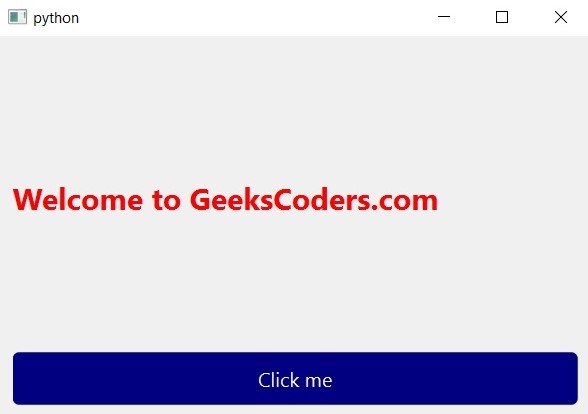
Run the code and this is the result
Now let’s use the style of the widgets directly
|
1 2 3 4 5 6 7 8 9 10 11 12 13 14 15 16 17 18 19 20 21 22 23 |
from PyQt6.QtWidgets import QApplication, QLabel, QPushButton, QVBoxLayout, QWidget app = QApplication([]) # Create new widget and set its layout widget = QWidget() layout = QVBoxLayout(widget) # Create label and set its stylesheet label = QLabel('Welcome to GeeksCoders.com') label.setStyleSheet('font-size: 24px; color: blue;') # Create button and set its stylesheet button = QPushButton('Click me') button.setStyleSheet('background-color: red; color: white;') # Add the label and button to the layout layout.addWidget(label) layout.addWidget(button) # Show widget and start the application event loop widget.show() app.exec() |
Run your code and this is the output

Learn More on Python GUI
- How to Create Label in PySide6
- How to Create Button in Python & PySide6
- How to Use Qt Designer with PySide6
- How to Add Icon to PySide6 Window
- How to Load UI in Python PySide6
- How to Create RadioButton in PySide6
- How to Create ComboBox in PySide6
- How to Create CheckBox in Python PySide6
- Responsive Applications with PyQt6 Multithreading
- Event Handling in Python and PyQt6