In this PyQt6 article we want to learn How to Integrate PyQt6 with Flask, so Python is powerful programming language, and it offers many different libraries for building desktop applications and web based applications. two popular libraries for building desktop applications and web applications are PyQt6 and Flask. in this article we will discuss how to integrate PyQt6 with Flask to build a web application with a desktop-like GUI.
What is PyQt6 ?
PyQt6 is set of Python bindings for the Qt framework, which is cross platform application development framework widely used for building desktop applications. PyQt6 allows developers to create desktop applications with a modern user interface that runs on multiple operating systems.
What is Flask ?
Flask is lightweight Python web framework that allows developers to build web applications quickly and easily. Flask is known for its simplicity, flexibility, and easy of use. Flask is commonly used for building small to medium-sized web applications and APIs.
Why Integrate PyQt6 with Flask ?
Integrating PyQt6 with Flask allows developers to create web applications with modern desktop like GUI. this can be useful for applications that require a richer user interface than what can be achieved with HTML, CSS and JavaScript alone. Also integrating PyQt6 with Flask can allow developers to reuse code between desktop and web applications and it makes development more efficient.
How to Integrate PyQt6 with Flask
First of all we need to install the required libraries which is Flask and PyQt6.
|
1 |
pip install PyQt6 Flask flask-socketio |
We also need the QtWebEngineWidgets module which provides the web engine that we want to use to display web content. you can install it like this
|
1 |
pip install PyQt6-WebEngine |
This is the complete code for How to Integrate PyQt6 with Flask, name the file app.py
|
1 2 3 4 5 6 7 8 9 10 11 12 13 14 15 16 17 18 19 20 21 22 23 24 25 26 27 28 29 30 31 32 33 34 35 36 37 38 39 40 41 42 43 44 45 46 47 48 49 50 51 52 53 54 55 |
from flask import Flask, render_template, jsonify,request from flask_socketio import SocketIO, emit from PyQt6.QtCore import QUrl, QObject, pyqtSlot, QThread from PyQt6.QtWebChannel import QWebChannel from PyQt6.QtWebEngineWidgets import QWebEngineView from PyQt6.QtWidgets import QApplication import sys import threading app = Flask(__name__) app.config['SECRET_KEY'] = 'secret!' socketio = SocketIO(app) @app.route('/') def index(): return render_template('index.html') @socketio.on('connect') def test_connect(): emit('my response', {'data': 'Connected'}) @socketio.on('disconnect') def test_disconnect(): print('Client disconnected') @app.route('/api') def api(): channel = QWebChannel() channel.registerObject('flask', request.environ['werkzeug.websocket']) return jsonify({'port': channel.port()}) def run_pyqt6(): app = QApplication(sys.argv) view = QWebEngineView() view.setWindowTitle("GeeksCoders.com") channel = QWebChannel() view.page().setWebChannel(channel) view.load(QUrl('http://localhost:5000')) view.show() sys.exit(app.exec()) if __name__ == '__main__': # Start the Flask server in a separate thread server = threading.Thread(target=socketio.run, args=(app,)) server.start() # Start the PyQt6 application in a separate thread pyqt6 = threading.Thread(target=run_pyqt6) pyqt6.start() |
This is our index.html
|
1 2 3 4 5 6 7 8 9 10 11 12 13 14 15 16 17 18 19 20 21 |
<!doctype html> <html> <head> <title>Flask SocketIO and PyQt6 Integration Example</title> <script src="//code.jquery.com/jquery-1.11.1.js"></script> <script src="//cdnjs.cloudflare.com/ajax/libs/socket.io/1.3.6/socket.io.min.js"></script> <script> $(document).ready(function(){ var socket = io.connect('http://' + document.domain + ':' + location.port); socket.on('my response', function(msg) { console.log(msg.data); }); }); </script> </head> <body> <h1>Welcome to GeeksCoders.com</h1> <h1>Flask SocketIO and PyQt6 Integration Example</h1> <p>Open this page in a browser and a PyQt6 window to see the integration in action.</p> </body> </html> |
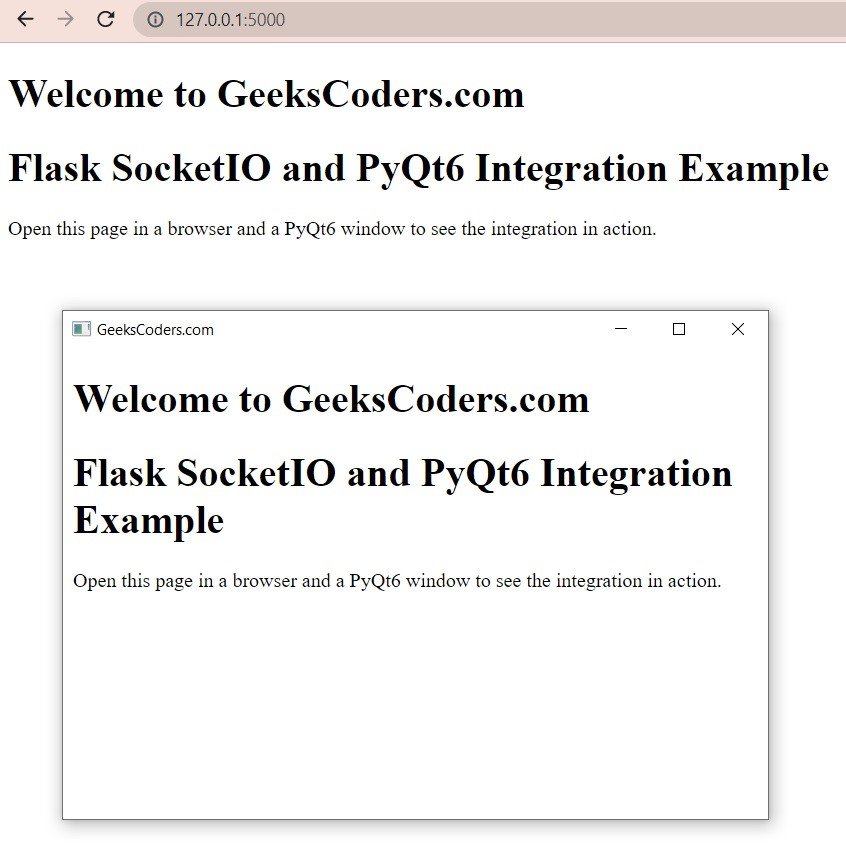
This code sets up basic Flask application with SocketIO server that sends and receives messages. it also creates PyQt6 application that loads the Flask application in QWebEngineView and shows it in a window. when the Flask application is opened in web browser and the PyQt6 application is started, they will communicate with each other via QWebChannel and SocketIO.
Run the code and this will be the result

Learn More on Python GUI
- Qt Designer Tool in PyQt6
- How to Use Stylesheets in Python PyQt6
- Event Handling in Python and PyQt6
- Responsive Applications with PyQt6 Multithreading
- How to Deploy PyQt6 Applications
- How to Build Web Applications with PyQt6
- How to Create ComboBox in PySide6
- How to Create CheckBox in Python PySide6
- Responsive Applications with PyQt6 Multithreading
- Event Handling in Python and PyQt6
- How to Use Stylesheets in Python PyQt6
