Do you need PyQt5 Tutorial in 2023, so this tutorial is for you, in this PyQt5 Tutorial we are going to talk about Build Python GUI Applications. first of all let’s talk about PyQt5 and the installation process.
What is PyQt5 ?
PyQt5 is cross platform GUI toolkit that is widely used in the Python programming language. it is set of Python bindings for the Qt application framework developed by the Qt Company. PyQt5 allows developers to create desktop applications with graphical user interfaces (GUIs) using different widgets such as buttons, labels and textboxes. in this pyqt5 tutorial we want to cover the basics of PyQt5 and build simple application using it.
Build Python GUI Applications with PyQt5 in 2023
First of all we need to install PyQt5.
|
1 |
pip install PyQt5 |
Let’s start by creating simple PyQt5 application. create a new Python file called myapp.py and add the following code:
|
1 2 3 4 5 6 7 8 9 10 11 12 13 |
import sys from PyQt5.QtWidgets import QApplication, QWidget app = QApplication(sys.argv) # Create window window = QWidget() window.setWindowTitle('Geekscoders - PyQt5 in 2023') window.setGeometry(100, 100, 300, 200) window.show() # Run event loop sys.exit(app.exec_()) |
So now let me describe this code, in this code we have import QApplication and QWidget classes from the PyQt5.QtWidgets module. after that we have created new QApplication object and new QWidget object called window. we set the window title and size using the setWindowTitle() and setGeometry() methods. and lastly we show the window using the show() method and start the event loop using the exec_() method, now let’s me give you some more information about the modules that we have used in the above example.
What is PyQt5 QApplication ?
PyQt5 QApplication is a class that represents the main application window in PyQt5 GUI application. it provides the framework for the graphical user interface of the application, including the window itself, menus, toolbars and status bars. QApplication class is responsible for initializing and managing the application, processing user events and dispatching them to the appropriate widgets. QApplication class is part of the PyQt5 module, which is a set of Python bindings for the Qt application framework.
What is QtWidgets Module in PyQt5 ?
QtWidgets module is one of the core modules in PyQt5 which provides a set of GUI classes to create desktop applications with graphical user interfaces. this module contains different classes for creating and managing widgets, layouts and other graphical elements of user interface.
Some of the commonly used classes in the QtWidgets module include:
- QWidget: this is base class for all user interface elements, which represents rectangular area on the screen.
- QPushButton: it is button widget that can be clicked by the user to trigger an action.
- QLabel: this widget is used to display text or images.
- QComboBox: this widget provides drop down list of options for the user to choose from.
- QLineEdit: this widget that allows the user to enter and edit text.
- QGridLayout: a layout manager used to arrange widgets in grid like structure.
- QVBoxLayout and QHBoxLayout: Layout managers used to arrange widgets vertically and horizontally.
- QMainWindow: A widget that represents the main window of an application.
These classes along with many others in the QtWidgets module provides the building blocks for creating rich and interactive user interfaces in PyQt5. by using these classes and their methods, developers can create custom GUI elements and layouts to meet the specific needs of their applications.
So we have learned that how we can create simple GUI window with PyQt5, now let’s use OOP, and create our window with OOP.
|
1 2 3 4 5 6 7 8 9 10 11 12 13 14 |
import sys from PyQt5.QtWidgets import QApplication, QWidget class MainWindow(QWidget): def __init__(self): super().__init__() self.setWindowTitle('Geekscoders - PyQt5 in 2023') self.setGeometry(100, 100, 300, 200) self.show() if __name__ == '__main__': app = QApplication(sys.argv) window = MainWindow() sys.exit(app.exec_()) |
In the above example we have defined MainWindow class that inherits from QWidget. we override the __init__() method to set the window title and geometry, and after that we call the show() method to display the window.
in the if __name__ == ‘__main__’, block we have created an instance of QApplication and then creates an instance of our MainWindow class. and lastly we call app.exec_() to start the event loop and sys.exit() to ensure that the program exits cleanly when the event loop is terminated, if you run the code we will have the same window.
To Build Python GUI Applications with PyQt5 we need widgets, so PyQt5 widgets are graphical elements that can be added to GUI application user interface. these widgets are the building blocks of Python PyQt5 application and are used to create buttons, text boxes, labels menus and other graphical elements. in Python PyQt5 widgets are implemented as classes that inherit from the QWidget base class. this means that every widget in PyQt5 application is a subclass of QWidget. Some of the commonly used PyQt5 widgets include:
- QLabel: this widget used to display text or images.
- QPushButton: this widget that can be clicked by the user to trigger an action.
- QCheckBox: this widget that allows the user to select or deselect an option.
- QLineEdit: this widget that allows the user to enter and edit text.
- QComboBox: this widget that provides a drop-down list of options for the user to choose from.
- QSpinBox and QDoubleSpinBox: Widgets that allow the user to select numeric value.
In addition to these basic widgets, PyQt5 also provides more advanced widgets for creating more complex user interfaces. for example QTableView and QTreeView can be used to create tables and tree views. and QGraphicsView can be used to create graphical representations of data.
widgets can be added to the user interface of PyQt5 application using layout managers, which are also implemented as PyQt5 classes. Layout managers are used to arrange widgets in specific layout such as a grid or box. this allows developers to create flexible and responsive user interfaces that adjust to different screen sizes and resolutions.
So now let’s create examples on these widgets, first we are going to start from PyQt5 QLabel.
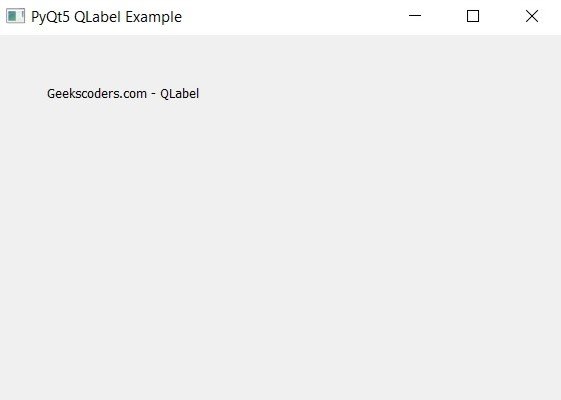
PyQt5 QLabel
QLabel is a widget in PyQt5 that is used to display text or an image. it can be used to create static or dynamic text labels that can be added to a user interface. QLabel supports different text formats such as HTML, plain text and rich text. it can also be used to display images in various formats including PNG, JPEG and GIF.
|
1 2 3 4 5 6 7 8 9 10 11 12 13 14 15 16 17 18 19 20 |
import sys from PyQt5.QtWidgets import QApplication, QWidget, QLabel class Window(QWidget): def __init__(self): super().__init__() # Create QLabel widget label = QLabel('Geekscoders.com - QLabel', self) label.move(50, 50) # Set the window properties self.setWindowTitle('PyQt5 QLabel Example') self.setGeometry(100, 100, 300, 200) self.show() if __name__ == '__main__': app = QApplication(sys.argv) window = Window() sys.exit(app.exec_()) |
In the above code we have just created our Window class that extends from QWidget and after that we have created our QLabel and also move the label to 50,50.
Run the code and this will be the result
So now let’s create PyQt5 QPushButton, also we are going to implement PyQt5 signals and slots, so first of all what PyQt5 signals and slots.
What is PyQt5 Signals and Slots ?
In PyQt5 signals and slots are used for communication between objects. signal is an event that is emitted by an object when a particular action occurs. slot is a function that is called in response to a signal. signal and slot mechanism allows objects to communicate without needing to know anything about each other’s internal implementation. when a signal is emitted, any connected slots are called, passing any relevant data as arguments, now let’s create our example practically with QPushButton.
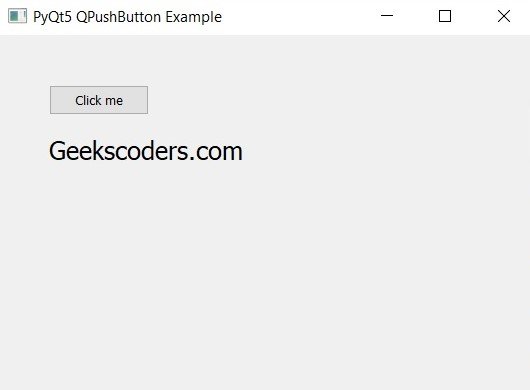
PyQt5 QPushButton
QPushButton is a widget in PyQt5 that is used to create push buttons in a user interface. push button is clickable button that is typically used to perform an action when the user clicks it. QPushButton provides different methods for setting the text, icon, size and other properties of the button. it also supports different events such as mouse clicks and keyboard events, which can be handled using event handlers or signals and slots.
|
1 2 3 4 5 6 7 8 9 10 11 12 13 14 15 16 17 18 19 20 21 22 23 24 25 26 27 28 29 30 |
import sys from PyQt5.QtWidgets import QApplication, QWidget, QPushButton, QLabel from PyQt5.QtGui import QFont class MainWindow(QWidget): def __init__(self): super().__init__() # Create QPushButton widget button = QPushButton('Click me', self) button.setGeometry(50, 50, 100, 30) button.clicked.connect(self.buttonClicked) # Create QLabel widget self.label = QLabel(self) self.label.setGeometry(50, 100, 200, 30) # Set window properties self.setWindowTitle('PyQt5 QPushButton Example') self.setGeometry(100, 100, 300, 200) self.show() def buttonClicked(self): self.label.setText('Geekscoders.com') self.label.setFont(QFont("Sanerif",15)) if __name__ == '__main__': app = QApplication(sys.argv) window = MainWindow() sys.exit(app.exec_()) |
In the above example we have created MainWindow class that inherits from QWidget. in the __init__() method we have created QPushButton widget. after that we have used setGeometry() method to position and size the button and connect the clicked signal of the button to a method called buttonClicked(). In the buttonClicked() method we have changed the label and font size of the text, for example when the user clicks on the button, the text label and font size will be changed.
Run the code and this will be the result
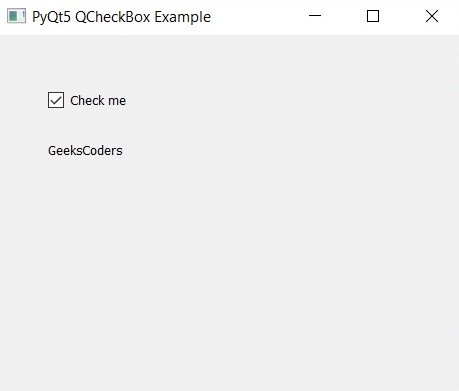
PyQt5 QCheckBox
QCheckBox is a widget in PyQt5 that is used to create checkboxes in a user interface. Acheckbox is a control that allows the user to select one or more options from a list of choices.
QCheckBox provides different methods for setting the text, size and other properties of the checkbox. it also supports different events such as state changes and keyboard events, which can be handled using event handlers or signals and slots.
|
1 2 3 4 5 6 7 8 9 10 11 12 13 14 15 16 17 18 19 20 21 22 23 24 25 26 27 28 29 30 31 |
import sys from PyQt5.QtWidgets import QApplication, QWidget, QCheckBox, QLabel class MainWindow(QWidget): def __init__(self): super().__init__() # Create a QCheckBox widget self.checkbox = QCheckBox('Check me', self) self.checkbox.setGeometry(50, 50, 100, 30) self.checkbox.stateChanged.connect(self.checkboxStateChanged) # Create a QLabel widget self.label = QLabel(self) self.label.setGeometry(50, 100, 200, 30) # Set the window properties self.setWindowTitle('PyQt5 QCheckBox Example') self.setGeometry(100, 100, 300, 200) self.show() def checkboxStateChanged(self): if self.checkbox.isChecked(): self.label.setText('GeeksCoders') else: self.label.setText('Welcome') if __name__ == '__main__': app = QApplication(sys.argv) window = MainWindow() sys.exit(app.exec_()) |
In the above code we have connected the stateChanged signal of checkbox to a method called checkboxStateChanged(). in the checkboxStateChanged() method we set the text of QLabel widget to GeeksCoders if the checkbox is checked and Welcome if the checkbox is unchecked.
Run the code and this will be the result
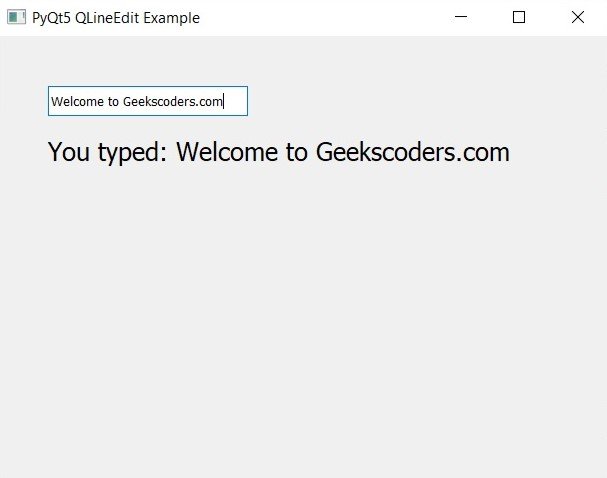
PyQt5 QLineEdit
QLineEdit is a widget in PyQt5 that is used to create single line input box in a user interface. it allows the user to enter and edit single line of text. QLineEdit provides different methods for setting and retrieving the text entered by the user as well as for setting the size, font and other properties of the input box. it also supports different events such as text changes and cursor movements, which can be handled using event handlers or signals and slots.
|
1 2 3 4 5 6 7 8 9 10 11 12 13 14 15 16 17 18 19 20 21 22 23 24 25 26 27 28 29 30 |
import sys from PyQt5.QtWidgets import QApplication, QWidget, QLineEdit, QLabel from PyQt5.QtGui import QFont class MainWindow(QWidget): def __init__(self): super().__init__() # Create QLineEdit widget self.lineedit = QLineEdit(self) self.lineedit.setGeometry(50, 50, 200, 30) self.lineedit.textChanged.connect(self.lineeditTextChanged) # Create QLabel widget self.label = QLabel(self) self.label.setGeometry(50, 100, 800, 30) # Set window properties self.setWindowTitle('PyQt5 QLineEdit Example') self.setGeometry(100, 100, 300, 200) self.show() def lineeditTextChanged(self, text): self.label.setText('You typed: ' + text) self.label.setFont(QFont("Sanerif", 15)) if __name__ == '__main__': app = QApplication(sys.argv) window = MainWindow() sys.exit(app.exec_()) |
Run the complete code and this will be the result
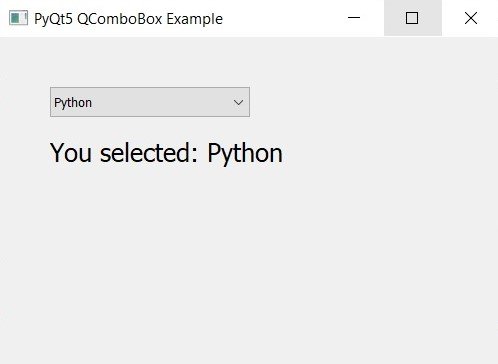
PyQt5 QComboBox
QComboBox is a widget in PyQt5 that is used to create drop down list of items in a user interface. it allows the user to select one option from a list of choices. QComboBox provides different methods for setting and retrieving the list of items, as well as for setting the size, font and other properties of the drop down list. it also supports different events such as selection changes and keyboard events which can be handled using event handlers or signals and slots.
|
1 2 3 4 5 6 7 8 9 10 11 12 13 14 15 16 17 18 19 20 21 22 23 24 25 26 27 28 29 30 31 32 33 34 |
import sys from PyQt5.QtWidgets import QApplication, QWidget, QLabel, QComboBox from PyQt5.QtGui import QFont class MainWindow(QWidget): def __init__(self): super().__init__() # Create a QComboBox widget self.combobox = QComboBox(self) self.combobox.setGeometry(50, 50, 200, 30) self.combobox.addItem('Python') self.combobox.addItem('Java') self.combobox.addItem('C++') self.combobox.currentIndexChanged.connect(self.comboboxIndexChanged) # Create a QLabel widget self.label = QLabel(self) self.label.setGeometry(50, 100, 400, 30) # Set the window properties self.setWindowTitle('PyQt5 QComboBox Example') self.setGeometry(100, 100, 300, 200) self.show() def comboboxIndexChanged(self, index): text = self.combobox.currentText() self.label.setText('You selected: ' + text) self.label.setFont(QFont("Times", 15)) if __name__ == '__main__': app = QApplication(sys.argv) window = MainWindow() sys.exit(app.exec_()) |
The important point in this code is this that we have currentIndexChanged signal to a method called comboboxIndexChanged(), in the comboboxIndexChanged() method we have used the currentText() method to get the text of the currently selected item and set the text of QLabel widget.
Run the code and this will be the result
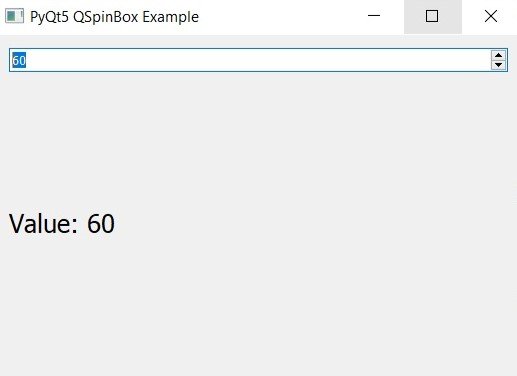
PyQt5 QSpinBox
QSpinBox is a widget in PyQt5 that provides numerical input field with up and down buttons for incrementing and decrementing the value. it is often used in user interfaces for numerical input such as setting quantity or a value for a parameter. QSpinBox provides different methods for setting and retrieving the value, as well as for setting the range, step size and other properties of the input field. it also supports different events, such as value changes and keyboard events, which can be handled using event handlers or signals and slots.
|
1 2 3 4 5 6 7 8 9 10 11 12 13 14 15 16 17 18 19 20 21 22 23 24 25 26 27 28 29 30 31 32 33 34 35 36 37 38 |
import sys from PyQt5.QtWidgets import QApplication, QWidget, QLabel, QSpinBox, QVBoxLayout from PyQt5.QtGui import QFont class MainWindow(QWidget): def __init__(self): super().__init__() # Create a QSpinBox widget self.spinBox = QSpinBox(self) self.spinBox.setMinimum(0) self.spinBox.setMaximum(100) self.spinBox.setSingleStep(5) self.spinBox.setValue(50) self.spinBox.valueChanged.connect(self.updateLabel) # Create a QLabel widget self.label = QLabel('Value: 50', self) # Create a layout and add the widgets layout = QVBoxLayout() layout.addWidget(self.spinBox) layout.addWidget(self.label) self.setLayout(layout) # Set the window properties self.setWindowTitle('PyQt5 QSpinBox Example') self.setGeometry(100, 100, 300, 200) self.show() def updateLabel(self, value): self.label.setText('Value: ' + str(value)) self.label.setFont(QFont("Times", 15)) if __name__ == '__main__': app = QApplication(sys.argv) window = MainWindow() sys.exit(app.exec_()) |
In the above code we have connected valueChanged signal of the QSpinBox to a method called updateLabel(). in the updateLabel() method we have used setText() method of a QLabel widget to display the current value of the QSpinBox.
Run the code and this will be the result
Python PyQt5 Layout Management
We have learned about the basic and fundamental concepts on Python PyQt5, but till now we have not used layout management, now let’s talk about PyQt5 layout management, so Layout management in PyQt5 refers to the process of arranging widgets in a window or dialog box. PyQt5 provides several classes that can be used to arrange widgets in different ways, such as QHBoxLayout, QVBoxLayout, QGridLayout and QFormLayout. these layout classes provides a way to organize widgets in a specific way such as horizontally or vertically, in grid or form, depending on the desired layout of the interface. they also provide methods for adding and removing widgets from the layout as well as setting the size and position of widgets within the layout. Layout management in PyQt5 is important because it allows for dynamic and responsive interfaces that can adjust to different screen sizes and resolutions. it also simplifies the process of arranging and positioning widgets, making it easier for developers to create complex user interfaces.
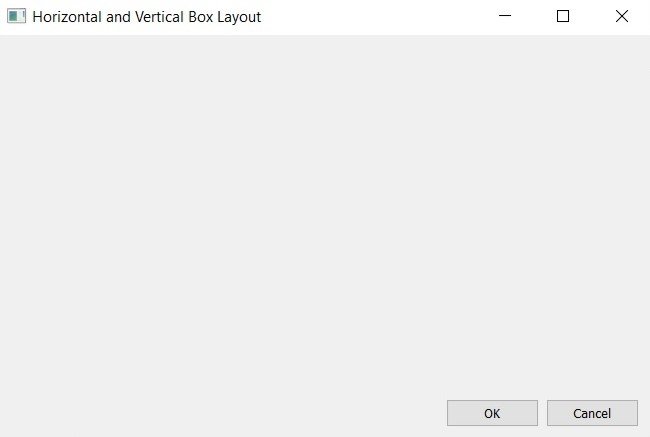
This is basic example of PyQt5 QHBoxLayout and QVBoxLayout.
|
1 2 3 4 5 6 7 8 9 10 11 12 13 14 15 16 17 18 19 20 21 22 23 24 25 26 27 28 29 30 31 32 33 34 35 |
import sys from PyQt5.QtWidgets import QApplication, QWidget, QPushButton, QHBoxLayout, QVBoxLayout class LayoutExample(QWidget): def __init__(self): super().__init__() self.MyUI() def MyUI(self): okButton = QPushButton("OK") cancelButton = QPushButton("Cancel") hbox = QHBoxLayout() hbox.addStretch(1) hbox.addWidget(okButton) hbox.addWidget(cancelButton) vbox = QVBoxLayout() vbox.addStretch(1) vbox.addLayout(hbox) self.setLayout(vbox) self.setGeometry(300, 300, 300, 150) self.setWindowTitle('Horizontal and Vertical Box Layout') self.show() if __name__ == '__main__': app = QApplication(sys.argv) ex = LayoutExample() sys.exit(app.exec_()) |
In the above example we have created QWidget and added two QPushButton widgets to it. after that we have created QHBoxLayout and added two buttons to it with some extra space added on either side using the addStretch method. and lastly we creates QVBoxLayout and add the QHBoxLayout to it with some extra space added at the top and bottom using addStretch.
Run the complete code and this will be the result
So we can say that PyQt5 is an excellent Python module for building Graphical User Interfaces (GUIs) in Python. with its powerful and intuitive set of tools developers can create complex and functional GUI applications. this tutorial has covered all the essential topics you need to get started with PyQt5 development, from basics of PyQt5 widgets such as QLabel, QCheckBox, QComboBox and QSpinBox to more advanced concepts like signals and slots, so why not give it a try and start building your own GUI applications with PyQt5 in 2023 ? with skills and knowledge you have gained from this tutorial, you will be well on your way to create amazing Python GUI applications that will impress your users and clients.
Learn More on PyQt5
- How to Deploy PyQt5 Applications
- How to Integrate PyQt5 with OpenCV
- How to Use Stylesheets in PyQt5
- Learn PyQt5 Event Handling with Signals and Slots
- PyQt5 Tutorial: Creating Menus and Toolbars
- How to Open & Save Files in Python PyQt5
- PyQt5 Designer Tutorial: Complete Guide to Qt Designer
- PyQt5 vs Tkinter: Which GUI Library is Right for You
- How to Build Web Applications in PyQt5
- How to Integrate Python Flask with PyQt5