In this Python TKinter article we are going to talk about Complete Guide on Python TKinter Grid Layout, TKinter is popular Python library for building graphical user interfaces (GUIs). TKinter offers different layout managers to organize widgets on GUI window, and one of them is Grid layout manager which allows you to position widgets on grid like structure. In this article we are going to discuss TKinter grid layout and show you how to use it in your GUI applications.
What is TKinter Grid Layout?
TKinter grid layout manager is a layout manager that organizes widgets in grid like structure. it allows you to position widgets in rows and columns, similar to table. you can define number of rows and columns, as well as the size of each cell in the grid. grid layout manager is flexible and can be used to create complex layouts.
For using grid layout manager in TKinter, you need to create grid with rows and columns. after that you can add widgets to the grid by specifying the row and column where the widget should be placed. this is an example:
|
1 2 3 4 5 6 7 8 9 10 11 12 13 14 15 16 17 18 19 20 21 22 23 24 25 |
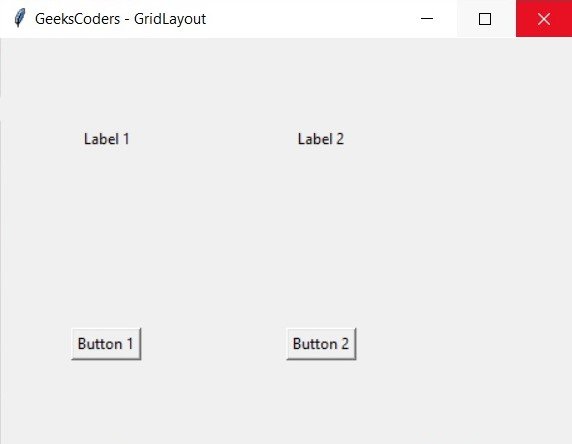
import tkinter as tk root = tk.Tk() root.title("GeeksCoders - GridLayout") # create grid layout with 2 rows and 3 columns root.columnconfigure(0, weight=1) root.columnconfigure(1, weight=1) root.columnconfigure(2, weight=1) root.rowconfigure(0, weight=1) root.rowconfigure(1, weight=1) # create widgets label1 = tk.Label(root, text="Label 1") label2 = tk.Label(root, text="Label 2") button1 = tk.Button(root, text="Button 1") button2 = tk.Button(root, text="Button 2") # add widgets to the grid label1.grid(row=0, column=0) label2.grid(row=0, column=1) button1.grid(row=1, column=0) button2.grid(row=1, column=1) root.mainloop() |
In this example, we have created a window with grid that has 2 rows and 3 columns. after that we have created four widgets, two labels and two buttons. after that we position widgets on the grid by specifying the row and column where each widget should be placed. grid method is used to add each widget to the grid.
Run the code and this will be the result

Grid Layout Options
There are several options that you can use to configure the grid layout. these are some of most commonly used options:
- row – row number where the widget should be placed
- column – column number where the widget should be placed
- sticky – determines how the widget should expand to fill the available space in the cell (can be N, S, E, W, NE, NW, SE, SW, or NSEW)
- padx – amount of horizontal padding to add to the widget
- pady – amount of vertical padding to add to the widget
- ipadx – amount of internal horizontal padding to add to the widget
- ipady – amount of internal vertical padding to add to the widget
Using Grid Weight
One of the most powerful features of Python TKinter grid layout manager is the ability to use weight to control the size of the cells in the grid. weight option determines how much space a row or column should take up in the grid. by default each row and column has weight of 0, which means they will not expand to fill any extra space.
for using weight, you need to call the rowconfigure and columnconfigure methods on the window or frame that contains the grid. These methods take two arguments, index of the row or column, and weight value. the weight value is floating point number that represents the proportion of extra space that the row or column should take up.
|
1 2 3 4 5 6 7 8 9 10 11 12 13 14 15 16 17 18 19 20 21 22 23 24 25 |
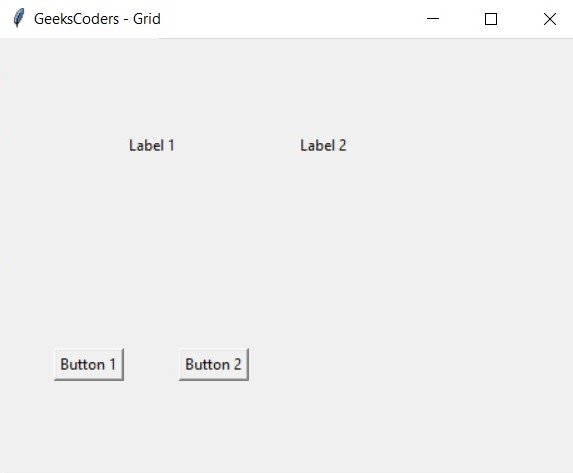
import tkinter as tk root = tk.Tk() root.title("GeeksCoders - Grid") # create grid with 2 rows and 3 columns root.columnconfigure(0, weight=1) root.columnconfigure(1, weight=2) root.columnconfigure(2, weight=1) root.rowconfigure(0, weight=1) root.rowconfigure(1, weight=1) # create widgets label1 = tk.Label(root, text="Label 1") label2 = tk.Label(root, text="Label 2") button1 = tk.Button(root, text="Button 1") button2 = tk.Button(root, text="Button 2") # add widgets to the grid label1.grid(row=0, column=0, sticky="E") label2.grid(row=0, column=1) button1.grid(row=1, column=0) button2.grid(row=1, column=1, sticky="W") root.mainloop() |
In this example we have created grid with 2 rows and 3 columns. after that we have assigned weight of 1 to the first and third columns, and weight of 2 to the second column. than we assign weight of 1 to each of the rows. this means that the second column will take up twice as much space as the other columns.
We also use the sticky option to control how the widgets expand to fill the available space. sticky option can take one or more of the following values: N, S, E, W, NE, NW, SE, SW or NSEW. this determines in which direction the widget should expand to fill the available space.
Run the code and this is the result

Learn More on Python GUI
- How to Create Label in PySide6
- How to Create Button in Python & PySide6
- How to Use Qt Designer with PySide6
- How to Add Icon to PySide6 Window
- How to Load UI in Python PySide6
- How to Create RadioButton in PySide6
- How to Create ComboBox in PySide6
- How to Create CheckBox in Python PySide6
- Responsive Applications with PyQt6 Multithreading
