In this Python PySide6 Tutorial we are going to talk about Python PySide6 Layout Management, so first of all let’s talk about PySide6, PySide6 is Python binding for Qt toolkit that provides different tools for building cross platform Graphical User Interfaces (GUIs). one of the key features of PySide6 is its powerful layout management system, which allows you to arrange widgets in GUI application in flexible and responsive way.
Our main main purpose in this article is Layout Management, so Layout management is important in GUI development because it determines how widgets are arranged and resized in response to user interaction and changes in the window size. in PySide6 there are several layout managers available, each with its own advantages and disadvantages.
-
QGridLayout
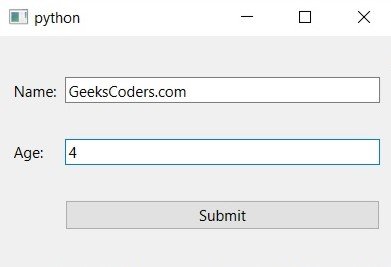
QGridLayout layout arranges widgets in grid, where each cell in the grid can contain one widget. this layout is useful for arranging widgets in tabular format. you can specify the size of each cell in the grid and the spacing between cells, we can say that you can specify the number of row and column in QGridLayout.
This is an example of QGridLayout in Python PySide6
1 2 3 4 5 6 7 8 9 10 11 12 13 14 15 16 17 18 19 20 21 22 23 24 25 26 27 28 29 30 31 32 33 34 35 36 37 38 39 40 |
from PySide6.QtWidgets import QApplication, QWidget, QLabel, QLineEdit, QPushButton, QGridLayout class MyGridLayout(QWidget): def __init__(self): super().__init__() self.MyUI() def MyUI(self): # create labels and line edits nameLabel = QLabel('Name:') nameEdit = QLineEdit() ageLabel = QLabel('Age:') ageEdit = QLineEdit() # create button submitButton = QPushButton('Submit') # create grid layout grid = QGridLayout() # add labels and line edits to grid grid.addWidget(nameLabel, 0, 0) grid.addWidget(nameEdit, 0, 1) grid.addWidget(ageLabel, 1, 0) grid.addWidget(ageEdit, 1, 1) # add button to grid grid.addWidget(submitButton, 2, 1) # set layout for widget self.setLayout(grid) if __name__ == '__main__': app = QApplication([]) widget = MyGridLayout() widget.show() app.exec() |
In this above code we have imported the required classes and modules from PySide6, after that we have created MyGridLayout class that extends from QWidget class, we have created MyUI() method, in that method we have added some PySide6 widget, like QLabel and QLineEdit, and after that we have added these widgets in the QGridLayout.
Run the complete code and this is the result
-
QHBoxLayout and QVBoxLayout
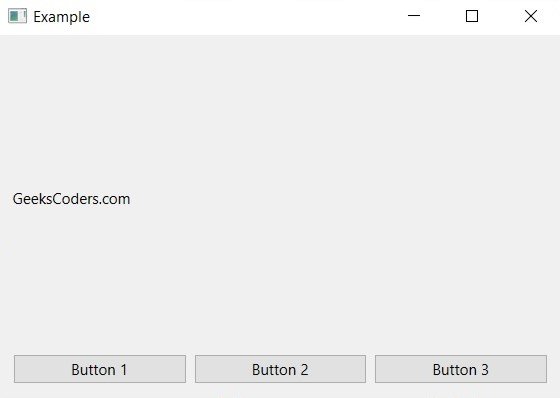
QHBoxLayout and QVBoxLayout managers arrange widgets horizontally and vertically. these managers are useful for arranging widgets in linear format, such as in toolbar or status bar. you can specify the spacing between widgets.
This is an example of PySide6 QHBoxLayout and QVBoxLayout
1 2 3 4 5 6 7 8 9 10 11 12 13 14 15 16 17 18 19 20 21 22 23 24 25 26 27 28 29 30 31 32 33 34 35 36 37 38 39 40 |
import sys from PySide6.QtWidgets import QApplication, QWidget, QHBoxLayout, QVBoxLayout, QPushButton, QLabel class MyHVLayout(QWidget): def __init__(self): super().__init__() self.MyUI() def MyUI(self): # create widgets label = QLabel("GeeksCoders.com") button1 = QPushButton("Button 1") button2 = QPushButton("Button 2") button3 = QPushButton("Button 3") # create layout hbox = QHBoxLayout() hbox.addWidget(button1) hbox.addWidget(button2) hbox.addWidget(button3) vbox = QVBoxLayout() vbox.addWidget(label) vbox.addLayout(hbox) # set layout self.setLayout(vbox) # set window properties self.setWindowTitle("Example") self.setGeometry(300, 300, 300, 150) self.show() if __name__ == '__main__': app = QApplication(sys.argv) ex = MyHVLayout() sys.exit(app.exec()) |
In the above example we have created a window that contains label and three buttons arranged in horizontal layout. after that horizontal layout is added to vertical layout that contains the label. and at the end vertical layout is set as the main layout of the window using self.setLayout(vbox).
Run the code and this is the result
-
QFormLayout
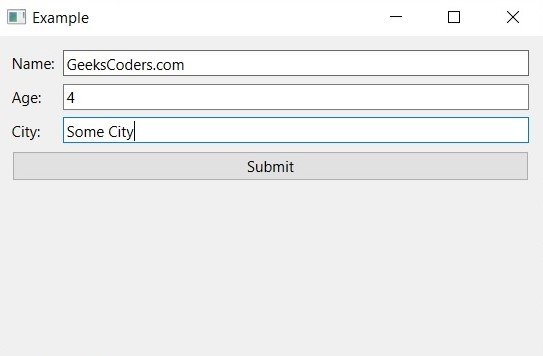
QFormLayout manager arranges widgets in two column format where each row contains a label and a widget. this manager is useful for creating forms with labels and input fields. you can specify the alignment and spacing between labels and widgets.
This is an example of Python PySide6 QFormLayout
1 2 3 4 5 6 7 8 9 10 11 12 13 14 15 16 17 18 19 20 21 22 23 24 25 26 27 28 29 30 31 32 33 34 35 36 37 38 39 40 41 42 |
import sys from PySide6.QtWidgets import QApplication, QWidget, QFormLayout, QLineEdit, QLabel, QPushButton class MyFormLayout(QWidget): def __init__(self): super().__init__() self.MyUI() def MyUI(self): # create form layout form_layout = QFormLayout() # create widgets name_label = QLabel("Name:") name_edit = QLineEdit() age_label = QLabel("Age:") age_edit = QLineEdit() city_label = QLabel("City:") city_edit = QLineEdit() submit_button = QPushButton("Submit") # add widgets to form layout form_layout.addRow(name_label, name_edit) form_layout.addRow(age_label, age_edit) form_layout.addRow(city_label, city_edit) form_layout.addRow(submit_button) # set form layout as main layout self.setLayout(form_layout) # set window properties self.setWindowTitle("Example") self.setGeometry(300, 300, 300, 150) self.show() if __name__ == '__main__': app = QApplication(sys.argv) ex = MyFormLayout() sys.exit(app.exec()) |
In the above example we have created a form with three input fields (name, age, and city) and submit button. we have used QFormLayout to arrange the widgets in structured manner. addRow method of QFormLayout is used to add each widget to the layout.
Note that the label widgets are left aligned and the input widgets are right aligned. QFormLayout automatically handles the alignment of widgets and this makes it easy to create forms in PySide6.
Run the code you will see this output
-
QStackedLayout
QStackedLayout manager arranges widgets on top of each other, where only one widget is visible at a time. This manager is useful for creating multi-page interfaces, where the user can switch between pages by clicking on a tab or a button.
This is an example of Python Pyside6 QStackLayout
1 2 3 4 5 6 7 8 9 10 11 12 13 14 15 16 17 18 19 20 21 22 23 24 25 26 27 28 29 30 31 32 33 34 35 36 37 38 39 40 41 42 43 44 45 46 47 |
from PySide6.QtWidgets import QApplication, QMainWindow, QStackedLayout, QPushButton, QWidget, QLabel, QVBoxLayout class MyStackLayout(QMainWindow): def __init__(self): super().__init__() # Create QStackedLayout and set it as # the central widget self.stack_layout = QStackedLayout() central_widget = QWidget() central_widget.setLayout(self.stack_layout) self.setCentralWidget(central_widget) # Create two pages to add to the stack layout self.page1 = QWidget() layout1 = QVBoxLayout(self.page1) self.label1 = QLabel('Page 1 - GeeksCoders.com') layout1.addWidget(self.label1) self.button1 = QPushButton('Go to Page 2') self.button1.clicked.connect(self.show_page2) layout1.addWidget(self.button1) self.page2 = QWidget() layout2 = QVBoxLayout(self.page2) self.label2 = QLabel('Page 2 - Welcome to GeeksCoders') layout2.addWidget(self.label2) self.button2 = QPushButton('Go to Page 1') self.button2.clicked.connect(self.show_page1) layout2.addWidget(self.button2) # Add the pages to the stack layout self.stack_layout.addWidget(self.page1) self.stack_layout.addWidget(self.page2) def show_page1(self): # Set the current index of the stack layout to show page 1 self.stack_layout.setCurrentIndex(0) def show_page2(self): # Set the current index of the stack layout to show page 2 self.stack_layout.setCurrentIndex(1) if __name__ == '__main__': app = QApplication([]) window = MyStackLayout() window.show() app.exec() |
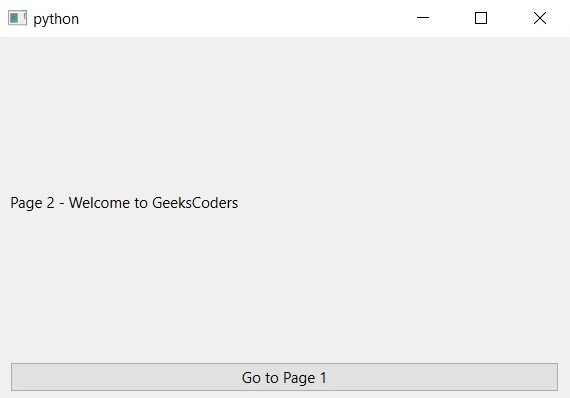
In the above example we have created a MyStackLayout class that extends from QMainWindow. in the constructor we have created QStackedLayout and set it as the central widget of the main window. we also creates two pages, each containing a label and a button that switches to the other page.
After that we have defined two methods, show_page1 and show_page2 that set the current index of the stack layout to show the corresponding page.
Run the code and this is the result
Learn More on Python GUI
- How to Create Label in PySide6
- How to Create Button in Python & PySide6
- How to Use Qt Designer with PySide6
- How to Add Icon to PySide6 Window
- How to Load UI in Python PySide6
- How to Create RadioButton in PySide6
- How to Create ComboBox in PySide6
- How to Create CheckBox in Python PySide6
- Responsive Applications with PyQt6 Multithreading
- Event Handling in Python and PyQt6
- How to Use Stylesheets in Python PyQt6