In this Python PySide6 article we want to learn about How to Create Print Dialog in Python PySide6, so for creating Print Dialog in Python PySide6 we need to use QPrintDialog and QPrinter from QPrintSupport module.
What is PySide6 QPrinter ?
PySide6 QPrinter is a class that provides platform independent interface for printing in PySide6 applications. it represents printer device and allows you to control different aspects of the printing process such as page size, orientation, resolution and color mode.
QPrinter is part of the PySide6.QtPrintSupport module which provides classes for printing support in PySide6. this module also provides classes for implementing print previews, print dialogs and printer configuration dialogs.
These are some of the features of QPrinter:
- It supports different page sizes such as A4, Letter, Legal and Custom.
- It allows you to set page orientation to either portrait or landscape.
- It supports different resolutions such as HighResolution, ScreenResolution and PrinterResolution.
- It allows you to set the color mode to either Color, GrayScale or BlackAndWhite.
- It provides methods for controlling page margins and page breaks.
- It supports different output formats such as PDF, PostScript and Image.
How to Create Print Dialog in Python PySide6
So this is the complete code for this article
|
1 2 3 4 5 6 7 8 9 10 11 12 13 14 15 16 17 18 19 20 21 22 23 24 25 26 27 28 29 30 31 32 33 34 35 36 37 38 39 40 41 42 43 44 45 46 47 |
import sys from PySide6.QtWidgets import QApplication, QDialog, QVBoxLayout, QTextEdit, QPushButton from PySide6.QtPrintSupport import QPrintDialog, QPrinter class PrintDialog(QDialog): def __init__(self, parent=None): super().__init__(parent) self.setWindowTitle('GeeksCoders - Print Dialog') # create QTextEdit widget to hold the # text to be printed self.textEdit = QTextEdit(self) self.textEdit.setPlainText('GeeksCoders.com') # create QPushButton to trigger the print dialog self.printButton = QPushButton('Print', self) self.printButton.clicked.connect(self.printDocument) # create layout and add the widgets to it layout = QVBoxLayout(self) layout.addWidget(self.textEdit) layout.addWidget(self.printButton) def printDocument(self): # create QPrinter object printer = QPrinter(QPrinter.HighResolution) # create QPrintDialog object printDialog = QPrintDialog(printer, self) # if user accepts the print dialog print document if printDialog.exec_() == QPrintDialog.Accepted: # create QTexDocument object to # hold the text to be printed document = self.textEdit.document() # print the document using the selected # QPrinter object document.print_(printer) if __name__ == '__main__': app = QApplication(sys.argv) dialog = PrintDialog() dialog.show() sys.exit(app.exec()) |
In the above code first we have imported the required modules and classes
|
1 |
from PySide6.QtPrintSupport import QPrintDialog, QPrinter |
After that you need to create QPrinter object
|
1 |
printer = QPrinter(QPrinter.HighResolution) |
We need to create QPrintDialog object
|
1 |
printDialog = QPrintDialog(printer) |
Use the QPrintDialog object to execute the print dialog and get the user’s selection
|
1 |
if printDialog.exec_() == QPrintDialog.Accepted: |
If the user accepts the print dialog, use the selected QPrinter object to print the document
|
1 2 |
document = self.textEdit.document() document.print_(printer) |
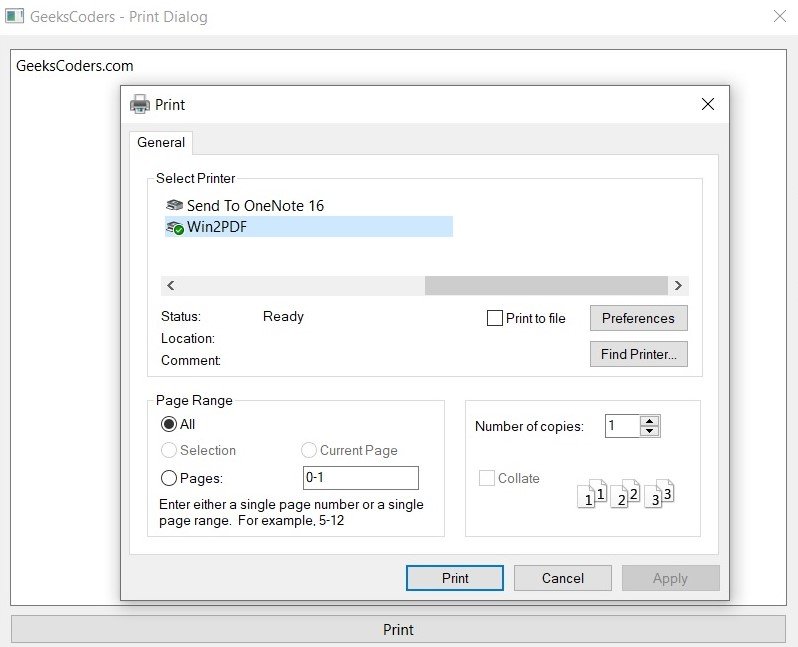
Run the code and this is the result

Learn More on Python GUI
- How to Create Label in PySide6
- How to Create Button in Python & PySide6
- How to Use Qt Designer with PySide6
- How to Add Icon to PySide6 Window
- How to Load UI in Python PySide6
- How to Create RadioButton in PySide6
- How to Create ComboBox in PySide6
- How to Create CheckBox in Python PySide6
- Responsive Applications with PyQt6 Multithreading
- Event Handling in Python and PyQt6
- How to Use Stylesheets in Python PyQt6
