In this OpenCV Python tutorial we are going to Learn OpenCV with Python,
we are going to start from the installation process and create different examples in
OpenCV with Python.
What is OpenCV ?
OpenCV (Open Source Computer Vision )is an open source library containing more
than 500 optimized algorithms for image and video analysis, OpenCV was developed
by intel, you can use OpenCV from displaying the feed of a webcam to teaching a robot
to recognize real life objects.
By OpenCV we can perform following actions
- Read and write images
- Face Detection using OpenCV
- Text Recognition in Images using OpenCV
- You can modify image quality and colors
Installation
You can install OpenCV for Python using pip.
|
1 |
pip install opencv-python |
- PyQt5 Tutorial – Build GUI in Python with PyQt5
- TKinter Tutorial -Build GUI in Python with TKinter
- Working with Python Pyglet Library
- Python Speech Recognition For Beginners
- PyQtGraph Tutorial in Python
Reading Image in Python OpenCV
Now we are going to create our first example and we want to read an image in OpenCV, this is the complete code for reading the image in opencv.
|
1 2 3 4 5 6 7 8 9 10 11 12 13 |
import cv2 cv2.namedWindow('Geekscoders.com' ) lena_image = "lena.tif" image =cv2.imread(lena_image) cv2.imshow("Geekscoders.com", image) cv2.waitKey(0) cv2.destroyAllWindows() |
Using this code we can give a name for our window.
|
1 |
cv2.namedWindow('Geekscoders.com' ) |
You can read image in OpenCV using imread() function.
|
1 |
image =cv2.imread(lena_image) |
For showing the image you can use imshow() function.
|
1 |
cv2.imshow("Geekscoders.com", image) |
cv2.waitKey() is a keyboard binding function. Its argument is the time in milliseconds. The function waits specified milliseconds for any keyboard event. If you press any key in that time, the program continues. If 0 is passed, it waits indefinitely for a key stroke
|
1 |
cv2.waitKey(0) |
Run the code and this is the result.

OpenCV Reading Image in Matplotlib
Now we want to read our image using matplotlib, so Matplotlib is a plotting library for the Python programming language and its numerical mathematics extension NumPy. It provides an object-oriented API for embedding plots into applications using general-purpose GUI toolkits like Tkinter, wxPython, Qt, or GTK+. you can simply use pip for the installation.
|
1 |
pip install matplotlib |
OK now this is our code for reading image in matplotlib.
|
1 2 3 4 5 6 7 8 9 10 11 12 |
import cv2 import matplotlib.pyplot as plt lena_image = cv2.imread("lena.tif") #plt.xticks([]), plt.yticks([]) # to hide tick values on X and Y axis plt.imshow(lena_image) plt.show() |
You can use imshow() method from matplotlib for showing the image.
|
1 |
plt.imshow(lena_image) |
If you want to hide tick values on X and Y axis than you can use this code.
|
1 |
plt.xticks([]), plt.yticks([]) |
Run the code and this is the result.
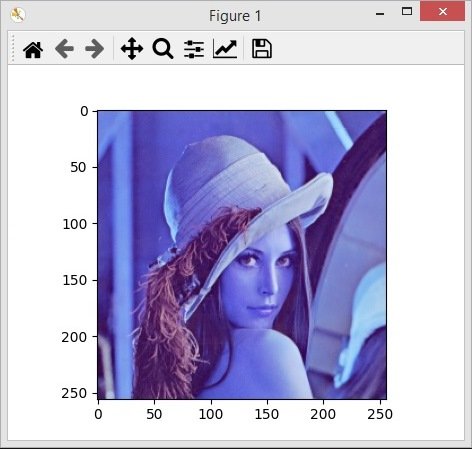
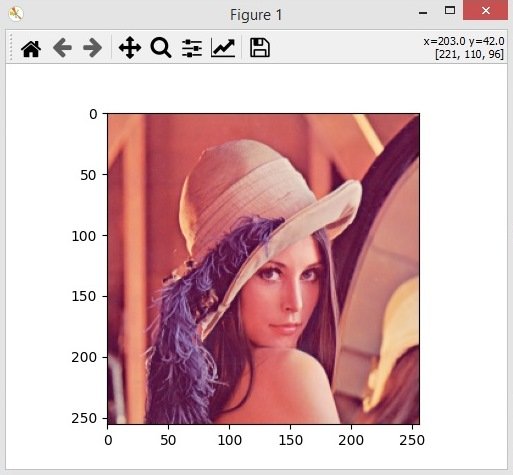
You can see a color difference in our image, it is because opencv renders the image in order of GBR, the reverse of the usual RBG format.This is the reason the colors get messed up from OpenCV to matplotlib. The matplotlib module displays images according to the more conventional RGB method. Therefore, in order to correctly render images from OpenCV in matplotlib, what we need to do is convert the GBR image into a RGB image.
|
1 2 3 4 5 6 7 8 9 10 11 |
import cv2 import matplotlib.pyplot as plt lena_image = cv2.imread("lena.tif") plt.imshow(lena_image) #convert color to rgb plt.imshow(cv2.cvtColor(lena_image, cv2.COLOR_BGR2RGB)) plt.show() |
Using this code we have converted our GBR color to RGB.
|
1 |
cv2.cvtColor(lena_image, cv2.COLOR_BGR2RGB) |
Run the code and this is the result.
Writing Image in OpenCV
In this part we want to learn how to write image in OpenCV, this is the complete code for writing image in opencv.
|
1 2 3 4 5 6 7 8 9 10 11 12 13 14 15 16 17 18 19 20 |
import cv2 lena_image = cv2.imread('lena.tif') cv2.imshow("Lena Image", lena_image) k = cv2.waitKey(0) #if user press escape key, we are going to close the window if k == 27: cv2.destroyAllWindows() #if the user press s key we are going to save the image elif k == ord('s'): cv2.imwrite('newimage.jpg', lena_image) cv2.destroyAllWindows() |
So in here if user press escape key, we are going to close the window.
|
1 2 |
if k == 27: cv2.destroyAllWindows() |
And if the user press s key we are going to save the image with a new name.
|
1 2 3 |
elif k == ord('s'): cv2.imwrite('newimage.jpg', lena_image) cv2.destroyAllWindows() |
Python OpenCV Reading Videos
In this part we are going to learn reading Mp4 video in OpenCV, so you can use an Mp4 video or you can use camera, the same code will be implemented with camera or Mp4 video, if you are using camera you need to give 0 in cap = cv2.VideoCapture(‘mp4vid.mp4’).
|
1 2 3 4 5 6 7 8 9 10 11 12 13 14 15 16 17 18 19 20 21 22 23 24 25 26 27 28 |
import cv2 #creae video capture, instead of video you #can use camera, for that add 0 cap = cv2.VideoCapture('mp4vid.mp4') #check if the video capture is open if(cap.isOpened() == False): print("Error Opening Video Stream Or File") while(cap.isOpened()): ret, frame =cap.read() if ret == True: cv2.imshow('frame', frame) if cv2.waitKey(25) == ord('q'): break else: break cap.release() cv2.destroyAllWindows() |
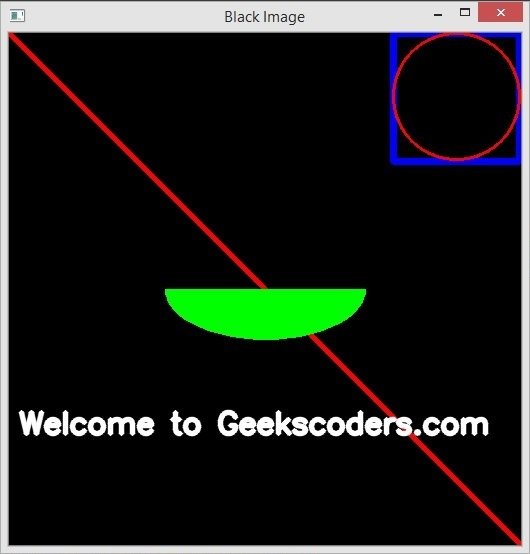
Python OpenCV Drawing Shapes
In this part we want to learn how you can draw different shapes in OpenCV, we will learn that how you can draw shapes like Line, Rectangle, Circle, Ellipse and Text. so this is the complete code for drawing different shapes.
|
1 2 3 4 5 6 7 8 9 10 11 12 13 14 15 16 17 18 19 20 21 22 23 24 25 26 27 28 29 30 31 32 33 34 35 36 37 38 39 40 41 42 43 44 45 46 47 48 49 50 51 52 53 |
import numpy as np import cv2 def drawing_shapes(): # Create a black image img = np.zeros((512, 512, 3), np.uint8) # Draw a diagonal red line with thickness of 5 px cv2.line(img, (0, 0), (511, 511), (0, 0, 255), 4) #we need to give top left corner and bottom right corner cv2.rectangle(img, (384, 0), (510, 128), (255, 0, 0), 6) #give center cordinates and radius cv2.circle(img, (447, 63), 63, (0, 0, 255), 2) #drawing ellipse #center cordinates (x,y location) #axes lenght (major and minor axes lenght) #angle = 0 #startAngle = 0 #endAngle = 180 #color = #thickness cv2.ellipse(img, (256, 256), (100, 50), 0, 0, 180, (0, 255, 0), -1) #drawing text # x, y position #size of font = 1 font = cv2.FONT_HERSHEY_SIMPLEX cv2.putText(img, 'Welcome to Geekscoders.com', (10, 400), font, 1, (255, 255, 255), 4, cv2.LINE_AA) cv2.imshow("Black Image", img) cv2.waitKey(0) cv2.destroyAllWindows() drawing_shapes() |
In the above code first we have created a blank image using Numpy, so NumPy is a library for the Python programming language, adding support for large, multi-dimensional arrays and matrices, along with a large collection of high-level mathematical functions to operate on these arrays.
|
1 |
img = np.zeros((512, 512, 3), np.uint8) |
Using this code you can create line in OpenCV, basically we are going to to create red line with thickness of 5 pixel.
|
1 |
cv2.line(img, (0, 0), (511, 511), (0, 0, 255), 5) |
You can use this code for creating of the rectangle in Python OpenCV, the first parameter is the image that we want to draw rectangle, after that you can give the x, y position and width, height, after that give the color and at the end give the thickness of line.
|
1 |
cv2.rectangle(img, (384, 0), (510, 128), (255, 0, 0), 6) |
This is used for creating circle in OpenCV, you can give the image, center coordinates, radious, color and thickness for the circle.
|
1 |
cv2.circle(img, (447, 63), 63, (0, 0, 255), 2) |
If you want to draw ellipse than you can use this code, you need to give these parameters, center coordinates (x,y location), axes length (major and minor axes length), angle, start angle, end angle, color and thickness.
|
1 |
cv2.ellipse(img, (256, 256), (100, 50), 0, 0, 180, (0, 255, 0), -1) |
You can use this code for drawing text in OpenCV, you can give x, y position, font, color, thickness and type of the font.
|
1 2 3 |
font = cv2.FONT_HERSHEY_SIMPLEX cv2.putText(img, 'Welcome to Geekscoders.com', (10, 400), font, 1, (255, 255, 255), 4, cv2.LINE_AA) |
Run the complete code and this is the result.
Python OpenCV Mouse Clicks
In this part we want to learn how you can handle mouse clicks in OpenCV, basically we want when a user clicks on the window we are going to draw a circle, so this is the complete code for this part.
You can use this code for listing all available mouse events.
|
1 2 3 |
for i in dir(cv2): if 'EVENT' in i: print(i) |
In this code we created a simple application which draws a circle on an image wherever we double click on it. first we create a mouse callback function which is executed when a mouse event take place. mouse event can be anything related to mouse like left-button down, left-button up, left-button double-click etc. It gives us the coordinates (x,y) for every mouse event. with this event and location, we can do whatever we like. Creating mouse callback function has a specific format which is same everywhere. It differs only in what the function does. So our mouse callback function does one thing, it draws a circle where we double-click.
|
1 2 3 4 5 6 7 8 9 10 11 12 13 14 15 16 17 18 19 20 21 22 23 24 25 26 27 28 29 30 31 32 33 34 |
import cv2 import numpy as np windowname = "Geekscoders.com" image = np.zeros((512,512,3), np.uint8) cv2.namedWindow(windowname) def draw_shape(event, x,y, flags, params): if event == cv2.EVENT_LBUTTONDBLCLK: #cv2.rectangle(image, (x, y), (400, 200), (255, 0, 0), 6) cv2.circle(image, (x, y), 60, (0, 255, 0), -1) cv2.setMouseCallback(windowname, draw_shape) def main(): while(True): cv2.imshow(windowname, image) if cv2.waitKey(20) == 27: break cv2.destroyAllWindows() if __name__ == "__main__": main() |
Run the complete code, double click on the window, you will see the circles.

Python OpenCV Creating Color Trackbar
In this part we want to create a simple color trackbar in opencv, for creating of color trackbar you can use createTrackbar() function. this is the complete code for creating color track bar in opencv.
|
1 2 3 4 5 6 7 8 9 10 11 12 13 14 15 16 17 18 19 20 21 22 23 24 25 26 27 28 29 30 31 32 33 34 35 36 37 38 39 40 41 42 43 44 45 46 47 48 49 50 |
import cv2 import numpy as np def nothing(x): pass # Create a black image, a window img = np.zeros((300,512,3), np.uint8) cv2.namedWindow('image') # create trackbars for color change cv2.createTrackbar('R','image',0,255,nothing) cv2.createTrackbar('G','image',0,255,nothing) cv2.createTrackbar('B','image',0,255,nothing) # create switch for ON/OFF functionality switch = '0 : OFF \n1 : ON' cv2.createTrackbar(switch, 'image',0,1,nothing) while(1): cv2.imshow('image',img) k = cv2.waitKey(1) & 0xFF if k == 27: break # get current positions of four trackbars r = cv2.getTrackbarPos('R','image') g = cv2.getTrackbarPos('G','image') b = cv2.getTrackbarPos('B','image') s = cv2.getTrackbarPos(switch,'image') if s == 0: img[:] = 0 else: img[:] = [b,g,r] cv2.destroyAllWindows() |
In this example basically we want to create a simple application which shows the color you specify. You have a window which shows the color and three trackbars to specify each of B,G,R colors. You slide the trackbar and correspondingly window color changes. cv2.getTrackbarPos() function, first argument is the trackbar name, second one is the window name to which it is attached, third argument is the default value, fourth one is the maximum value and fifth one is the callback function which is executed every time trackbar value changes. The callback function always has a default argument which is the trackbar position. In our case, function does nothing, so we simply pass.
Run the complete code and this will be the result

OpenCV Arithmetic Operation
Using Arithmetic Operations We can apply operations like addition, subtraction, Bitwise Operations, so there are two ways, the first way is manually and the second way is using the functions that are available for opencv.
OK now we want to add and subtract two images manually.
|
1 2 3 4 5 6 7 8 9 10 11 12 13 14 15 16 17 18 19 20 21 22 |
import cv2 img1 = cv2.imread("lena_color_512.tif") img2 = cv2.imread("woman.tif") add = img1 + img2 print(add) add2 = cv2.add(img1, img2) subtract = img1 - img2 print(subtract) cv2.imshow("Addition", add) cv2.imshow("Subtract", subtract) cv2.waitKey(0) cv2.destroyAllWindows() |
So you can see that we have manually added and subtracted the two images.
|
1 2 |
add = img1 + img2 subtract = img1 - img2 |
If you run the complete code you will see strange result, and it is not the result that you expect.

OK now let’s use built in functions of OpenCV for arithmetic operations, so we are using add() and also subtract() methods from OpenCV.
|
1 2 3 4 5 6 7 8 9 10 11 12 13 14 15 16 |
import cv2 img1 = cv2.imread("lena_color_512.tif") img2 = cv2.imread("woman.tif") add2 = cv2.add(img1, img2) subtract2 = cv2.subtract(img1, img2) cv2.imshow("Add 2", add2) cv2.imshow("Sub 2", subtract2) cv2.waitKey(0) cv2.destroyAllWindows() |
So you can see that in the above code we have used add() and also subtract() methods from opencv.
Run the code and you will see the expected result, and it is better than first result.

OpenCV Image Blending
Image blending is also a type of image addition, but we can add different weights to the images. You can use cv2.addWeighted() method of OpenCV for image blending. Here are two images to blend them together. First image is given a weight of 0.9 and second image is given 0.5, the last value is the gamma value and we use cv2.addWeighted() for blending the images.
|
1 2 3 4 5 6 7 8 9 10 11 12 13 14 |
import cv2 img1 = cv2.imread("lena_color_512.tif") img2 = cv2.imread("woman.tif") #last one is gamma value result = cv2.addWeighted(img1,0.9,img2,0.5,0) cv2.imshow('Geekscoders.com', result) cv2.waitKey(0) cv2.destroyAllWindows() |
Run the code and this is the result.

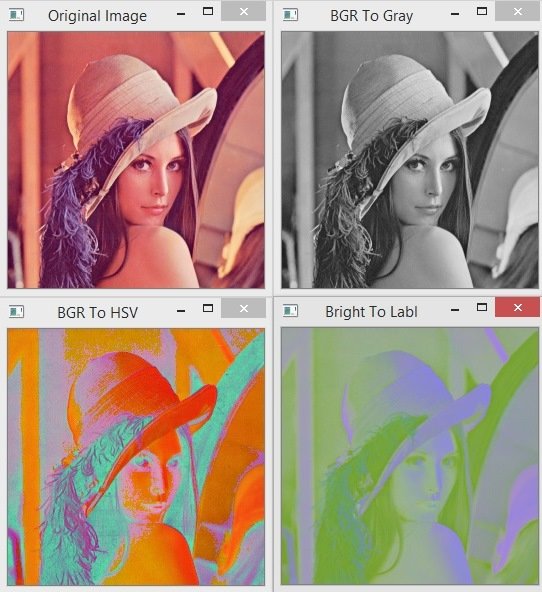
How to Change Color Space in OpenCV
There are more than 150 color-space conversion methods available in OpenCV. But we will look into some of them, BGR↔Gray and BGR↔HSV. in OpenCV you can use cv2.cvtColor() for converting color spaces.
|
1 2 3 4 5 6 7 8 9 10 11 12 13 14 15 16 17 18 19 |
import cv2 img1 = cv2.imread("lena.tif") bgrgra = cv2.cvtColor(img1, cv2.COLOR_BGR2GRAY) bgrhsv = cv2.cvtColor(img1, cv2.COLOR_BGR2HSV) brightlab = cv2.cvtColor(img1, cv2.COLOR_BGR2LAB) cv2.imshow("Original Image", img1) cv2.imshow("BGR To Gray", bgrgra) cv2.imshow("BGR To HSV", bgrhsv) cv2.imshow("Bright To Labl", brightlab) cv2.waitKey(0) cv2.destroyAllWindows() |
You can see in the above code we have used three color spaces, and we have converted vice versa.
Run the code and this is the result.
Python OpenCV BitWise Operations
bitwise operations includes AND, OR, NOT and XOR operations, these operations are very useful when we want to extract any part of the image. these are the operations that we have cv2.bitwise_and(img1, img2), cv2.bitwise_or(img1, img2), cv2.bitwise_xor.
|
1 2 3 4 5 6 7 8 9 10 11 12 13 14 15 16 17 18 19 20 21 22 23 24 25 26 27 28 |
import cv2 import numpy as np img1 = np.zeros((300,300), dtype="uint8") cv2.rectangle(img1, (100,100), (250,250), 255, -1) cv2.imshow("Image 1", img1) img2 = np.zeros((300,300), dtype="uint8") cv2.circle(img2, (150,150), 90, 255 , -1) cv2.imshow("Image 2", img2) and_bitwise = cv2.bitwise_and(img1, img2) cv2.imshow("Bitwise AND", and_bitwise) or_bitwise = cv2.bitwise_or(img1, img2) cv2.imshow("Bitwise OR" , or_bitwise) xor_bitwise = cv2.bitwise_xor(img1, img2) cv2.imshow("XOR Operations", xor_bitwise) cv2.waitKey(0) cv2.destroyAllWindows() |
First you need to create two images with rectangle and circle, you can use Numpy for creating blank image.
|
1 2 3 4 5 6 7 |
img1 = np.zeros((300,300), dtype="uint8") cv2.rectangle(img1, (100,100), (250,250), 255, -1) cv2.imshow("Image 1", img1) img2 = np.zeros((300,300), dtype="uint8") cv2.circle(img2, (150,150), 90, 255 , -1) cv2.imshow("Image 2", img2) |
Run the code and this is the result.

How to Rotate Image in OpenCV
we can rotate an image in opencv using rotate() function there are three constants that you can use as parameter.
cv2.ROTATE_90_CLOCKWISE
cv2.ROTATE_90_COUNTERCLOCKWISE
cv2.ROTATE_180
|
1 2 3 4 5 6 7 8 9 10 11 12 13 14 15 16 17 18 19 20 21 22 23 24 25 26 27 28 29 30 31 32 33 34 35 |
import cv2 import matplotlib.pyplot as plt img = cv2.imread('lena.tif') #Our three rotation img_rotate_90_clockwise = cv2.rotate(img, cv2.ROTATE_90_CLOCKWISE) img_rotate_90_counterclockwise = cv2.rotate(img, cv2.ROTATE_90_COUNTERCLOCKWISE) img_rotate_180 = cv2.rotate(img, cv2.ROTATE_180) #converting images from bgr to rgb original_image = cv2.cvtColor(img, cv2.COLOR_BGR2RGB) img_clockwise = cv2.cvtColor(img_rotate_90_clockwise, cv2.COLOR_BGR2RGB) img_counterclockwise = cv2.cvtColor(img_rotate_90_counterclockwise, cv2.COLOR_BGR2RGB) img_180 = cv2.cvtColor(img_rotate_180, cv2.COLOR_BGR2RGB) titles = ["Original Image", "Image 90 Clockwise", "Image 90 CounterClockWise", "Image Rotate 180" ] images = [original_image, img_clockwise, img_counterclockwise,img_180 ] for i in range(4): plt.subplot(2,2, i+1) plt.imshow(images[i]) plt.title(titles[i]) plt.xticks([]), plt.yticks([]) plt.show() cv2.waitKey(0) cv2.destroyAllWindows() |
This is the three rotations that we are going to use in opencv.
|
1 2 3 |
img_rotate_90_clockwise = cv2.rotate(img, cv2.ROTATE_90_CLOCKWISE) img_rotate_90_counterclockwise = cv2.rotate(img, cv2.ROTATE_90_COUNTERCLOCKWISE) img_rotate_180 = cv2.rotate(img, cv2.ROTATE_180) |
In here we are going to convert our BGR colors to RGB.
|
1 2 3 4 |
original_image = cv2.cvtColor(img, cv2.COLOR_BGR2RGB) img_clockwise = cv2.cvtColor(img_rotate_90_clockwise, cv2.COLOR_BGR2RGB) img_counterclockwise = cv2.cvtColor(img_rotate_90_counterclockwise, cv2.COLOR_BGR2RGB) img_180 = cv2.cvtColor(img_rotate_180, cv2.COLOR_BGR2RGB) |
Also we show the images in Matplotlib, so Matplotlib is a plotting library for the Python programming language and its numerical mathematics extension NumPy. It provides an object-oriented API for embedding plots into applications using general-purpose GUI toolkits like Tkinter, wxPython, Qt, or GTK+.
Run the complete code and this is the result.

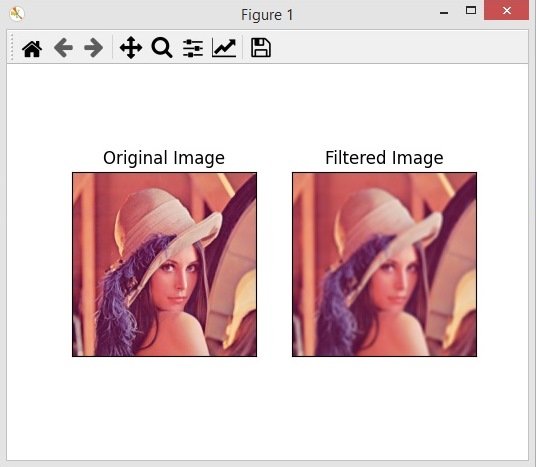
Image Filtering in OpenCV
In this part we are going to talk about 2D Convolution or image filtering, you can do image filtering using low pass filter (LPF) and high pass filters (HPF). for example if you want to remove the noises of the image you can use LPF filter or if you want to blur an image you can use LPF. and using HPF filter you can find the edges in the image. in OpenCV there is a function cv2.filter2D() that is used for filtering.
In this example we are going to use a 5 by 5 averaging filter kernel.
|
1 2 3 4 5 6 7 8 9 10 11 12 13 14 15 16 17 18 19 20 21 22 23 24 25 26 27 28 29 30 31 32 |
import cv2 import numpy as np from matplotlib import pyplot as plt #we need to read our image image = cv2.imread('lena.tif') #this is our 5 x 5 kernel kernel = np.ones((5,5), np.float32)/25 #create filter2d method filter_2d = cv2.filter2D(image, -1, kernel) #convert the image from bgr to rgb original_image = cv2.cvtColor(image, cv2.COLOR_BGR2RGB) filtered_image = cv2.cvtColor(filter_2d, cv2.COLOR_BGR2RGB) #show the image using matplotlib plt.subplot(121) plt.imshow(original_image),plt.title('Original Image') plt.xticks([]), plt.yticks([]) plt.subplot(122),plt.imshow(filtered_image),plt.title('Filtered Image') plt.xticks([]), plt.yticks([]) plt.show() cv2.waitKey(0) cv2.destroyAllWindows() |
So in the above example first we have created a 5 x 5 kernel.
|
1 |
kernel = np.ones((5,5), np.float32)/25 |
After that we have created our cv2.filter2D() method, you need to give the image, ddepth and kernel as parameter.
|
1 |
filter_2d = cv2.filter2D(image, -1, kernel) |
After that we need to convert our original and filtered image from BGR color to RGB. because by default OpenCV uses BGR color and we need RGB color, if we don’t convert the image, there will be messed up in the color.
|
1 2 |
original_image = cv2.cvtColor(image, cv2.COLOR_BGR2RGB) filtered_image = cv2.cvtColor(filter_2d, cv2.COLOR_BGR2RGB) |
After that we are going to show our images in Matplotlib and we are using two subplots.
|
1 2 3 4 5 6 7 |
plt.subplot(121) plt.imshow(original_image),plt.title('Original Image') plt.xticks([]), plt.yticks([]) plt.subplot(122),plt.imshow(filtered_image),plt.title('Filtered Image') plt.xticks([]), plt.yticks([]) plt.show() |
Run the complete code and this is the result.
OpenCV Image Blurring
Image blurring or image smoothing is used for removing image noises and it is used for removing high frequency contents like noise and edges. according to documentation there are four types of blurring techniques in OpenCV. Averaging, Gaussian Blurring, Median Blurring and Bilateral Filtering.
Average Blurring
In average blurring we takes the average of all pixels under the kernel area and replace them with central element with this average. and this is done in OpenCV by using cv2.blur() function.
|
1 2 3 4 5 6 7 8 9 10 11 12 13 14 15 16 17 18 19 20 21 22 23 24 25 26 27 28 29 |
import cv2 import matplotlib.pyplot as plt #read the image in opencv image = cv2.imread('lena.tif') #ksize = kernel size You can change the kernel size as you want blurred_image = cv2.blur(image, (10,10)) #convert the image from bgr to rgb original_image = cv2.cvtColor(image, cv2.COLOR_BGR2RGB) blurred = cv2.cvtColor(blurred_image, cv2.COLOR_BGR2RGB) #show the image using matplotlib plt.subplot(121) plt.imshow(original_image),plt.title('Original') plt.xticks([]), plt.yticks([]) plt.subplot(122),plt.imshow(blurred),plt.title('Average Blurred') plt.xticks([]), plt.yticks([]) plt.show() cv2.waitKey(0) cv2.destroyAllWindows() |
You can see that we have used cv2.blur() method, and you need to give the image and the kernel size as parameter. also in the above code we have converted our image from BGR to RGB and at the end we have showed the image using Matplotlib library.
Run the code and this is the result.

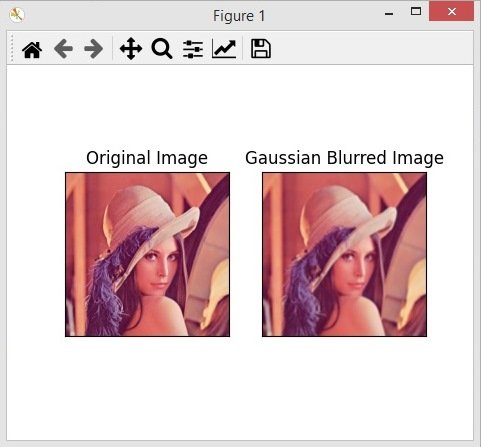
Gaussian Filtering
The second technique for smoothing the image is Gaussian Filtering in this technique we need to specify width and height of the kernel which should be positive and odd. also we need to add standard deviation in the x and y directions. sigmax and sigmay. you can use cv2.GaussianBlur() for this in opencv.
|
1 2 3 4 5 6 7 8 9 10 11 12 13 14 15 16 17 18 19 20 21 22 23 24 25 26 27 28 29 |
import cv2 import matplotlib.pyplot as plt #read the image image = cv2.imread('lena.tif') #create gaussian blur function, give the image, kernel and sd gaussian_blur = cv2.GaussianBlur(image, (5,5), 0) #convert the image from bgr to rgb original_image = cv2.cvtColor(image, cv2.COLOR_BGR2RGB) gaussian = cv2.cvtColor(gaussian_blur, cv2.COLOR_BGR2RGB) #show the image using matplotlib library plt.subplot(121) plt.imshow(original_image),plt.title('Original Image') plt.xticks([]), plt.yticks([]) plt.subplot(122),plt.imshow(gaussian),plt.title('Gaussian Blurred Image') plt.xticks([]), plt.yticks([]) plt.show() cv2.waitKey(0) cv2.destroyAllWindows() |
In the above code we have used cv2.GaussianBlur() method, and you need to give the image and the kernel size as parameter. also in the above code we have converted our image from BGR to RGB and at the end we have showed the image using Matplotlib library.
Run the code and this is the result.
Median Blurring
Median Blurring computes the median of all pixels under the kernel and the central pixel is replaced with the median value, according to OpenCV documentation it is mostly used for removing salt and pepper noises.
|
1 2 3 4 5 6 7 8 9 10 11 12 13 14 15 16 17 18 19 20 21 22 23 24 25 26 27 28 29 |
import cv2 import matplotlib.pyplot as plt #read the image in opencv image = cv2.imread('lena_salt.png') #create medianBlur function, give the image # and median as parametr median = cv2.medianBlur(image,5) #convert the image from bgr to rgb original_image = cv2.cvtColor(image, cv2.COLOR_BGR2RGB) median_blur = cv2.cvtColor(median, cv2.COLOR_BGR2RGB) #show the image using matplotlib plt.subplot(121) plt.imshow(original_image),plt.title('Original Image') plt.xticks([]), plt.yticks([]) plt.subplot(122),plt.imshow(median_blur),plt.title('Median Blurred Image') plt.xticks([]), plt.yticks([]) plt.show() cv2.waitKey(0) cv2.destroyAllWindows() |
In the above code we have used cv2.medianBlur() method, and you need to give the image and the median as parameter. also in the above code we have converted our image from BGR to RGB and at the end we have showed the image using Matplotlib library.
Run the complete code and this is the result.

Bilateral Filtering
A bilateral filter is non-linear, edge-preserving and noise-reducing smoothing filter. The intensity value at each pixel in an image is replaced by a weighted average of intensity values from nearby pixels. This weight can be based on a Gaussian distribution.
So this is the syntax.
|
1 |
cv2.bilateralFilter(src, dst, d, sigmaColor, sigmaSpace, borderType) |
| Name | Description |
| SRC | It is the source image |
| DST | It is the destination or output image |
| D | A variable of the type integer representing the diameter of the pixel neighborhood. |
| SIGMACOLOR | A variable of the type integer representing the filter sigma in the color space |
| SIGMASPACE | A variable of the type integer representing the filter sigma in the coordinate space |
So this is the complete code.
|
1 2 3 4 5 6 7 8 9 10 11 12 13 14 15 16 17 18 19 20 21 22 23 24 25 26 27 28 29 30 31 32 |
import cv2 import matplotlib.pyplot as plt #read the image image = cv2.imread('imageface.jpg') #create bilteralfilter function bil_blur = cv2.bilateralFilter(image,13,75,75) #convert the image from bgr to rgb cvt_orig = cv2.cvtColor(image, cv2.COLOR_BGR2RGB) cvt_blur = cv2.cvtColor(bil_blur, cv2.COLOR_BGR2RGB) #show the result using matplotlib subplots plt.subplot(121) plt.imshow(cvt_orig) plt.title('Original Image') plt.xticks([]), plt.yticks([]) plt.subplot(122) plt.imshow(cvt_blur) plt.title('Bilateral Image') plt.xticks([]), plt.yticks([]) plt.show() cv2.waitKey(0) cv2.destroyAllWindows() |
Run the code and this is the result.

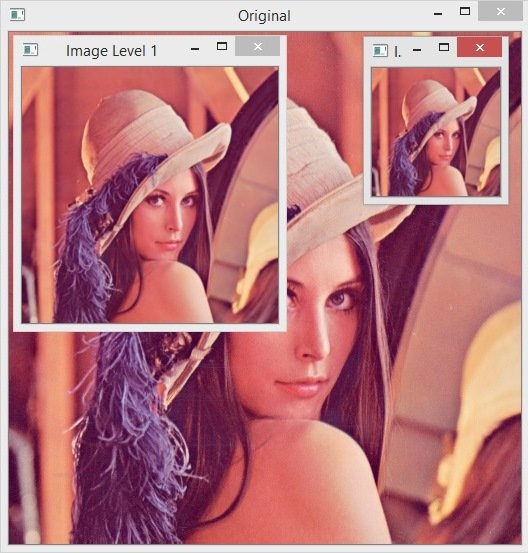
Python OpenCV Image Pyramid
Image Pyramid is one the best concepts of the image processing, so when we are going to work with the images that is high resolution images. sometimes we need to work with images of different resolution of the same image like low resolution images. and we create the different resolution of the same image, now this is called pyramid in OpenCV, or we can say Image pyramid refers to the way of representing an image at multiple resolutions. so there are two functions that we can use pyrup() function increases the size to double of its original size, pyrdown() function decreases the size to half.
|
1 2 3 4 5 6 7 8 9 10 11 12 13 14 15 16 17 18 |
import cv2 #read the image in OpenCV image = cv2.imread('lena_color_512.tif') #create different image levels or image resolution img_level_1 = cv2.pyrDown(image) img_level_2 = cv2.pyrDown(img_level_1) #show the original image and the different resolution cv2.imshow("Original",image) cv2.imshow("Image Level 1",img_level_1) cv2.imshow("Image Level 2",img_level_2) cv2.waitKey(0) cv2.destroyAllWindows() |
You can see that using cv2.pyrdown() method we have created different resolution images, as i have already said that pyrdown() function decreases the size to half.
|
1 2 |
img_level_1 = cv2.pyrDown(image) img_level_2 = cv2.pyrDown(img_level_1) |
Now run the code, along with the original image we have two new resolution images.